***Joana's 70-72 Borean Tundra Guide***


Introduction:
Your arrival in Borean Tundra is such a pleasant surprise to see new content!  Isn't it nice to walk right out of the town to see it being attacked by spiders?  You will come across many cool things in this zone, including the introduction of the Tuskarr (those fat beavers), and the Taunka (those Tauren with different faces).  You will come across a statue of Hemet Nesingwary that is on fire!  Who could be so upset about Mr. Nesingwary?  You'll see other surprises like scary sea ghosts!  You also get to dress up as a 
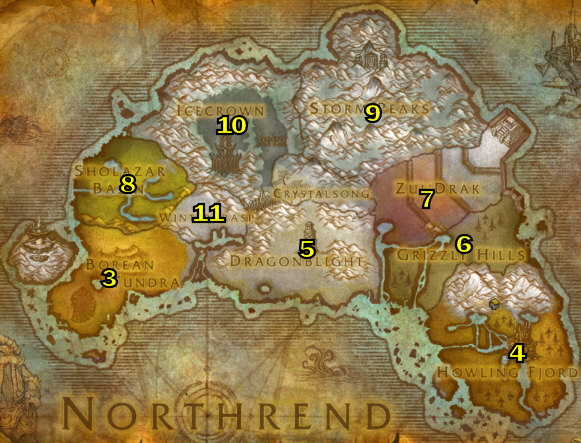
fish for one quest!  Isn't that nice?  See Reference Map.

Interactive MAP MOD (MetaMap) Coordinates.

Go here to learn how to get map coordinates and Interactive Map Coordinates, which are very important to have when using my guide.


Help me improve this guide!

If you feel that some quests should contain additional information that would be helpful, or if you have any additions or find any errors in this guide, PLEASE contact me here, make sure you leave "Northrend Guide Improvements" in the subject line so it filters correctly into my inbox.   I appreciate any feedback to make this guide better!


If you have any general questions or comments on anything, you can contact me here:  joana@joanasworld.com  You can also visit my website:  WWW.JOANASWORLD.COM


World of Warcraft™
World of Warcraft and Blizzard Entertainment are trademarks or registered trademarks of Blizzard Entertainment, Inc. in the U.S. and/or other countries.


If you are interested in making money referring people to buy my guide, you can follow the instructions on THIS PAGE HERE about how to do this, generally with my affiliate program you earn 50% of all the profit if you refer somebody to my site with your affiliate link that buys my guide!  TALK ABOUT EASY MONEY!


Copyright 2008


LEGAL:  Do not distribute this product in any way shape or form.  Any theft or unauthorized reproduction of this Guide is prohibited. Violators will be prosecuted.  Special markers have been encrypted into this guide to identify the original buyer.  Be WARNED if you distribute this guide on the internet, I will know who it is.

PLEASE READ! (HOW TO USE THIS GUIDE):
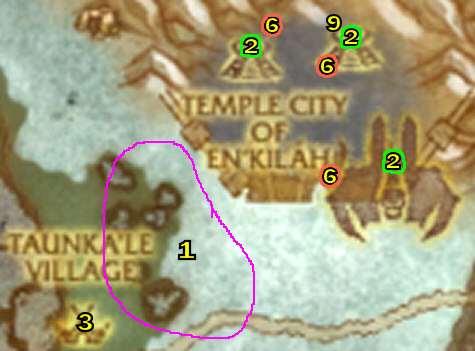
 

08) "Quest Name"  (this quest has a yellow highlighted number)  Quests that have a yellow highlighted number simply means it is numbered on the map to the right.  This saves time because some quests are not numbered on the maps, so you know whether or not to look on the maps.


All quests and mobs through out my guide are linked to wowhead.  When following my guide, you can use these links for further information on the quests/mobs.


All video links are in RED.  You will need to download the Divx WebPlayer when prompted.  And you can double click on the videos when playing to make it full screen.


The checkboxes () next to each step are for your personal use only.  I have included them for each step incase you want to mark off which step in the guide you are at.  You do not have to use these if you don't want, I have included them since it was requested by a lot of people.


Guide Color Codes:
Accept a quest.
Go do a quest.
Turn in a quest.
General mob/item link.
Picture.
Video link.
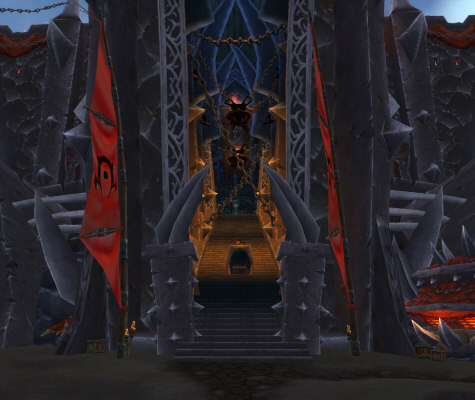
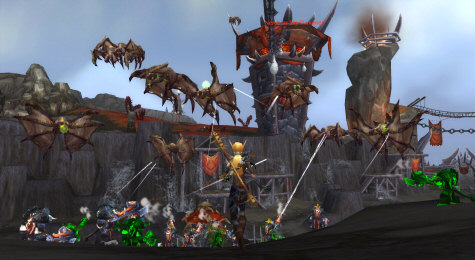
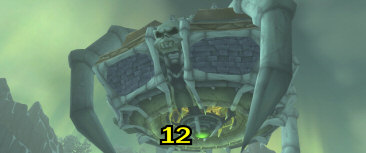


- Download Printable Version of This Guide! -

Members Area Menu

01) Introduction

02) Here is the order where you will be leveling:

03) 70-72 Borean Tundra

           OR:

04) 70-72 Howling Fjord

05) 72-74 Dragonblight

06) 74-75 Grizzly Hills

07) 75-77 Zul'Drak

08) 77-78 Sholazar Basin

09) 78-79 Storm Peaks

10) 79-80 Icecrown


Other Guides:

11) PVP ZONE:  Wintergrasp

12) Joana's Death Knight Leveling & Strategy Guide

13) User Submitted Death Knight Guides


Main Members Area


Great WotLK Products:  WotLK Secrets Guide  -  70-80 Alliance Guide  -  Luke's Gold Guide

(Northrend Levels 70-80)

70-72 Borean Tundra

Warsong Hold

01) In order to get to Borean Tundra you must take the zeppelin in Durotar (at 41.18).

02) Once at Borean Tundra, you will arrive at Warsong Hold, (a small horde base).

03) PLEASE NOTE: Throughout my guide always keep an eye out on your minimap for the quest givers, it will be much easier to find them that way.

04) Get off of the zeppelin and accept "Hellscream's Vigil"

05) Walk down the spiral ramp and build up your professions from the trainers, make sure you get the upgrades for First Aid.

06) Then go down the spiral ramp further until you get to Williamson and make Warsong Hold your new home.

07) Then walk up the little ramp and then down until you get to Garrosh Hellscream and turn in "Hellscream's Vigil" ... Accept "The Defense of Warsong Hold" (right next to you).

08) Walk out of the south-east side up the little ramp then down the steps of Warsong Hold and turn in "The Defense of Warsong Hold" (on your left as you walk out) ... Accept "Taking Back Mightstone Quarry"

09) Also in Warsong Hold accept the following quests:  "Patience is a Virtue that We Don't Need" "Taken by the Scourge" "Too Close For Comfort" "Ride to Taunka'le Village" and "To Bor'gorok Outpost, Quickly!"  (Yeah it will take a bit of walking around to accept all these, look for the exclamation marks on the minimap).

HIDDEN QUEST:   There is a somewhat of a hidden quest that starts once every 30 minutes or so near the bottom of the steps that lead out of Warsong Hold (at 43.56 where the Warsong Captain is at).  A bunch of flying waves of Nerub'ar comes and attack a bunch of NPCs right there (once every 30 minutes), the battle lasts a whole 10 minutes (see pic on the right), and near the end of the battle an ELITE mob (named Ith'rix the Harvester) shows up and the NPCs will easily kill it.  Once that ELITE mob is dead loot the carcass that drops (anybody can loot it), which starts "What the Cold Wind Brings..".  NOTE:  You will know when the battle starts when the Warsong Captain yells "Marksmen! Front and center! Scourge attacking incoming!", and you will know when the battle is over and you can loot the quest item when the Warsong Captain yells "Let the forces of the Lich King gaze upon the carcass of this wretch and know that the Horde will not relent!".  Once you got the quest accepted turn this in at High Overlord Saurfang inside Warsong Hold.


This quest can be skipped, there is no follow up, so don't worry if you didn't do it.

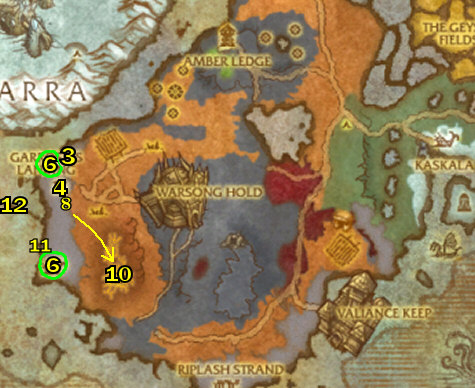
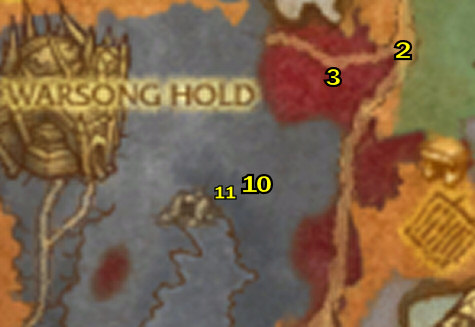
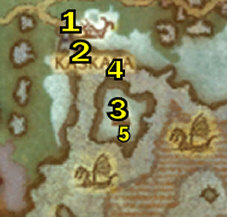
10) Go do the following 3 quests just right outside of Warsong Hold:

11) "Taking Back Mightstone Quarry" Kill the Nerub'ar Skitterers (spiders)

12) "Patience is a Virtue that We Don't Need" (Pick up the boxes that are on the ground)

13) "Taken by the Scourge" (kill the white webbed blobs)

14) Once all 3 are done go back and turn them all in (at the southern side of the Hold) ... Accept all new quests: "Bury Those Cockroaches!" "Cutting Off the Source" and "Untold Truths"

15) Then go do the following 3 quests just right outside Warsong Hold:

16) "Bury Those Cockroaches!" (South=41.58, East=44.56, West=39.52, North=41.50, See Video to see how one of them is done)

17) "Cutting Off the Source" (The eggs are all around the place, mainly on the platforms)

18) "Untold Truths" Turn this in (at 40.52) ... Accept "Nerub'ar Secrets"

19) Go back to the south-east side of Warsong Hold (43.55) and turn in "Bury Those Cockroaches!" "Cutting Off the Source" and "Nerub'ar Secrets" ... Accept "Message to Hellscream" and "Wind Master To'bor"

20) Go inside the middle of Warsong Hold to Garrosh Hellscream and turn in "Message to Hellscream" ... Accept "Reinforcements Incoming..."

21) Go up the lift inside Warsong Hold and get the Flight Path (FP) at Turida Coldwind.

22) Then go across (through the passage way door) to the other side and turn in "Wind Master To'bor" ... Accept "Magic Carpet Ride"

23) Go talk to Yanni, just right next to you and have him send you to Garrosh's Landing..


Garrosh's Landing

01)) Turn in "Magic Carpet Ride" ... Accept "Tank Ain't Gonna Fix Itself" "Into the Mist" and "Horn of the Ancient Mariner"

02) Then turn in "Tank Ain't Gonna Fix Itself" right behind you ... Accept "Mobu's Pneumatic Tank Transjigamarig" and "Super Strong Metal Plates!"

03) "Mobu's Pneumatic Tank Transjigamarig" (The object you need to pick up is in the hut at 32.49).  NOTE:  If you see any metal plates on the ground, pick them up.

04) Grind your way to the top of the building (at 31.52) and accept "Escaping the Mist"

05) "Escaping the Mist" (Simple escort quest)

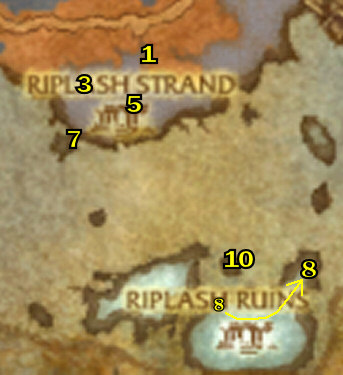
06) "Horn of the Ancient Mariner" (You need to keep killing the Mistweavers until one of them drops the horn, you can find some north and south at the west coast)

07) Go finish up "Into the Mist" and "Super Strong Metal Plates!" (You have to be in the mist to do these)

08) Go back to the Coast of Echoes (32.54) and turn in all quests and accept new ones: Turn in "Escaping the Mist" "Into the Mist" "Horn of the Ancient Mariner" "Mobu's Pneumatic Tank Transjigamarig" and "Super Strong Metal Plates!" ... Accept "Burn in Effigy" "Orabus the Helmsman" and "Tanks a lot..."

09) Turn in "Tanks a lot..." (right next to you) and accept "The Plains of Nasam"

10) "The Plains of Nasam" (Hop in a tank and go south-east to do this quest, See Video).  (Need to go to around 36.64 in order to get the Scourge Leader Identified).

11) Go to the boat (Bor's Anvil at 29.61) and torch it  for the quest "Burn in Effigy" (we will do the other 3 boats later).

12) "Orabus the Helmsman" (You need to go to the very tip of the jetty, at 26.54 and blow the horn, kill the mobs that come out).

13) "Burn in Effigy" (Go north and torch the remaining 3 boats: Bor's Hammer: 29.53,  The Kur Drakkar: 30.48,  The Serpent's Maw: 31.48)
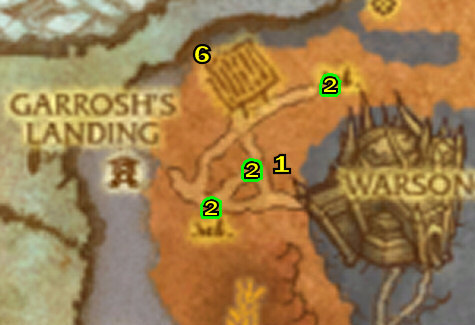
14) Go back to the Coast of Echoes (32.54) and turn in all quests and accept new ones: Turn in "Burn in Effigy" and "Orabus the Helmsman" ... Accept "Seek Out Karuk!"

Warsong Farms Outpost

01) Go to Warsong Farms Outpost (at 37.52) and turn in "Reinforcements Incoming..." ... Accept "The Warsong Farms" "Merciful Freedom" and "Damned Filthy Swine"

02) "The Warsong Farms" (Granary: 34.55,  Torp's Farm: 36.51,  Slaughterhouse: 39.47) along with "Merciful Freedom" and "Damned Filthy Swine"

03) Once all three of them are done, turn them all in (at 37.52) ... Accept "Get to Getry" and "Bring 'Em Back Alive"

04) "Bring 'Em Back Alive" (Need to bring back 8 kodos, if you're confused, Watch This Video to see how fast I did it).

05) Once that is done, turn it in.

06) "Get to Getry" (Need to go up in the Outpost at 34.46 to turn this in, if the NPC is not there that means somebody else is doing the escort quest with him, just wait until he comes back) ... Accept "Foolish Endeavors"

07) "Foolish Endeavors"  (Just follow through with the dialog and then help kill Varidus until it is complete)

08) Once all that is done, Hearth to Warsong Hold.

09) Turn in "Foolish Endeavors" and "The Plains of Nasam" (at Garrosh Hellscream) ... Accept "Nork Bloodfrenzy's Charge"

Riplash Strand

01) Go to (47.75) and turn in "Seek Out Karuk!" ... Accept "Karuk's Oath"

02) "Karuk's Oath" (The mobs are right in front of you along the Strand, in the mist).

03) Go to 44.77 in Riplash Strand and accept "Cruelty of the Kvaldir" (From the Captured Tuskarr Prisoner, sometimes this NPC is not there, if he is not there try again later).

04) Once those are done, turn them in (at 47.75) ... Accept "Gamel the Cruel"

05) "Gamel the Cruel" (Gamel is located in the small cave at 46.78).

06) Once done go back (to 47.75) to turn it in ... Accept "A Father's Words"

07) "A Father's Words" (Turn this in at Veehja, at 43.80) ... Accept "The Trident of Naz'jan"

08) "The Trident of Naz'jan" Need to kill Ragnar (at 54.88), the entrance to that area is at 50.91.

09) Once that is done go back to Veehja (at 43.80) to turn it in ... Accept "The Emissary"

10) "The Emissary" (Leviroth is located under the water at 51.88, remember to use the Trident on him). Turn this in at Karuk (47.75)

11) Once done, turn this in at Karuk (47.75).

12) Also turn in "Cruelty of the Kvaldir" (If the NPC wasn't there earlier, you can go try again above on step #3)

13) Hearth back to Warsong Hold (If hearthstone is still on a cooldown, you can just run there).

14) Stock up/Repair/Sell Items.

Bloodspore Plains

01) Then go south-east just right outside of Warsong Hold and turn in "Nork Bloodfrenzy's Charge" ... Accept "Coward Delivery... Under 30 Minutes or it's Free"

02) "Coward Delivery... Under 30 Minutes or it's Free" (You must take the Alliance Deserter to 55.50 and fire the flare gun).  Once done, turn this in at Scout Tungok, who patrols around the area there on a white wolf ... Accept "Vermin Extermination"

03) Go to 52.52 and accept "The Wondrous Bloodspore"

04) "The Wondrous Bloodspore" along with "Vermin Extermination" (Both done around the Bloodspore Plains)

05) Once done go to Scout Tungok (around 53.51) and turn in "Vermin Extermination"

06) Go (to 52.52) and turn in "The Wondrous Bloodspore" ... Accept "Pollen from the Source"

07) "Pollen from the Source" (The Moths around you drop the pollen).  Once done go back (to 52.52) and turn it in ... Accept "A Suitable Test Subject"

08) "A Suitable Test Subject" (right-click the Pollinated Bloodspore Flower in your inventory).  Once done, turn it in ... Accept "The Invasion of Gammoth"

09) "The Invasion of Gammoth" (Turn this in right next to you) ... Accept "Gammothra the Tormentor"

10) "Gammothra the Tormentor" (The entrance to the Den is at 49.58)  I found Gammothra the Tormentor in the south-west side down in the cave.  You need to use the Pouch of Crushed Bloodspore to weaken him.  To leave the cave keep going up.

11) Next go outside way up on the cliff to 48.59, you may need to go all the way around to get up there (It's right above the cave entrance), once there accept "Massive Moth Omelet?"

12) Go back to (52.52) and turn in "Massive Moth Omelet?" and "Gammothra the Tormentor" ... Accept "Trophies of Gammoth"

13) Hearth to Warsong Hold (If hearthstone is still on a cooldown, you can just run there) and turn in "Trophies of Gammoth" ... Accept "Hellscream's Champion"

D.E.H.T.A. Encampment

01) Go to 57.44, and accept/complete "A Mission Statement"

02) Then accept all new quests there: "Ears of Our Enemies" "Help Those That Cannot Help Themselves" "Ned, Lord of Rhinos..." "Happy as a Clam" and "Unfit for Death"

03) Go complete the following quests (steps 4-7) in any order:

04) "Happy as a Clam" along with "Ears of Our Enemies" (Done at the Lake, 53.43)

05) "Help Those That Cannot Help Themselves" Use the Trap Smasher on the trapped animals around the east side of the Lake.

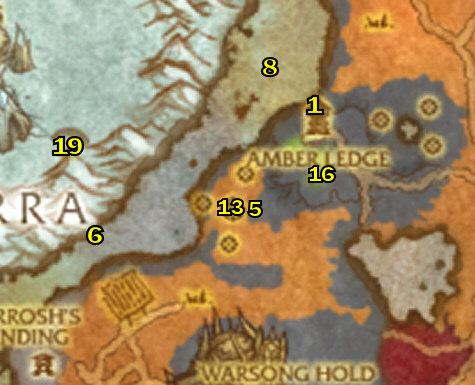
06) "Ned, Lord of Rhinos..." (Ned is found at around 48.40)  (This quest suggests two players to do it, but It is easily solable at level 70, See Video)

07) "Unfit for Death" (Need to use the Pile of Fake Furs on the Caribou Traps, this is also done all around the east side of the Lake)

08) Once all of those quests are done go back to the D.E.H.T.A. Encampment (57.44) and turn them all in ... Accept "The Abandoned Reach" "The Culler Cometh" "Khu'nok Will Know"

09) "Khu'nok Will Know" (Need to deliver the Calf to Khu'nok the Behemoth, at 59.30).  Turn it in ... Accept "Kaw the Mammoth Destroyer"

10) "Kaw the Mammoth Destroyer" (Need to mount a mammoth bull and then go kill Kaw, at 54.24, See Video).

11) Once that is done, go back to D.E.H.T.A. Encampment (57.44) and turn it in.

12) "The Culler Cometh" (Karen the Culler is found at 57.56)  (This quest suggests two players to do it, but It is easily solable at level 70).

13) Next go down a bit to The Abandoned Reach (at 57.55) and turn in "The Abandoned Reach" ... Accept "Not On Our Watch"

14) "Not On Our Watch" (Done at The Abandoned Reach, around 58.56).  Once done, turn it in ... Accept "The Nefarious Clam Master..."

15) "The Nefarious Clam Master..." (Clam Master K is found under the water around the wrecked ship, at 61.66).

16) Once that is done go back to the D.E.H.T.A. Encampment (57.44) and turn in "The Nefarious Clam Master..." and "The Culler Cometh"

17) Accept "The Assassination of Harold Lane"

18) GROUP: If you can find 1-3 more people to help or so, you can do "The Assassination of Harold Lane" (Harold Lane is located at 50.41, and is not to easy to solo, See Video).

19) Once done, go back to the D.E.H.T.A. Encampment (57.44) and turn it in.

20) NOTE: The quest "Can't Get Ear-nough..." is repeatable for the Blessing of D.E.H.T.A. buff only.

Amber Ledge

01) Go to Amber Ledge (at 46.32) and turn in "Too Close For Comfort" ... Accept "Prison Break" and "Monitoring the Rift: Cleftcliff Anomaly"

02) Get FP there.  (at the big dragon)

03) Stock up/Repair/Sell Items.

04) NOTE: If you are interested in getting the new profession Inscription, this is the place to do it.

05) "Prison Break" (done at 42.40, once you get a key from one of the mage hunters there, then use it on an Arcane Prison).

06) "Monitoring the Rift: Cleftcliff Anomaly" (Need to go to 34.42 below where the water is at and use the Arcanomter at the glowing purple rift, See Pic)

07) Go back to Amber Ledge (at 46.32) and turn in all quests and accept new ones: Turn in "Prison Break" and "Monitoring the Rift: Cleftcliff Anomaly" ... Accept "Abduction" and "Monitoring the Rift: Sundered Chasm"

08) "Monitoring the Rift: Sundered Chasm" (The purple rift is under the water at 43.28, See Video)

09) "Abduction" (Done at 42.40, read quest description).  Then take the Captured Beryl Sorcerer back to Amber Ledge and turn in this quest along with "Monitoring the Rift: Sundered Chasm" ... Accept "The Borean Inquisition" and "Monitoring the Rift: Winterfin Cavern"

10) "The Borean Inquisition" (Need to go in the tower next to you to turn this quest in, See This Video for the where to turn this quest in along with what you have to do for the next quest.) ... Accept "The Art of Persuasion"

11) "The Art of Persuasion" (Keep clicking on the Neural Needler on the Imprisoned Beryl Sorcerer right next to you to complete this quest).  Once done, turn it in ... Accept "Sharing Intelligence"

12) "Sharing Intelligence" Turn this in back out in Amber Ledge ... Accept "A Race Against Time"

13) "A Race Against Time" (Done at Beryl Point, 41.39, you must target Inquisitor Salrand floating slightly above in the air, and use the Beryl Shield Detonator item on her, kill her, then loot the chest).

14) Once that is done, go back to Amber Ledge to turn it in ... Accept "Reforging the Key"

15) "Reforging the Key" Turn this in at the big dragon at Amber Ledge ... Accept "Taking Wing"

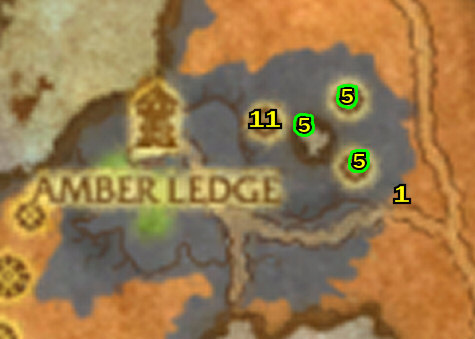
16) "Taking Wing" (Turn this in at Amber Ledge, 46.37) ... Accept "Rescuing Evanor".  NOTE:  This quest is currently bugged in the beta, if you accepted it and it failed, then log out of the game and log back in, you will be able to accept it again, keep repeating until it works.

17) "Rescuing Evanor" (This quest pretty much controls itself).  Once it's done turn it in ... Accept "Dragonspeak"

18) "Dragonspeak" Turn this in at the big dragon at Amber Ledge ... Accept "Traversing the Rift"

19) "Traversing the Rift" Once the flight is over and you are at Transitus Shield, Coldarra turn this quest in.

Coldarra

01) Accept all quests at Transitus Shield: "Reading the Meters" "Secrets of the Ancients" "Basic Training" and "Nuts for Berries"

02) NOTE:  "Have They No Shame?" is a dungeon quest done inside the Nexus and can be done later once more quests are gathered and you obtain a full group, this will be skipped for now.

03) Go do all of the following quests in Coldarra (doesn't matter what order).  And as you complete these quests you can go back and turn them in and get the follow up quests, and start working on them as well.

04) "Reading the Meters" (Nexus=28.28 - See Pic, Southern=28.34, Northern=31.20, Western=22.23)

05) "Secrets of the Ancients"

06) "Basic Training" (Kill Coldarra Spellweavers)

07) "Nuts for Berries" (gather Frostberries from the Frostberry Bushes)

08) Once all these quests are done, turn them all in and get the follow up quests ... Accept "Keep the Secret Safe" and "Hatching a Plan"

09) NOTE: "Postponing the Inevitable" and "Quickening" are Dungeon quests that are done inside the Nexus, and can be done later once more quests are gathered and a full group is established.

10) "Keep the Secret Safe" along with "Hatching a Plan"  (You need to collect 5 frozen axes from Coldarra Wyrmkin then use them on the Eggs in the 'purplish ditches').

11) Once these are done, turn them in ... Accept "Drake Hunt"

12) "Drake Hunt" (The Nexus Drake Hatchlings are level 72 dragons flying up in the air around the Nexus).  Once done, turn it in ... Accept "Cracking the Code"

13) NOTE: "Drake Hunt" Is a daily quest, so you may be able to do it again, if so do it and turn it in along with the next quest.

14) "Cracking the Code" (Inquisitor Caleras is at 32.27).  While doing this quest you should find an item that starts "Puzzling...". Once done, turn them all in ... Accept "The Cell"

15) "The Cell" (General Cerulean is at 27.20, and Warbringer Goredrak is at 24.29).  Once done turn it in ... Accept "Keristrasza"

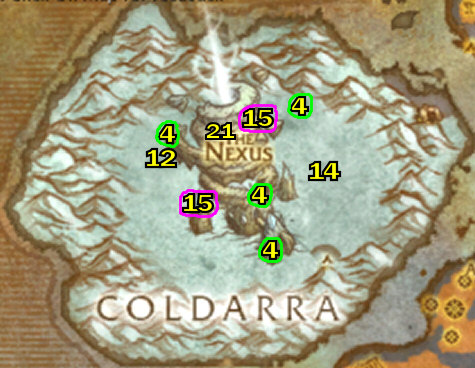
16) "Keristrasza" (You need to use the Augmented Arcane Prison item to summon Keristrasza.  Summon her and turn it in at her) ... Accept "Bait and Switch"

17) "Bait and Switch" (Simply pick up the purple crystals on the ground around the Nexus).  Once done use the Augmented Arcane Prison to turn it in ... Accept "Saragosa's End"

18) "Saragosa's End" (You need to talk to Keristrasza by using the Augmented Arcane Prison so you can face Saragosa)  (Once up there use the Arcane Power Focus Item to call down and weaken Saragosa to kill em). Then use the Augmented Arcane Prison to turn it in ... Accept "Mustering the Reds"

19) Talk to Keristrasza to take you back down to Transitus Shield.

20) Turn in "Mustering the Reds" (at Transitus Shield) ... Accept "Springing the Trap"

21) "Springing the Trap" (You need to use this flare at 25.22, See Pic).  Once done go back to Transitus Shield to turn it in.

22) GROUP: "Prisoner of War" along with "Postponing the Inevitable" "Have They No Shame?" and "Quickening" are Dungeon quests that are done inside the Nexus, and can be done if you can get a full group of 5-25 players established.  These are optional and can be skipped for now.

23) Fly to Amber Ledge.


Coldrock Quarry

01) Then go slightly east to 54.36..

02) Once there, there are two quest chains to do, one from the big rock (Elder Atkanok) and one from Etaruk.

03) Accept the two starting quests: "Reclaiming the Quarry" and "The Honored Ancestors"

04) As you complete these quests, you can quickly go back and turn them in to get the follow up and start doing them as well.  I will split this section into two quest chains. They are all done in Coldrock Quarry (around 51.34):

Quest chain #1:

05) "The Honored Ancestors" (Kesuk=50.32, Sagani=52.34, Takret=52.31).  Once done turn it in ... Accept "The Lost Spirits"

06) "The Lost Spirits" (Need to kill the beryl hounds, and use the Core of Malice to free the Kaskala).  Once done turn it in ... Accept "Picking Up the Pieces"

07) "Picking Up the Pieces" Once done, turn it in ... Accept "Leading the Ancestors Home"

08) "Leading the Ancestors Home" (simply go back to the monuments to do this: (Kesuk=50.32, Sagani=52.34, Takret=52.31, note that you need to use the given quest item at each location).  Once done turn it in.

Quest chain #2:

09) "Reclaiming the Quarry"  Once done, turn it in ... Accept "Hampering Their Escape"

10) "Hampering Their Escape" (The platforms are up in the air, simply throw the Grenades at them (that you obtain from the Beryl Reclaimers).  (East=52.35 and you must be up on the ledge before you throw it, North=52.31, West=51.33 [note: these are not listed on the metamap mod]).  Once done, turn it in ... Accept "A Visit to the Curator"

11) "A Visit to the Curator" (The Curator is located up on the blue platform ledge at 50.32, See Pic).  Once done, turn it in.

Steeljaw's Caravan

01) Go to Steeljaw's Caravan (at 48.19) and accept "The Honored Dead" and "Put Them to Rest"

02) Then Accept and do "We Strike!" (an escort quest).  This quest is not easy, so if you can get someone to help that would be great.  If the quest giver is not there that means somebody else is currently doing the escort.  While doing this escort work on doing the quests in step #3:

03) "The Honored Dead" and "Put Them to Rest"  (Finish these quests up).

04) Once these quests are done go back (to 48.19) and turn in "The Honored Dead" and "Put Them to Rest"

Bor'gorok Outpost

05) Go to Bor'gorok Outpost (at 49.10) and turn in "We Strike!" and "To Bor'gorok Outpost, Quickly!" ... Accept "The Sky Will Know"

06) Also accept "King Mrgl-Mrgl"

07) Get FP there.

Ruins of Eldra'nath

08) Go to 46.9 and turn in "The Sky Will Know" ... Accept "Boiling Point"

09) "Boiling Point" (Simmer=a fire elemental at 50.15 up on the ledge, Churn=a water elemental at 45.13).

10) Once that is done, go turn it in (at 46.9) ... Accept "Motes of the Enraged"

11) "Motes of the Enraged" (The motes are obtained from the wind elementals just west).

12) Once that is done, go turn it in (at 46.9) ... Accept "Return to the Spirit Talker"

Winterfin Retreat

01) Next go to Winterfin Retreat (down at the shore, at 43.13) and turn in "King Mrgl-Mrgl" ... Accept "Learning to Communicate"

02) "Learning to Communicate" (Scalder, walks around the very bottom of the water around 42.16, See Pic).  Once done, turn it in ... Accept "Winterfin Commerce"

03) "Winterfin Commerce" (The clams are down in the water). 

04) Once that it is done turn it in ... Accept all new quests there: "Oh Noes, the Tadpoles!" and "Them!"

05) "Oh Noes, the Tadpoles!" along with "Them!" (These are done across the water at Winterfin Village, around 39.18).  Once done, go back and turn them in ... Accept "I'm Being Blackmailed By My Cleaner"

06) "I'm Being Blackmailed By My Cleaner" (Turn this in just up the shore) ... Accept "Grmmurggll Mrllggrl Glrggl!!!"

07) Also accept "Succulent Orca Stew"

08) "Succulent Orca Stew" along with "Grmmurggll Mrllggrl Glrggl!!!" (Glrggl is in the water around 39.8).

09) Once they are both done, go back and turn them in ... Accept "The Spare Suit"

10) "The Spare Suit" Go turn this in and accept "Surrender... Not!"

11) Go to the cave at Winterfin Village, entrance to the cave is (at 40.20) and do the following:  (Remember to put your Spare Suit on!)

12) "Monitoring the Rift: Winterfin Cavern" (Use the Arcanometer Item at the entrance to the cave, 40.20)

13) Accept the quest "Keymaster Urmgrgl" (Inside the cave)

14) "Escape from the Winterfin Caverns" This is an escort quest that starts right next to you.  If the quest giver is not there, means that somebody else is currently doing the escort quest. If you can't do it now, then you can try again later.  Note when doing this escort you will have to take your disguise off (by right-clicking the buff at the top of the screen) to attack mobs.

15) "Keymaster Urmgrgl" along with "Surrender... Not!"

16) Once you have both completed, go back and turn in "Keymaster Urmgrgl" (in the cave)

17) Then if you have not done "Escape from the Winterfin Caverns" quest you can try it again now.

18) Then go back to Winterfin Retreat and turn in "Surrender... Not!" and "Escape from the Winterfin Caverns"

Bor'gorok Outpost

01) Go back to Bor'gorok Outpost (at 49.10) and turn in "Return to the Spirit Talker" ... Accept "Vision of Air"

02) "Vision of Air" (Simply right-click the Imperean's Primal item to do this quest).  Once done, turn it in ... Accept "Farseer Grimwalker's Spirit"

03) Then accept "Revenge Upon Magmoth" (at Bor'gorok Outpost)

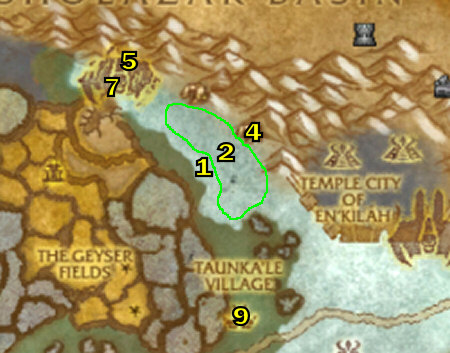
04) "Farseer Grimwalker's Spirit" (Need to turn this in the north-eastern part of the Magmoth cave, the entrance to the cave is at 55.12 just jump into the water there, there is another entrance at 54.13 with a ramp going down).  You need to kill all the mobs around it first.  Turn it in ... Accept "Kaganishu"

05) "Kaganishu" (Kaganishu is at the south-eastern part of the cave)  (Loot Kaganishu's Fetish and use it back at Farseer Grimwalker's Spirit).  Turn it in ... Accept "Return My Remains"

06) "Return My Remains" (Make sure you pick up his remains underneath of him)

07) "Revenge Upon Magmoth" Finish this quest up. (Done east at Magmoth, around 54.13)  (Please note that the Foragers and Crushers are found outside of the cave, not in it, and the Mate of Magmothregars are found only in the cave).
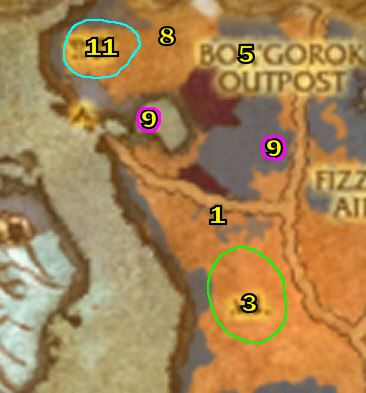
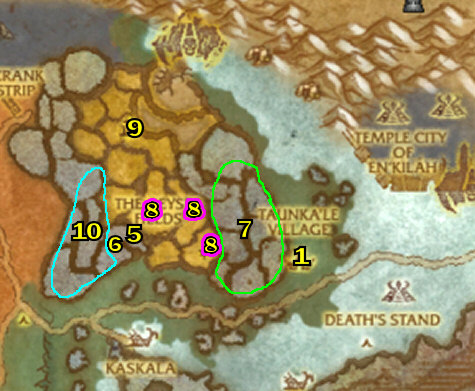
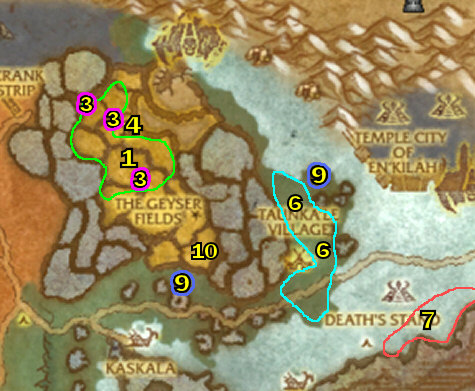
08) Go back to Bor'gorok Outpost (at 49.10) and turn in "Return My Remains" and "Revenge Upon Magmoth"

09) Then fly to Amber Ledge and turn in "Monitoring the Rift: Winterfin Cavern"

Kaskala

01) Go to Kaskala (at 63.45) and accept "Not Without a Fight!" and "Preparing for the Worst"

02) "Not Without a Fight!" along with "Preparing for the Worst" (Done right at Kaskala, around 65.47). Once they are done, turn them in ... Accept "Muahit's Wisdom"

03) "Muahit's Wisdom" (Turn this in at 67.54) ... Accept "Spirits Watch Over Us"

04) "Spirits Watch Over Us" (Iruk's corpse is at under the water at 67.50).  Once done, go back and turn it in ... Accept "The Tides Turn"

05) "The Tides Turn" (Heigarr the Horrible is at 67.56).  Once done, turn it in ... Accept "Travel to Moa'ki Harbor" (right next to you)

Taunka'le Village

01) Go to Taunka'le Village (at 77.37) and turn in "Hellscream's Champion" and "Ride to Taunka'le Village" ... Accept "What Are They Up To?"

02) Make Taunka'le Village your new home.

03) Accept all other quests there: "Scouting the Sinkholes" "Sage Highmesa is Missing" and "Load 'er Up!"

04) Get FP there.

05) Go accept "Emergency Supplies" (at 64.35)

06) "Load 'er Up!" Blow the whistle at the crash site, 63.36, then go back to Taunka'le Village to turn it in (at the goblin, have to watch him fly around a bit) ... Accept "The Power of the Elements" (Right next to you)

07) "The Power of the Elements" (Done just north-west in the Steam Springs)

08) "Scouting the Sinkholes" (South=70.36, Northeast=69.32, Northwest=66.32)

09) "What Are They Up To?" (You simply just have to visit the Fizzcrank Pumping Station, at 65.23)

10) "Emergency Supplies" (You need to find Fizzcrank Recon Pilots laying on the ground, they are mostly found laying up by the water around the Scalding Pools)

11) Once they are all done, go back to Taunka'le Village (at 77.37) and turn in all quests and accept all new ones: Turn in "Scouting the Sinkholes" "The Power of the Elements" "What Are They Up To?" and "Emergency Supplies" ... Accept "The Heart of the Elements" and "Master the Storm" "Patching Up"

12) "Master the Storm" (Simply use the totem in the hut to kill the Storm Tempest at Taunka'le Village).  Once done turn it in ... Accept "Weakness to Lightning"

13) Then accept "Cleaning Up the Pools" and "Souls of the Decursed"

01) "Cleaning Up the Pools" along with "Souls of the Decursed" and "Weakness to Lightning" (These are all done around Fizzcrank Pumping Station, at 65.23)

02) Once those 3 quests are done, hearth back to Taunka'le Village and turn them in ... Accept "The Sub-Chieftains" and "Defeat the Gearmaster"

03) "The Sub-Chieftains" (For these mobs, look for the spinning spot lights around The Geyser Fields, Twonky=60.20, ED-210=65.17, Max=63.22, Grinder=65.28).

04) "Defeat the Gearmaster" (The manual and Mechazod are up in Fizzcrank Pumping Station that looks like this See Pic, at 65.23)

05) Once those two quests are done hearth (or run back) to Taunka'le Village and turn in "The Sub-Chieftains" and "Defeat the Gearmaster"

06) "Patching Up" (Need to kill the Marsh Caribou all around The Flood Plains for 5 Uncured Caribou Hides and then use them at a steam vent in the Geyser Fields)

07) "The Heart of the Elements" (Need to kill Frozen Elementals all around the south-east shores of Borean Tundra).

08) Once they are both done, go back to Taunka'le Village and turn in "Patching Up" and "The Heart of the Elements" ... Accept "The Horn of Elemental Fury" and "Shrouds of the Scourge"

09) "The Horn of Elemental Fury" (Burblegobble is at 68.40, and Gurgleboggle is at 78.28).  Note, you need to use the keys to open up the Baubles.  Once done, go back and turn it in ... Accept "The Collapse"

10) "The Collapse" (Need to use The Horn of Elemental Fury at 70.36).  Once done, go back and turn it in.

The Dens of Dying

01) "Sage Highmesa is Missing" (Need to turn this in at 74.23) ... Accept "A Proper Death"

02) "A Proper Death" along with "Shrouds of the Scourge" (Need to kill Plagued Magnataur and Scourged Mammoths, they are just east of you).

03) Once they are both done, go back (to 74.23) and turn in "A Proper Death" ... Accept "Stop the Plague"

04) "Stop the Plague" (Go to the cave at 78.18 and use the Cleansing Seeds at the cauldron).  Once done, go back to turn it in ... Accept "Find Bristlehorn" and "Fallen Necropolis"

Talramas

05) "Find Bristlehorn" (Longrunner Bristlehorn is inside Talramas (in the cage) See Pic, at 69.12).  Turn it in ... Accept "The Doctor and the Lich-Lord"

06) "The Doctor and the Lich-Lord" (These mobs are up in Talramas, 69.12, See This Video for how to get up there.)

07) "Fallen Necropolis" (Finish this quest up while you are around Talramas)

08) Once they are both done go back and turn them both in (at 74.23) ... Accept "Return with the Bad News"

09) Hearth (or run back) to Taunka'le Village (at 77.37) and turn in all quests and accept new ones: Turn in "Shrouds of the Scourge" and "Return with the Bad News" ... Accept "The Bad Earth"

Temple City of En'Kilah

01) "The Bad Earth" (These are objects you pick up off the ground just east of Taunka'le Village).  Once done, go back and turn it in ... Accept "Blending In"

02) "Blending In" (Put on the cape and explore the following Spires at the Temple City of En'kilah: Decay=83.20, Blood=88.20 (need to go up on the second floor for this one), Pain=89.28).

03) Once that is done hearth (or go back) to Taunka'le Village and turn it in ... Accept "Words of Power" "A Courageous Strike" and "Neutralizing the Cauldrons"

04) Go do the following 3 quests together at the Temple City of En'Kilah (around 85.25):

05) "Words of Power" (Naferset=83.20, Talet-Kha=89.28, Andorath=88.20)

06) "Neutralizing the Cauldrons" (East=87.29, Central=86.22, West=85.20)

07) "A Courageous Strike"

08) PLEASE NOTE: There is an item (called Vial of Fresh Blood) that is dropped by Darkfallen Bloodbearer which starts "The Spire of Blood"

09) "The Spire of Blood" (Turn this in at the Tauren lying on ground in The Spire of Blood, 87.19) ... Accept "Shatter the Orbs!"

10) "Shatter the Orbs!" (Simply kill 5 red orbs there)

11) Once they are all done, hearth (or go back) to Taunka'le Village and turn them all in ... Accept "Breaking Through"

12) GROUP: Try to find a group of at least one other player, and do "Breaking Through" (You need to go to  86.28 to enter and kill the 3 mobs, the first 2 are easily soloable and are on the first level inside the necropolis, but the last one isn't, See Video on killing the last one, use the 2 teleporters in the center of the necropolis to go either up or down in it, need to go up to get to the 3rd mob).  If you were unable to find a group to do this, then you will have to skip to the 'Dragonblight' guide below.

13) Once done hearth (or go back) and turn it in ... Accept "The Fall of Taunka'le Village". 

14) "The Fall of Taunka'le Village" Turn this in right in Taunka'le Village ... Accept "Across Transborea"

15) "Across Transborea" (Simply escort the Evacuee into Dragronblight by heading east, please note that the NPC stops sometimes so keep an eye on em).

16) Once it is complete go turn it in (at 12.51 in Dragonblight) ... Accept "A Tauren Among Taunka"

17) "A Tauren Among Taunka" (Turn this in at Westwind Refugee Camp, 12.51 in Dragonblight).

18) To continue on, please go to my Dragonblight guide...

To continue on with this guide, please go to my Dragonblight Guide!

You can check the bottom of my 1-60 guide for general tips/tricks on how to level faster, along with hunter specific tips/tricks.

COMING SOON:  Recorded 1-80 speed runs!

Want to leave testimonials about my guide?  You can do that on my MySpace Page through leaving a comment!  First you have to be my friend first, and please do so!

For screenshots and to get to know Joana/Mancow better you can visit this part of my site here!  And if you are interested in signing up for my newsletter, you can do so at this page here!

Help me improve this guide!

If you feel that some quests should contain additional information that would be helpful, or if you have any additions or find any errors in this guide, PLEASE contact me here, make sure you leave "Northrend Guide Improvements" in the subject line so it filters correctly into my inbox.   I appreciate any feedback to make this guide better!

MORE GUIDES:  To check out more World of Warcraft guides that are decent buys, you can check out Ultimate World Of Warcraft Guide for WotLK PvP strategies and tips and they also offer lots of guides for free lifetime membership updates,  Luke's Gold Guide, which is great if you need a gold guide, and also the Penn's Profession's Guide for in-depth overview of WoW professions, this guide can give you some more pointers on the classes and such.  And for a complete list of WoW products you can purchase, please check out my Premium Guide List out.