***Joana's 70-71 Howling Fjord Guide***


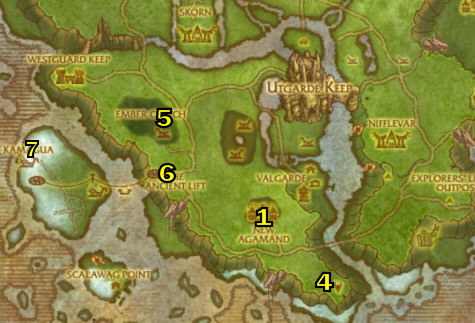
Introduction:
Howling Fjord is a pretty cool zone, you will come across many cool things here, like the introduction of the Tuskarr (those fat beavers), and the Taunka (those Tauren with different faces).  There's many cool things here like burning trees, drunken dwarves, evil people, and you get to talk to a wolf!  Also, Scalawag Point was a pretty cool 
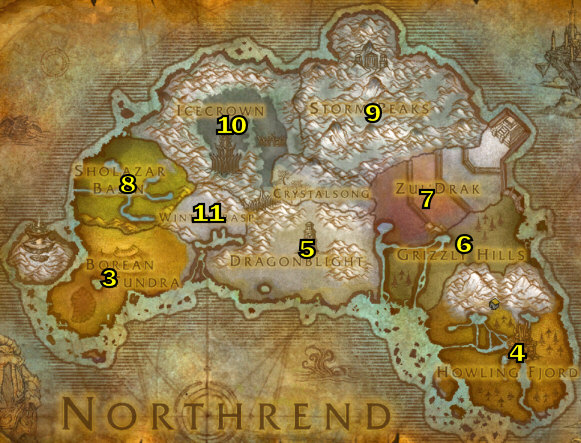
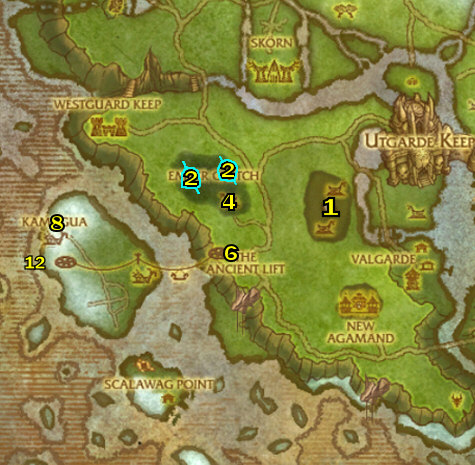
experience!  See Reference Map.

Interactive MAP MOD (MetaMap) Coordinates.

Go here to learn how to get map coordinates and Interactive Map Coordinates, which are very important to have when using my guide.


Help me improve this guide!

If you feel that some quests should contain additional information that would be helpful, or if you have any additions or find any errors in this guide, PLEASE contact me here, make sure you leave "Northrend Guide Improvements" in the subject line so it filters correctly into my inbox.   I appreciate any feedback to make this guide better!


If you have any general questions or comments on anything, you can contact me here:  joana@joanasworld.com  You can also visit my website:  WWW.JOANASWORLD.COM


World of Warcraft™
World of Warcraft and Blizzard Entertainment are trademarks or registered trademarks of Blizzard Entertainment, Inc. in the U.S. and/or other countries.


If you are interested in making money referring people to buy my guide, you can follow the instructions on THIS PAGE HERE about how to do this, generally with my affiliate program you earn 50% of all the profit if you refer somebody to my site with your affiliate link that buys my guide!  TALK ABOUT EASY MONEY!


Copyright 2008


LEGAL:  Do not distribute this product in any way shape or form.  Any theft or unauthorized reproduction of this Guide is prohibited. Violators will be prosecuted.  Special markers have been encrypted into this guide to identify the original buyer.  Be WARNED if you distribute this guide on the internet, I will know who it is.

PLEASE READ! (HOW TO USE THIS GUIDE):


08) "Quest Name"  (this quest has a yellow highlighted number)  Quests that have a yellow highlighted number simply means it is numbered on the map to the right.  This saves time because some quests are not numbered on the maps, so you know whether or not to look on the maps.


All quests and mobs through out my guide are linked to wowhead.  When following my guide, you can use these links for further information on the quests/mobs.


All video links are in RED.  You will need to download the Divx WebPlayer when prompted.  And you can double click on the videos when playing to make it full screen.


The checkboxes () next to each step are for your personal use only.  I have included them for each step incase you want to mark off which step in the guide you are at.  You do not have to use these if you don't want, I have included them since it was requested by a lot of people.


Guide Color Codes:
Accept a quest.
Go do a quest.
Turn in a quest.
General mob/item link.
Picture.
Video link.


- Download Printable Version of This Guide! -

Members Area Menu

01) Introduction

02) Here is the order where you will be leveling:

03) 70-72 Borean Tundra

           OR:

04) 70-72 Howling Fjord

05) 72-74 Dragonblight

06) 74-75 Grizzly Hills

07) 75-77 Zul'Drak

08) 77-78 Sholazar Basin

09) 78-79 Storm Peaks

10) 79-80 Icecrown


Other Guides:

11) PVP ZONE:  Wintergrasp

12) Joana's Death Knight Leveling & Strategy Guide

13) User Submitted Death Knight Guides


Main Members Area


Great WotLK Products:  WotLK Secrets Guide  -  70-80 Alliance Guide  -  Luke's Gold Guide

(Northrend Levels 70-80)

70-71 Howling Fjord

Vengeance Landing

01) In order to get to Howling Fjord you must take the zeppelin in Tirisfal Glades (at 59.58).

02) Once at Howling Fjord, you will arrive at Vengeance Landing, a small horde base.

03) PLEASE NOTE: Throughout my guide always keep an eye out on your minimap for the quest givers, it will be much easier to find them that way.

04) Get off of the zeppelin and accept all quests there:  "The New Plague" "Let Them Eat Crow" and "War is Hell"

05) Get FP (Flight Path) there.

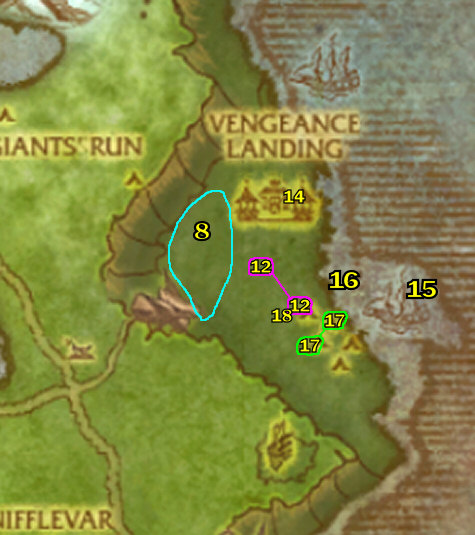
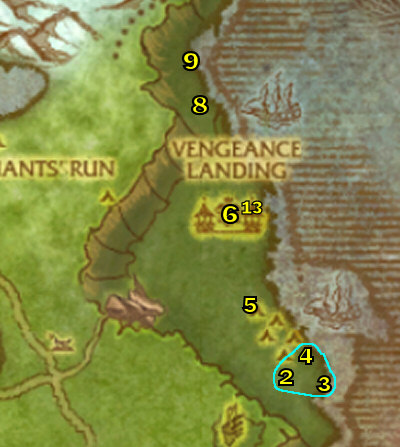
06) Make Vengeance Landing your new home.  (The Inn is the eastern most building in Vengeance Landing)

07) Go to the building (in Vengeance Landing, at 79.29) and upgrade your First Aid.  Also note that the Inscription Trainer is there as well if you are interested in getting Inscription.

08) Go south-west just a bit and do the following two quests together [steps 9 - 10]:

09) "Let Them Eat Crow" (Just kill the Fjord Crows until you get 8 Crow Meat, then get the pup out of the cage and feed them all the meat).  Do this along with:

10) "War is Hell" (Simply use the torch to burn fallen Forsaken and Alliance corpses, just west of Vengeance Landing).

11) Once they are both done, go back to Vengeance Landing and turn them in ... Accept "Reports from the Field" and "Sniff Out the Enemy"

12) "Reports from the Field" Talk to the two NPCs just south. (Razael: 77.34, he is on an undead warhorse, Lyana: 78.37).

13) Once done go back (to Vengeance Landing) and turn it in ... Accept "The Windrunner Fleet"

14) "The Windrunner Fleet" (Camille is at 79.29).  Once the flight is over turn this in ... Accept "The Ambush"

15) "The Ambush" (Done right there around on the boats, help the Forsaken kill the North Fleet Marines). Once done, turn it in (on the boat, at 84.36) ... Accept "Guide Our Sights"

16) Next jump off that boat and swim to the wrecked boat (at 80.35) and do "The New Plague" (Pick up the Plague Containers on the ground)

17) "Guide Our Sights" (The cannons are up the small steps on the south side of the wall: east cannon: 79.40, west cannon: 80.38)

18) Go turn in "Guide Our Sights" in (at Lyana, 78.37) ... Accept "Landing the Killing Blow"

01) "Landing the Killing Blow" Here are the locations of the 3 mobs you have to kill:

02) Captain Olster: 81.43

03) Lieutenant Celeyne: 83.43. -  NOTE: There is an escort quest right there called "Trail of Fire" (If the NPC is not there means that somebody else is currently doing the escort).  it's not that easy, there is no follow up quest so it can be skipped if you can't do it).

04) Sergeant Lorric: 82.40

05) Go turn in "Landing the Killing Blow" in (at Lyana 78.37) ... Accept "Report to Anselm"

06) Go back to Vengeance Landing and turn in "Report to Anselm" "The New Plague" ("Trail of Fire" If you did it) ... Accept "Spiking the Mix"

07) NOTE: "A Score to Settle" Involves Utgarde Keep which is a dungeon in the middle of Howling Fjord, and can be skipped for now and done later.

08) "Spiking the Mix" (Go north from Vengeance Landing and kill the Giant Tidecrawlers)  NOTE: Work your way to the cave at 76.19

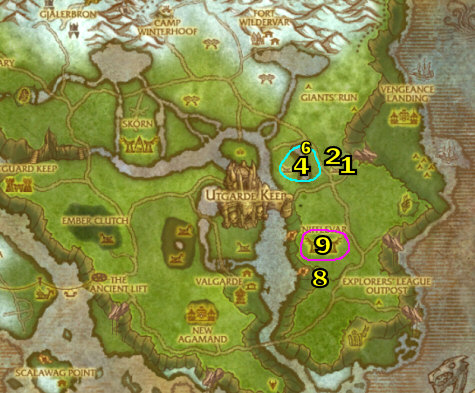
09) "Sniff Out the Enemy" This quest has you use the Plaguehound Leash to unleash a pup that takes you to the point to where you turn this quest in.  But you actually don't even need to use it.  Just turn this quest in at the cave, 76.19 ... Accept "The Dragonskin Map"

10) Hearth to Vengeance Landing.

11) Turn in "The Dragonskin Map" ... Accept "The Offensive Begins"

12) Turn in "Spiking the Mix" ... Accept "Test at Sea"

13) "Test at Sea" Go to Camille (at 79.29) to fly and do this 'bombing' quest, See Video.  Once done, turn it in ... Accept "New Agamand"


Vengeance Lift

01) Go up the lift west of Vengeance Landing.  Once up there turn in "The Offensive Begins" (At Gorth the abomination) ... Accept "A Lesson in Fear" and "Help for Camp Winterhoof" (next to you there)

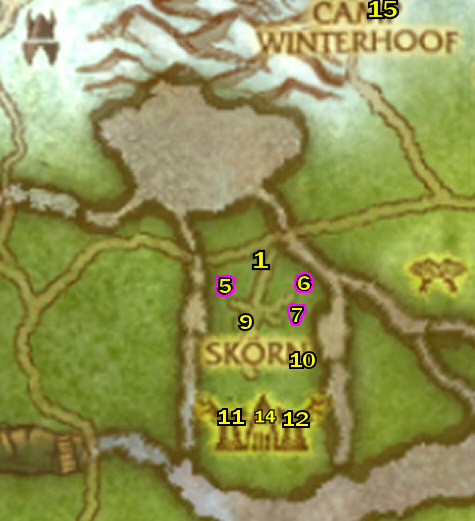
02) "A Lesson in Fear" Just kill Winterskorn defenders in Balejar Watch, at 69.39 and they will eventually show up, the named mobs will 'yell' something to let you know they are there.

03) Once that is done, turn it in ... Accept "Baleheim Bodycount" and "Baleheim Must Burn!"

04) "Baleheim Bodycount" along with "Baleheim Must Burn!" (tower: 67.39, bridge: 66.39, barracks: 63.40, dwelling: 65.40, See Video).

05) Once those two are done, go back to Gorth (at 71.39) and turn them in ... Accept "The Ambush"

06) "The Ambush" (Turn this in at lydell, he is at 65.36) ... Accept "Adding Injury to Insult"

07) "Adding Injury to Insult" (It's easily soloable. Just use the insult scroll at distance from Bjorn (at 63.39) then run back across the river to Lydell's ambush. They will finish him off for you.) See Video. Once done, turn it in.

Ghostblade Post

08) Next go way down south to Ghostblade Post (at 67.60) and accept "Against Nifflevar" and "The Enemy's Legacy"

09) "Against Nifflevar" along with "The Enemy's Legacy" (These quests are done, just north at Nifflevar)  (The Sagas are at: Valkyr: 67.57, Winter Curse: 68.52, Twins: 64.53)

10) Once those two quests are done, go back to Ghostblade Post (at 67.60) and turn them in.

New Agamand

01) Next go to New Agamand (at 52.67).

02) Get FP there.

03) Make New Agamand your new home.

04) Turn in "New Agamand" ... Accept "A Tailor-Made Formula"

05) Also accept "Green Eggs and Whelps" and "Shield Hill"

06) "A Tailor-Made Formula" (Thorvald drops the Blood at 46.68).

07) Once done, go back to New Agamand (at 52.67) and turn in "A Tailor-Made Formula" ... Accept "Apply Heat and Stir"

08) "Apply Heat and Stir" Read quest description carefully, this is done right where you accepted the quest, you basically just need to keep going back and forth from the cauldron to the table clicking on the quest item until the quest gets completed, See Video.  Once done, turn it in ... Accept "Field Test"

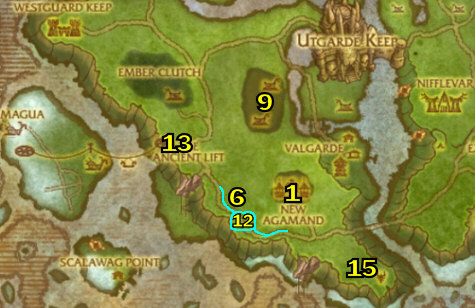
09) "Field Test" (Done at Halgrind, around 49.55, simply spray the mobs there).

10) Once done hearth (or go back) to New Agamand (at 52.67) and turn in "Field Test" ... Accept "Time for Cleanup"

11) "Time for Cleanup" (Simply turn this in right at New Agamand) ... Accept "Parts for the Job"

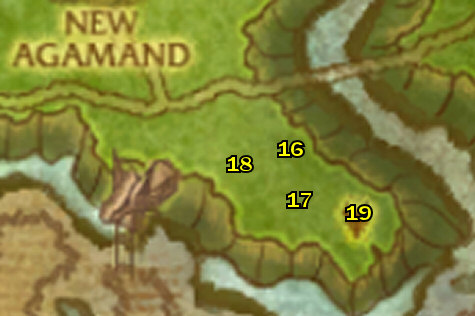
12) "Parts for the Job" (Grind your way on Shoveltusks until you get to Anton, he is patrolling up and down on the road west of New Agamand (between 52.73 and 46.69). Once you find him, buy the Fresh Pound of Flesh item from him.

13) Go to The Ancient Lift (at 40.60) and accept "The Dead Rise!" (From Orfus of Kamagua)

14) Hearth (or just go back) to New Agamand (at 52.67) and turn in "Parts for the Job" ... Accept "Warning: Some Assembly Required"

15) "The Dead Rise!" Done at Shield Hill, you can also help locate these by their 'spirits' are floating above their graves.  Here are the locations of the Clue's:

16) Rodin: 59.77

17) Isuldof: 59.79

18) Fengir: 57.77

19) Windan: 61.80

01) "Warning: Some Assembly Required" (Done at Halgrind, around 49.55, It's best to gather a whole bunch of Vrukul then use the Plagued Blood Explosion ability to kill them all, then repeat until done, See Video).

Ember Clutch

02) Next go over to Ember Clutch (around 39.51) find a big Ember Clutch Ancient and accept "Root Causes"

03) "Green Eggs and Whelps" (Done at Ember Clutch, around 39.51)  (Spray the eggs with the quest item and then kill the mob that comes out of it)

04) "Root Causes" (Done at the buildings in Ember Clutch, Skeld Drakeson is in the house at 41.52)

05) Once those are done, go turn in "Root Causes" at a big Ember Clutch Ancient in Ember Clutch.

06) Then go to The Ancient Lift (at 40.60) and turn in "The Dead Rise!" ... Accept "Elder Atuik and Kamagua"

07) Take the great lift to Kamagua.

Kamagua

08) Once at Kamagua, go to 25.56 and turn in "Elder Atuik and Kamagua" ... Accept "Grezzix Spindlesnap"

09) Also accept "Feeding the Survivors"

10) Get FP there.

11) Make Kamagua your new home.

12) Go in the water south-west a bit (to 23.62) and turn in "Grezzix Spindlesnap" ... Accept "Street "Cred""

13) Then talk to Lou the Cabin Boy (the small tauren in the small boat) to have him take you to Scalawag Point.

Scalawag Point

01) Once there turn in "Street "Cred"" (The NPC in the tent) ... Accept ""Scoodles""

02) Also accept "Forgotten Treasure" and ("Swabbin' Soap" This is accepted on the boat at 37.79)

03) ""Scoodles"" ("Scoodles" is around 37.83 in the water)

04) "Forgotten Treasure" (Amani Vase: 37.85 on the boat that's all in pieces under the water, Eagle Figurine: 37.84 inside the full boat under the water.)

05) Once those are done, go back and turn in "Forgotten Treasure" (35.80) ... Accept "The Fragrance of Money"

06) Turn in ""Scoodles"" ... Accept "The Staff of Storm's Fury" "The Frozen Heart of Isuldof" "The Lost Shield of the Aesirites" and "The Ancient Armor of the Kvaldir"

07) Also accept "Gambling Debt" (36.80)

08) "Gambling Debt" (Simply speak to "Silvermoon" Harry in the tent and give him a small beating, then talk to him to take his payment).  Once done, turn it in ... Accept "Jack Likes His Drink"

09) "Jack Likes His Drink" (He is inside the Building in the dining room. Talk to the waitress Olga to get a drink, then loot Jack's payment when he faints).  Once done, go back and turn it in ... Accept "Dead Man's Debt"

10) "The Lost Shield of the Aesirites" (Need to go to the small island at 38.74 and wait until the boat shows up, then get on the boat and turn this in) ... Accept "Mutiny on the Mercy"

11) "Mutiny on the Mercy" (Need to go in the ship's hold and kill the undead there for the Blasting Powder).  Once done, go back up top and turn it in ... Accept "Sorlof's Booty"

12) "Sorlof's Booty" (Fairly simple, while you're on this ghost ship - there will big a big elite stone giant that everyone's shooting at along a shoreline they come across, click on the big cannon (that is on the opposite side of the boat that the captain is on) as many times as it takes to kill the giant.  Once its dead - jump off the boat onto the shore and loot the booty and then go back to the little island at 38.74 and reboard the ship to turn this quest in. ... Accept "The Shield of the Aesirites"

01) "The Fragrance of Money" (kill the Rabid Brown Bears on the north-eastern side of Scalawag Point)

02) "Swabbin' Soap" (Big Roy is swimming in the water around 31.78)

03) Once those are done, go turn in "Swabbin' Soap" (on the boat at 37.79)

04) Turn in "The Fragrance of Money" ... Accept "A Traitor Among Us"

05) "A Traitor Among Us" (Turn this in right next to you) ... Accept "Zeh'gehn Sez"

06) "Zeh'gehn Sez" (Turn this in right next to you) ... Accept "A Carver and a Croaker"

07) "A Carver and a Croaker" (Read quest objective to see what you have to do).  Once done, turn it in ... Accept ""Crowleg" Dan" (It will take a few seconds before you can accept it)

08) ""Crowleg" Dan" (Talk to "Crowleg" Dan on the boat at 35.83 and them kill him). Once done, go back and turn it in ... Accept "Meet Number Two"

09) "Meet Number Two" (Turn this in upstairs inside the house) ... Accept "The Jig is Up"

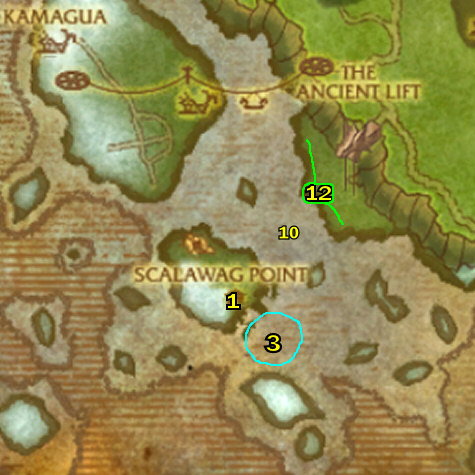
10) "The Jig is Up" This quest can be soloed, it is done in the cave above Scalawag Point (entrance to the cave is at 33.75), once you get Jonah's health to around 30%, he jumps down and gets eaten by a bear, go down and kill the bear to loot the spyglass.  See Video, NOTE: see where you pick up the Frozen Heart for the next quest in this video.

11) "The Frozen Heart of Isuldof" (This is found back in the cave (entrance to the cave is at 33.75) up the little ramp where the big bear is at)

12) Go back in the house at Scalawag Point and turn in "The Jig is Up"

13) Go talk to ALanya on the deck (at 36.81) and have her take you to Bael'gun.

14) Once at Bael'gun go loot the Armor in the boat's Hold (at 81.73) for the quest "The Ancient Armor of the KvaldirSee Video.

15) Hearth to Kamagua.

Kamagua

01) Accept "The Way to His Heart..." (at 24.58)

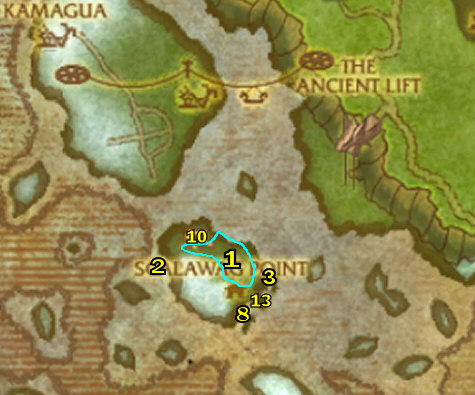
02) "Dead Man's Debt" Go across the bridge at 29.60 and then look for the Dirt Mound at 32.60, kill the mobs that spawn to loot the item.

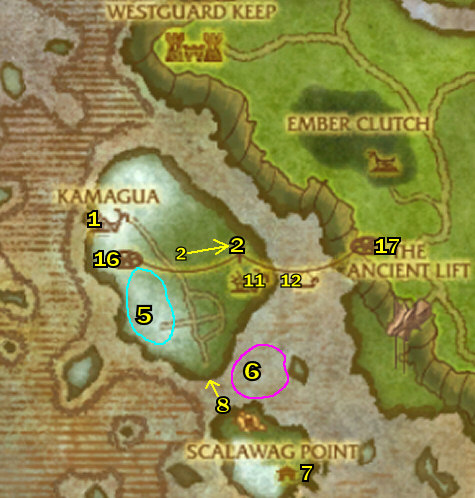
04) "Feeding the Survivors" (Kill Shoveltusk around Kamagua) This quest is annoying because the wolves keep devouring the Shoveltusk!  Once this is done, go back to Kamagua and turn it in ... Accept "Arming Kamagua"

05) "Arming Kamagua" (Grind your way down south killing Chimaera to complete this quest.)

06) Next gather at least 14 fish out in the water around 33.71 for the quest "The Way to His Heart...", look for the 'School's of Tasty Reef Fish' and use the net to gather the fish, the Sharks drop the fish as well.  We will do the next part on step #8.

07) Then go over to Scalawag Point (at 36.80) and turn in "Dead Man's Debt"

08) "The Way to His Heart..." Do the next part of this quest which has you lure a Reef Bull (around 31.74) over to the other side of the water to a Reef Cow with the Fish you collected earlier. See Video.  I was able to do this quest with 6 fish.

09) Go back to Kamagua and turn in "The Way to His Heart..."

10) Turn in "Arming Kamagua" ... Accept "Avenge Iskaal"

11) "Avenge Iskaal" (Done at 33.64)

12) "The Staff of Storm's Fury" The Staff of Storm's Fury is down in the boat's hold at 35.64. Just wait until Abdul the Insane (ELITE) paths up on the top deck then go down into the cargo hold to loot it.

13) Hearth (or go back) to Kamagua.

14) Turn in "Avenge Iskaal"

15) Accept "Travel to Moa'ki Harbor" (If it's available, if not don't worry.)

16) Go on the Great Lift (at 24.62).

17) Once you get to the other side, go to Orfus and turn in "The Staff of Storm's Fury" "The Frozen Heart of Isuldof" "The Shield of the Aesirites" and "The Ancient Armor of the Kvaldir" ... Accept "A Return to Resting"

18) Go New Agamand.

New Agamand

01) Turn in "Green Eggs and Whelps" ... Accept "Draconis Gastritis"

02) Also turn in "Warning: Some Assembly Required"

03) Make New Agamand your new home.

04) "Shield Hill" along with "A Return to Resting" (Done at Shield Hill)  (Staff: 59.77, Isuldof: 59.79, Shield: 57.77, Armor: 61.80)

05) "Draconis Gastritis" (Done at Ember Clutch, around 39.51)

06) Go to The Ancient Lift (at 40.60) and turn in "A Return to Resting" ... Accept "Return to Atuik"

07) Take the Ancient Lift over to Kamagua and turn in "Return to Atuik" (at 25.56)

08) Hearth to New Agamand (If hearthstone is still on a cooldown, just fly there.)

09) Turn in "Draconis Gastritis" and "Shield Hill"

10) The south side of Howling Fjord is now done, it is time to do the northern part of HF now...

Camp Winterhoof

01) Travel all the way up to Camp Winterhoof (at 49.11)..

02) Once there turn in "Help for Camp Winterhoof"

03) Accept all quests there: "Hasty Preparations" "Suppressing the Elements" and "Making the Horn"

04) Get FP there.

05) Make Camp Winterhoof your new home.

06) Go do the following 3 quests together [steps 7 - 9]:

07) "Hasty Preparations" (Pick up hippogryph feathers on the ground around Camp Winterhoof)

08) "Suppressing the Elements" (You can find Iceshard Elementals and Howling Cyclones to the north-east of Camp Winterhoof, and there is another patch of them in the zone Grizzly Hills at 64.66)

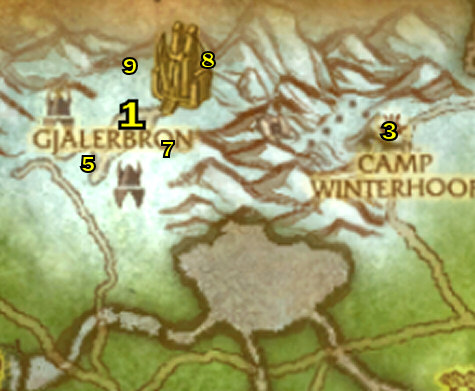
09) "Making the Horn" The rams are located around Camp Winterhoof in the snowy areas, all around 41.16 (that's about the middle point for them) along the coast of the lake. Drop rate is about 30%.

10) Once these 3 quests are done hearth (or just go back) to Camp Winterhoof and turn them all in and accept all new quests ... Accept "Mimicking Nature's Call" "The Book of Runes" "March of the Giants" "Keeping Watch on the Interlopers" and "The Frozen Glade"

11) Go to The Frozen Glade (at 61.22) and turn in "The Frozen Glade" accept "Spirits of the Ice"

12) "Spirits of the Ice" (Kill the elementals in the immediate area, drop rate is 100%).  Once done, turn it in ... Accept "The Fallen Sisters" and "Wild Vines"

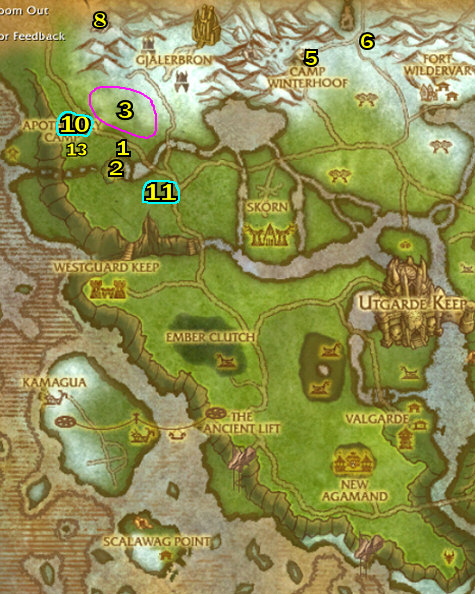
13) "The Fallen Sisters" along "Wild Vines" These are done around 51.27, attack the Nymphs until you get the message 'Chill Nymph appears weak!' and then use the pendant on them, along with killing the small flowers there.

14) Once those are done, go back (to 61.22) and turn them in ... Accept "Spawn of the Twisted Glade" and "Seeds of the Blacksouled Keepers"

15) "Spawn of the Twisted Glade" along with "Seeds of the Blacksouled Keepers" (These are all done around 54.17, Once you kill the spores use the Enchanted Ice Core quest item to freeze it.)

16) Once done, go back (to 61.22) and turn it in ... Accept "Keeper Witherleaf"

17) "Keeper Witherleaf" (He roams around 54.17)

18) Once done, go back (to 61.22) and turn it in.

Giant's Run

01) "Mimicking Nature's Call" Blow the horn at the frozen waterfall at 52.3 and then kill Frostgore that comes out.

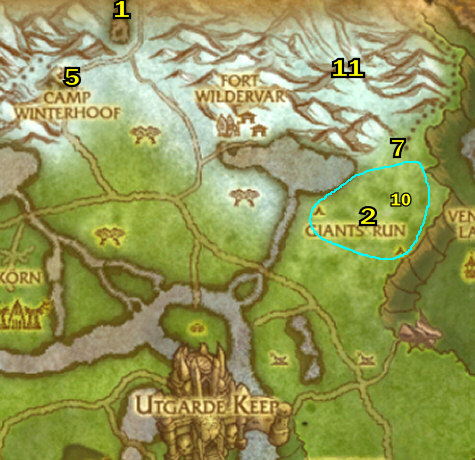
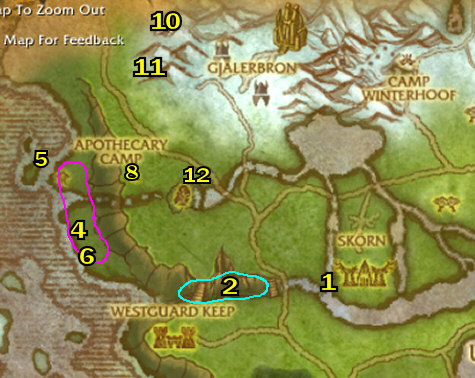
02) Go do the following 2 quests at Giant's Run, around 68.27:

03) "The Book of Runes" The 3 chapters for the book of runes drops off the Iron Rune Stonecallers/Binders, you then combine the Chapters to create 'The Book of Runes'.  Do this along with:

04) "March of the Giants" The Runed Stone Giants are easy to solo even though they are elite, just kill them and use the 'pick' on their corpse.  If you need help, I'm sure there will be others in that area that are willing to help.  You can also use the pick on ones you did not kill.

05) Once they are all done, hearth (or go back) to Camp Winterhoof and turn in ALL in ... Accept all new quests: "Mastering the Runes" "The Lodestone" "Skorn Must Fall!"

06) Go do the following 2 quests east at Giant's Run:

07) "The Lodestone" (Need to use the Rune Sample quest item at the Broken Tablet, at 71.17, See Pic)

08) "Mastering the Runes" (The tools are located around Giants' Run, See This Link for the locations the tools may be at.)

09) Once these 2 quests are done hearth (or go back) to Camp Winterhoof and turn them in and accept all new quests ... Accept "The Rune of Command" and "Demolishing Megalith"

10) "The Rune of Command" (Go back to Giant's Run, around 68.27 and use the Rune of Command quest item on a neutral Stone Giant, then kill Binder Murdis at 71.24)

11) "Demolishing Megalith" (Megalith is a Giant that roams around 68.13 up in the snowy hills, I was able to solo him at level 71, but had a bit of trouble, it would probably help to find someone to help you kill him)  (If you can't do it, you can skip it, there is no follow up quest, or you can go do it when you find a group).  TIP:  You can solo this much more effectively by using the Stone Giant Minion you can obtain with the Rune of Command quest item.

12) Once these 2 quests are done hearth (or go back) to Camp Winterhoof and turn them in.

Skorn

01) "Skorn Must Fall!" Go to Skorn at 44.26 and use the Winterhoof Emblem item to call out Winterhoof Brave, then turn this quest in and accept "Gruesome, But Necessary" "Burn Skorn, Burn!" and "Towers of Certain Doom"

02) Then do the following 3 quests at Skon:

03) "Gruesome, But Necessary" (Kill any of the Winterskorn in the area, then use your Machete quest item on them.)

04) "Burn Skorn, Burn!" Quest item used:  Brave's Torch.  See the locations of the places to burn below:

05) Northwest Longhouse: 43.28

06) Northeast Longhouse: 46.28

07) Barracks: 46.30

08) "Towers of Certain Doom" Quest item used:  Brave's Flare.  See the locations of the towers below:

09) Northwest Tower: 44.30

10) East Tower: 46.32

11) Southwest Tower: 43.36

12) Southeast Tower: 46.36

13) NOTE: While doing these quests, you will find an item that starts "Stop the Ascension!".  You can turn these quests in as you do them at Winterhoof Brave.  Once all 3 of those are turned in ... Accept "The Conqueror of Skorn!"

14) "Stop the Ascension!" (Use the scroll at the Pyre at 45.35 - top of the hill in Skorn, then kill Halfdan the Ice-Hearted)

15) Once that's all done hearth (or go back) to Camp Winterhoof and turn in all quests and accept all new ones: Turn in "The Conqueror of Skorn!" and "Stop the Ascension!" ... Accept "Dealing With Gjalerbron" "Find Sage Mistwalker" and "Of Keys and Cages"

Gjalerbron

01) "Of Keys and Cages" along with "Dealing With Gjalerbron" (These are done at Gjalerbron around 35.11)  (Watch out for the Elite Liches patrolling the area.)

02) NOTE: While doing these 2 quests you should find an item that starts "Gjalerbron Attack Plans"

03) Once that's all done hearth (or go back) to Camp Winterhoof and turn in all quests and accept all new ones: Turn in "Gjalerbron Attack Plans" "Dealing With Gjalerbron" and "Of Keys and Cages" ... Accept "The Frost Wyrm and its Master" "Necro Overlord Mezhen" "The Walking Dead" and "Sleeping Giants"

04) Go back to Gjalerbron and do the following 5 quests together [steps 5 - 9]:

05) "Sleeping Giants" (Done inside the cave at 34.13, kill the Necrolords for the item to wake up the dormant Vrykul).

06) "The Walking Dead" (Focus on doing these while you are also doing the others. The Fearsome Horrors are in the cave at 34.13)

07) "Necro Overlord Mezhen" (Mezhen is found at 38.12, and he drops an item which starts "The Slumbering King")

08) "The Slumbering King" (Kill the queen at 40.6)  [this starts in a quest item found in step #7]

09) "The Frost Wyrm and its Master" The Wyrmcaller Vile can be found at 36.7.  The Wyrmcaller's Horn can be looted from its corpse. Don't wait too long with calling down Glacion as the Wyrmcaller Vile respawns very fast and will add to the fight, See Video.

10) "The Walking Dead" (Make sure this quest is finished up)

11) Once that's all done hearth (or go back) to Camp Winterhoof and turn in ALL quests: "The Frost Wyrm and its Master" "Necro Overlord Mezhen" "The Slumbering King" "Sleeping Giants" and "The Walking Dead"

Steel Gate

01) Go to the Steel Gate (at 31.24) and turn in "Find Sage Mistwalker" ... Accept "The Artifacts of Steel Gate" and "The Rivenwood Captives"

02) "The Artifacts of Steel Gate" (The Artifacts are objects you pick up off the ground at the Steel Gate, around 30.27). Once done, go back and turn it in ... Accept "The Cleansing"

03) "The Rivenwood Captives" (Done just north around 31.19, This quest is just like the one in Outland at the Bone Wastes.)

04) Once "The Rivenwood Captives" is done go back (to 31.24) and turn in.

05) Hearth to Camp Winterhoof.

06) "The Cleansing" Need to go up to the very top of the hill, The path starts at 53.8, See Video for how to get up there and then do the quest.

07) Once that is done, go all the way back to the Steel Gate (at 31.24) and turn in "The Cleansing" ... Accept "In Worg's Clothing"

08) "In Worg's Clothing" Ulfang is in the cave at 29.5, put the Worg Disguise on once you get close to the cave, and turn this in ... Accept "Brother Betrayers"

09) "Brother Betrayers"  Here are the locations of these 2 mobs:

10) Bjomolf around: 26.20

11) Varg around: 35.31

TIP:  Here is a little trick you can use to target and find these mobs a bit quicker.  Once in the general area of these mobs, type these in chat:

/tar bjomolf

OR..

/tar varg

NOTE:  Doing this will target the mob for you.  If it doesn't target, that means the mob is not on your screen.

12) Once done, go back to the cave at 29.5 and turn in "Brother Betrayers" ... Accept "Eyes of the Eagle"

13) Next go to the Apothecary Camp (at 26.24) and turn in "Keeping Watch on the Interlopers" ... Accept "What's in That Brew?"

14) Also accept: "Brains! Brains! Brains!" and "And You Thought Murlocs Smelled Bad!"

15) Get FP there.

01) "Eyes of the Eagle" Go to 41.37 at the bottom of the waterfall and click the eggs, kill the eagle that comes out, loot the eyes.

02) "What's in That Brew?" along with "Brains! Brains! Brains!" (These are done at Whisper Gulch, an entrance to it is at 37.36)

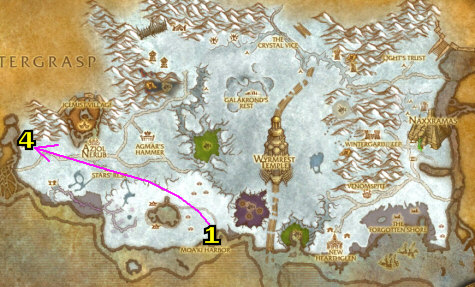
03) Once that is done, from Whisper Gulch just go down south to the coast and do:

04) "And You Thought Murlocs Smelled Bad!" (Done all along the shore, around 22.31)  NOTE: While doing this quest you will find an item that starts "It's a Scourge Device", if you did not find it keep grinding away at the undead along the shore until it does.

05) Go to the small island (at 19.22) and accept "Trident of the Son"

06) "Trident of the Son" (Rotgill is around 22.33)

07) Once done go back (to 19.22) and turn in"Trident of the Son".

08) Once all that is done, go up to the Apothecary Camp (at 26.24) and turn in all quests and accept "Bring Down Those Shields"

09) "Bring Down Those Shields" (Done back at the shore to the west).  Once done go back and turn it in.

10) Go to Ulfang's cave (at 29.5) and turn in "Eyes of the Eagle" ... Accept "Alpha Worg"

11) "Alpha Worg" (Garwal is almost straight south of the cave, near the spiders, around 26.13).  Once again, you can use the:  /tar garwal  trick.

12) Once "Alpha Worg" is done, go to the Steel Gate (at 31.24) and turn it in.

13) Go to Apothecary Camp (at 26.24) and fly to Kamagua.

14) Go to the docks and take the boat to Moa'ki Harbor.

Dragonblight

Moa'ki Harbor

01) Once at Moa'ki Harbor turn in "Travel to Moa'ki Harbor"

02) Accept only the quest "Your Presence is Required at Agmar's Hammer"

03) Get FP there.

Westwind Refugee Camp

04) Go all the way over to the Westwind Refugee Camp (at 14.49 in Dragonblight).

06) To continue on, please go to my Dragonblight guide...

To continue on with this guide, please go to my Dragonblight Guide!

You can check the bottom of my 1-60 guide for general tips/tricks on how to level faster, along with hunter specific tips/tricks.

COMING SOON:  Recorded 1-80 speed runs!

Want to leave testimonials about my guide?  You can do that on my MySpace Page through leaving a comment!  First you have to be my friend first, and please do so!

For screenshots and to get to know Joana/Mancow better you can visit this part of my site here!  And if you are interested in signing up for my newsletter, you can do so at this page here!

Help me improve this guide!

If you feel that some quests should contain additional information that would be helpful, or if you have any additions or find any errors in this guide, PLEASE contact me here, make sure you leave "Northrend Guide Improvements" in the subject line so it filters correctly into my inbox.   I appreciate any feedback to make this guide better!

MORE GUIDES:  To check out more World of Warcraft guides that are decent buys, you can check out Ultimate World Of Warcraft Guide for WotLK PvP strategies and tips and they also offer lots of guides for free lifetime membership updates,  Luke's Gold Guide, which is great if you need a gold guide, and also the Penn's Profession's Guide for in-depth overview of WoW professions, this guide can give you some more pointers on the classes and such.  And for a complete list of WoW products you can purchase, please check out my Premium Guide List out.