***Joana's 72-74 Dragonblight Guide***


Introduction:
Please 
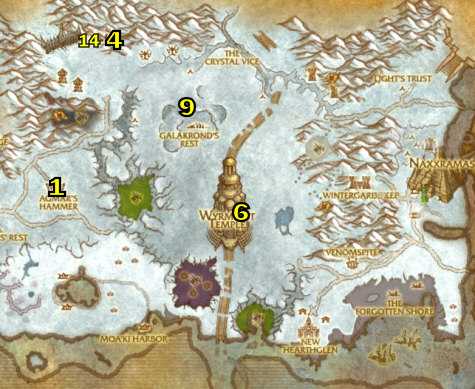
do not let the Scarlet Onslaught take over Northrend!  Hopefully my guide will help you stop that from happening!  Also watch out for the evil dragon base in the middle of the map.. Or wait.. my bad, I guess they are our friends!  Wow we got lucky there!  
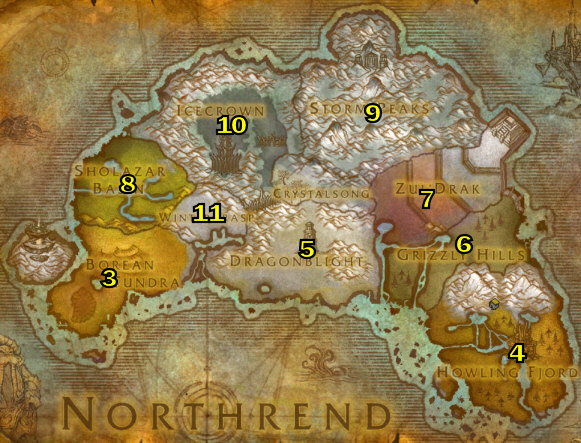
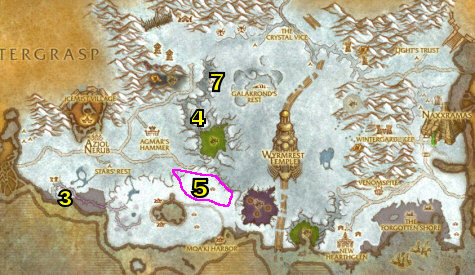
What is up with all of these dragon shrines in this zone?  BTW, 
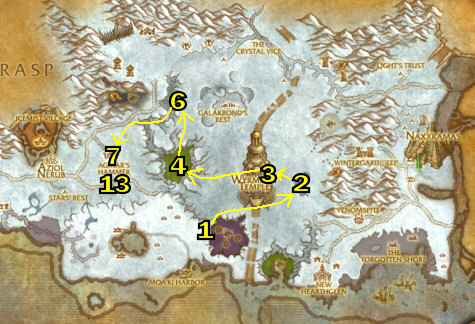
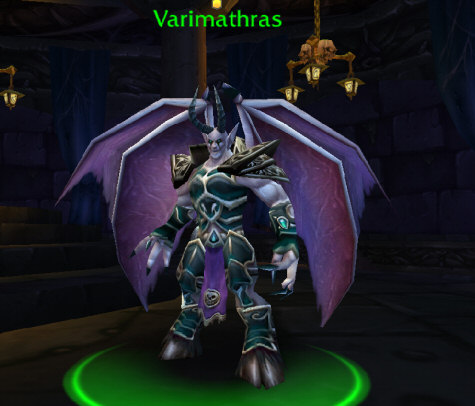
don't let Varimathras kill you!  Or Thrall for that matter!  See Reference Map.

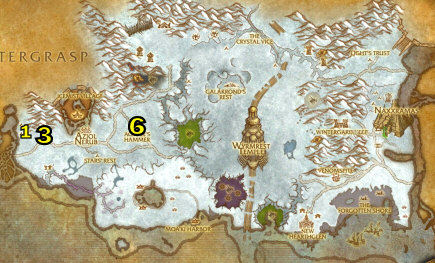
Interactive MAP MOD (MetaMap) Coordinates.

Go here to learn how to get map coordinates and Interactive Map Coordinates, which are very important to have when using my guide.


Help me improve this guide!

If you feel that some quests should contain additional information that would be helpful, or if you have any additions or find any errors in this guide, PLEASE contact me here, make sure you leave "Northrend Guide Improvements" in the subject line so it filters correctly into my inbox.   I appreciate any feedback to make this guide better!


If you have any general questions or comments on anything, you can contact me here:  joana@joanasworld.com  You can also visit my website:  WWW.JOANASWORLD.COM


World of Warcraft™
World of Warcraft and Blizzard Entertainment are trademarks or registered trademarks of Blizzard Entertainment, Inc. in the U.S. and/or other countries.


If you are interested in making money referring people to buy my guide, you can follow the instructions on THIS PAGE HERE about how to do this, generally with my affiliate program you earn 50% of all the profit if you refer somebody to my site with your affiliate link that buys my guide!  TALK ABOUT EASY MONEY!


Copyright 2008


LEGAL:  Do not distribute this product in any way shape or form.  Any theft or unauthorized reproduction of this Guide is prohibited. Violators will be prosecuted.  Special markers have been encrypted into this guide to identify the original buyer.  Be WARNED if you distribute this guide on the internet, I will know who it is.

PLEASE READ! (HOW TO USE THIS GUIDE):


08) "Quest Name"  (this quest has a yellow highlighted number)  Quests that have a yellow highlighted number simply means it is numbered on the map to the right.  This saves time because some quests are not numbered on the maps, so you know whether or not to look on the maps.


All quests and mobs through out my guide are linked to wowhead.  When following my guide, you can use these links for further information on the quests/mobs.


All video links are in RED.  You will need to download the Divx WebPlayer when prompted.  And you can double click on the videos when playing to make it full screen.


The checkboxes () next to each step are for your personal use only.  I have included them for each step incase you want to mark off which step in the guide you are at.  You do not have to use these if you don't want, I have included them since it was requested by a lot of people.


Guide Color Codes:
Accept a quest.
Go do a quest.
Turn in a quest.
General mob/item link.
Picture.
Video link.


- Download Printable Version of This Guide! -

Members Area Menu

01) Introduction

02) Here is the order where you will be leveling:

03) 70-72 Borean Tundra

           OR:

04) 70-72 Howling Fjord

05) 72-74 Dragonblight

06) 74-75 Grizzly Hills

07) 75-77 Zul'Drak

08) 77-78 Sholazar Basin

09) 78-79 Storm Peaks

10) 79-80 Icecrown


Other Guides:

11) PVP ZONE:  Wintergrasp

12) Joana's Death Knight Leveling & Strategy Guide

13) User Submitted Death Knight Guides


Main Members Area


Great WotLK Products:  WotLK Secrets Guide  -  70-80 Alliance Guide  -  Luke's Gold Guide

(Northrend Levels 70-80)

72-74 Dragonblight

Westwind Refugee Camp

01) If you are not at Westwind Refugee Camp, then go there (at 14.49)

02) Accept "Into the Fold" and "Pride of the Horde"

03) "Into the Fold" along with "Pride of the Horde" (These are done just south-east of Westwind Refugee Camp)

04) Once they are both done, go back and turn them in ... Accept "Blood Oath of the Horde"

05) "Blood Oath of the Horde" (Simply talk through 5 of the Taunka at the Westwind Refugee Camp). Once done, turn it in ... Accept "Agmar's Hammer"

06) "Agmar's Hammer" (Travel to Agmar's Hammer, at 36.47)

Agmar's Hammer

01) Turn in "Agmar's Hammer" and "Your Presence is Required at Agmar's Hammer" (ONLY if you have it)

02) Make Agmar's Hammer your new home.

03) Accept "Victory Nears..." "Rifle the Bodies" (WANTED POSTER: "Wanted: Dreadtalon" "Wanted: Gigantaur" and "Wanted: Magister Keldonus")

04) Accept "Message from the West" (by the mail box).  For this quest, right-click the brazier to burn the letter, then turn it in.

05) Turn in "Victory Nears..." (by the big bon fire in the middle of the town) ... Accept "From the Depths of Azjol-Nerub"

06) Accept all other quests there:  "Black Blood of Yogg-Saron" "Imbeciles Abound!" "Marked for Death: High Cultist Zangus" "Containing the Rot"

07) Get FP there.


WANTED GROUP QUESTS:

01) This section requires a group to do all the quests, you can come back to this section later if or when you find a group to do these. If you do not have group you can skip to the next section below for now.

02) If you can find a group you can do the 3 WANTED quests, here are the details:

03) GROUP: "Wanted: Magister Keldonus" (Magister Keldonus is at 21.64)

04) GROUP: "Wanted: Dreadtalon" (Dreadtalon flies up around the north of the Ruby Dragonshrine, around 45.44, you need to pull him down).

05) GROUP: "Wanted: Gigantaur" (Gigantaur roams around 45.61)

06) Once all 3 of these are done and turned in at Agmar's Hammer you get to accept "To Dragon's Fall"

07) "To Dragon's Fall" (Turn this in at 47.33) ... Accept "Sarathstra, Scourge of the North"

08) GROUP: "Sarathstra, Scourge of the North" (Talk to Rokhan to call down the dragon, then kill it).  Once done, turn it in.

West Dragonblight

01) Grind your way west to the Pit of Narjun (at 26.49) while working on "Containing the Rot" and then do the following 3 quests once you get there:

02) "Black Blood of Yogg-Saron"

03) "Marked for Death: High Cultist Zangus"

04) "From the Depths of Azjol-Nerub"

05) Make sure you accept the quest "An Enemy in Arthas" in the Pit of Narjun and then go do it  (This quest can be done right outside of the instance, but the other 2 quests you can accept from him are done in the instance, and can be done later with a full group).  Once "An Enemy in Arthas" is done go back and turn it in ... Accept "The Lost Empire"

06) "Containing the Rot" (Simply finish this quest up)

07) Once all that is done, go to Moonrest Gardens (at 24.60, watch out for the Alliance base 'Stars Rest') and accept "Avenge this Atrocity!"

08) "Rifle the Bodies" (You need to try and loot the Dead Mage Hunters until the Moonrest Garden Plans shows up).  NOTE: At the time of this writing if you are mounted while looting it will not work.

09) "Avenge this Atrocity!"  (Done around 26.64)

10) Then go turn in "Avenge this Atrocity!" (at 24.60) ... Accept "End Arcanimus"

11) "End Arcanimus" (Arcanimus is the big elemental down in the pit at 19.61).

12) Once "End Arcanimus" is done, go back and turn it in (at 24.60).

13) Hearth back to Agmar's Hammer.

14) Turn in all quests and accept all new ones: Turn in "Rifle the Bodies" "The Lost Empire" "From the Depths of Azjol-Nerub" "Black Blood of Yogg-Saron" "Containing the Rot" "Marked for Death: High Cultist Zangus" ... Accept "Prevent the Accord" "The Might of the Horde" "Scourge Armaments" "The Good Doctor..." "Strength of Icemist"

15) Turn in "The Good Doctor..." ... Accept "In Search of the Ruby Lilac"

Icemist Village

01) "The Might of the Horde" Go to Icemist Village (around 26.43) and use the Warsong Battle Standard item, clear an area first and then be careful because the banner goes down with only a few hits, See Video.

02) "Strength of Icemist" (Need to turn this down below in Icemist Village at 22.41) ... Accept "Chains of the Anub'ar"

03) "Chains of the Anub'ar" (Anok=down at 24.44, Tivax=in the hut at 26.38, Sinok=up at 26.44 or 23.44). Once it's done go back (down to 22.41) and turn it in ... Accept "Return of the High Chief"

04) "Return of the High Chief" (Click on the Anub'ar Mechanism at 25.40 to do this quest)

05) NOTE: You should find an item while doing these quests that starts "The Flesh-Bound Tome"

06) "Scourge Armaments" (This quest should be done by now, if it isn't then finish it now)

07) "Prevent the Accord" (Done at Moonrest Gardens, at 18.58).  NOTE: While doing this quest you will find an item that starts "A Strange Device"

Agmar's Hammer

08) Once all that is done hearth back to Agmar's Hammer (or just run there) and turn in all quests and accept new ones: Turn in "Return of the High Chief" "Prevent the Accord" "A Strange Device" "The Might of the Horde" "The Flesh-Bound Tome" "Scourge Armaments" ... Accept "All Hail Roanauk!" "Projections and Plans" "Attack by Air!" "Koltira and the Language of Death"

09) Turn in "Koltira and the Language of Death" ... Accept "In Service of Blood" "In Service of Frost" and "In Service of the Unholy"

10) Turn in "Attack by Air!" ... Accept "Blightbeasts be Damned!"

11) "All Hail Roanauk!"  Go to Roanauk Icemist in Agmar's Hammer (at 36.45) and talk to him to complete the quest. Then go back to Agmar to turn it in.

West Dragonblight

01) "Blightbeasts be Damned!" (Done at Icemist Village around 26.43, there is a lot of mobs for this quest around 25.47, See Video)

02) "Projections and Plans" (Go to Moonrest Gardens around 21.57 and use the Surge Needle Teleporter, then just walk around on that platform until the object gets observed).

03) Hearth back to Agmar's Hammer (or run back) and turn in "Blightbeasts be Damned!" and "Projections and Plans" ... Accept "The Focus on the Beach"

04) "The Focus on the Beach" (need to go to 26.64 and kill Captain Emmy Malin and then use the Ley Line Focus Control Ring on that purple arch, See Video).

05) Once that is done hearth (or go back) to Agmar's Hammer and turn it in ... Accept "Atop the Woodlands"

06) Also accept "Strengthen the Ancients" at Agmar's Hammer.

07) "Strengthen the Ancients" along with "Atop the Woodlands" (These are done at Lothalor Woodlands, you need to kill Lieutenant Ta'zinni and use his Ley Line Focus Control Amulet at the purple arch at 32.71, you will also get an item from the Lieutenant that starts "A Letter for Home")

08) Once those quests are done, hearth (or go back) to Agmar's Hammer and turn in "Strengthen the Ancients" "Atop the Woodlands" and "A Letter for Home" ... Accept "Search Indu'le Village"

Moa'ki Harbor

01) Go to Moa'ki Harbor (at 48.74) and turn in "Travel to Moa'ki Harbor" ... Accept "Let Nothing Go To Waste"

02) Make Moa'ki Harbor your new home.

03) Get FP there.

04) Also accept "Planning for the Future"

05) Go down in the water (at 47.79) and accept "Signs of Big Watery Trouble"

06) Turn in "Signs of Big Watery Trouble" ... Accept "The Bait"

07) "The Bait" (Need to go to the little island at 43.82 and kill Kili'ua).

08) Once that is done, go back (to 47.76) and turn it in ... Accept "Meat on the Hook"

09) "Meat on the Hook" (See Video, once done, turn it in).

10) "Let Nothing Go To Waste" along with "Planning for the Future"  (These are done just north in Snowfall Glade, at 45.61)

11) Once those 2 quests are done, go back to Moa'ki Harbor (48.74) and turn them in ... Accept "Slay Loguhn"

12) "Slay Loguhn" (Loguhn is at 46.59, make sure you remember to smear the blood on you that you get).

13) Once that is done, go back to Moa'ki Harbor (48.74) and turn it in.

14) Accept and do "Spiritual Insight" (right-click the Incense item you get).  Once it is over, turn it in ... Accept "Elder Mana'loa"

15) Accept and do "Tua'kea's Crab Traps" (The traps are underneath the water).  Once it's done, turn it in.

16) "Elder Mana'loa" Go to the Indu'le Village (at 36.65) and turn this in (at the big rock statue) ... Accept "Freedom for the Lingering"

17) "Search Indu'le Village" (Turn this in under the water at 40.66) ... Accept "The End of the Line"

18) "The End of the Line" Just do the first part to this quest for now: (Need to use the Ley Line Focus Control Talisman at the purple arch under the water right next to you).

19) "In Service of Blood" (You must use it on a Deranged Indu'le Villager once it's health gets below 35%)

20) "Freedom for the Lingering" Once it's done turn it in ... Accept "Conversing With the Depths"

21) "Conversing With the Depths" (You need to go on top of the island at 34.84 and click the Pearl of the Depths object there, then jump in the water when Oach'noa tells you to, See Video).

22) Once done Hearth to Moa'ki Harbor.

23) Turn in "Conversing With the Depths"

01) "The End of the Line" (Do the second part of this quest, you simply need to go to the western edge of the Azure Dragonshrine at 53.65 to get it 'observed').

02) "In Service of Frost" (Go to 67.53 to do this quest)

03) Go to Wyrmrest Temple (at 60.51) and get the FP there.

04) "In Search of the Ruby Lilac" (The Ruby Lilac is in the small cave at the Ruby Dragonshrine, at 47.49).  NOTE: Dahlia Suntouch in the cave drops an item that starts "The Fate of the Ruby Dragonshrine"

05) "In Service of the Unholy" (Duke Vallenhal patrols around the Ruby Dragonshrine, around 47.49, he is riding on a Death Knight's horse).

06) Go To Dragon's Fall (at 47.33) and accept "Pest Control"

07) Then go to Agmar's Hammer (TIP:  there is a shortcut at 41.38) and turn in "In Service of Blood" "In Service of Frost" and "In Service of the Unholy" ... Accept "The Power to Destroy"

08) "The Power to Destroy" (Kill the Shadowy Tormentors around Agmar's Hammer).  NOTE: To get out of the shadow world, just right-click on the 'World of Shadows' icon at the top of the screen.  Once this is done, turn it in ... Accept "The Translated Tome"

09) "The Translated Tome" (Turn this in to Captain Gort at Agmar's Hammer)

10) Turn in "In Search of the Ruby Lilac" ... Accept "Return to Soar"

11) Turn in "The End of the Line" ... Accept "Gaining an Audience"

12) Turn in "Return to Soar" ... Accept "Where the Wild Things Roam"

13) "Where the Wild Things Roam" (Throw the Pack of Vaccine at the Wildlife just around Agmar's Hammer, don't get to close to the bears since they are hostile, See Video).  Once it is done, turn it in.

14) Accept "The High Executor Needs You" (by the guy at the bon fire in the middle of Agmar's Hammer).

15) Fly to Wyrmrest Temple.

Fly to Wyrmrest

16) Make Wyrmrest Temple your new home.

17) Turn in "Gaining an Audience" ... Accept "Speak with your Ambassador"

18) "Speak with your Ambassador" (Turn this in right next to you) ... Accept "Report to the Ruby Dragonshrine"

19) Go to the top of the temple by talking to Tariolstrasz (the NPC you was just at in step #18).

20) Once up there turn in "The Fate of the Ruby Dragonshrine"

21) Accept all quests there: "Seeds of the Lashers" "Mystery of the Infinite" and "The Obsidian Dragonshrine"

22) "Pest Control" (These are done around certain spots around the Wyrmrest Temple, you should have no problems finding them).

23) Next go to Venomspite (at 76.62)..

Venomspite

01) Get FP there.

02) Make Venomspite your new home.

03) Turn in "The High Executor Needs You" ... Accept "To Conquest Hold, But Be Careful!" (Requires level 73 to accept it, which you should be by now, if not wait until you are lvl 73 and it will be available).

04) Turn in "Imbeciles Abound!" ... Accept "The Forsaken Blight and You: How Not to Die"

05) Accept and do "Blighted Last Rites" (the prisoner is in the cage right next to you). Once it's done, turn it in ... Accept "Let Them Not Rise!"

06) Accept all other quests in Venomspite: "Funding the War Effort" "Materiel Plunder" and (WANTED POSTER: "Wanted: The Scarlet Onslaught")

07) Go south a little bit (to Surveyor Hansen at 79.64) and accept "Beachfront Property"

08) "Beachfront Property" along with "Funding the War Effort" and "The Forsaken Blight and You: How Not to Die" (These are all done at The Forgotten Shore, around 81.69)

09) Once all three of those are done, go to Surveyor Hansen (at 79.64) and turn in "Beachfront Property"

10) Then go to Venomspite (76.62) and turn in "Funding the War Effort" and "The Forsaken Blight and You: How Not to Die" ... Accept "Emerald Dragon Tears"

Emerald Dragonshrine

01) Go to the Emerald Dragonshrine (at 63.73, but the entrance is at 69.64) and accept "Cycle of Life" (From Nishera the Garden Keeper).

02) "Cycle of Life" along with "Emerald Dragon Tears" and "Seeds of the Lashers" (All done in Emerald Dragonshrine)

03) Turn in "Cycle of Life" (Right there in Emerald Dragonshrine) ... Accept "The Plume of Alystros"

04) GROUP: If you can find a group, you can do: "The Plume of Alystros" Or you can come back later once you get a group. Once done, turn it in.

05) Hearth to Venomspite.

Venomspite

01) Turn in "Emerald Dragon Tears" ... Accept "Spread the Good Word"

02) "Let Them Not Rise!" along with "Materiel Plunder" and "Wanted: The Scarlet Onslaught" (These are all done at New Hearthglen, around 70.75)

03) Once those 3 quests are done, hearth (or go back) to Venomspite and turn them all in and accept all new quests: "Fresh Remounts" "Stealing from the Siegesmiths" and "No Mercy for the Captured"

04) "Spread the Good Word" (84.55 is where to go for this, simply lob the bombs at the undead with the Blight Spreader, See Video).

05) "Stealing from the Siegesmiths" (The Siegesmith Bombs are all around on the ground at The Carrion Fields, around 86.51)

06) Once those are done, hearth (or go back) to Venomspite and turn in "Stealing from the Siegesmiths" ... Accept "Bombard the Ballistae"

07) Turn in "Spread the Good Word" ... Accept "The Forsaken Blight"

08) Then go accept "A Means to an End" and "Need to Know"

New Hearthglen

01) Go do all of the following (steps 2 - 6) at New Hearthglen, in any order:

02) "Bombard the Ballistae"

03) "A Means to an End" (Release the termites in the lumbermill at 68.74, Foreman will spawn, kill him.)

04) "Need to Know" (Barracks: 69.71 See Pic, Abbey: 72.72 See Video, Beach: 71.80 See Pic).

05) "Fresh Remounts" (This is done at New Hearthglen, See Video for how one of them is done).  Once done, turn it in.

06) "No Mercy for the Captured" (These are all done at New Hearthglen, Schneider=71.72, Scrivener Barriga=69.73, Burke=72.74, Amai=72.72).

07) Once all that is done hearth (or go back) to Venomspite and turn in ALL quests ... Accept "Torture the Torturer" "Fire Upon the Waters" and "The Spy in New Hearthglen"

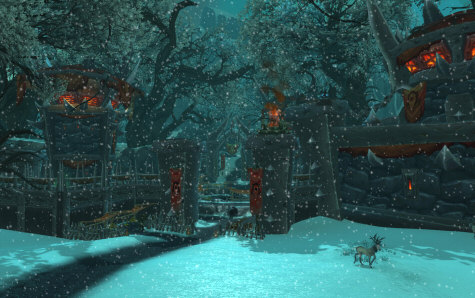
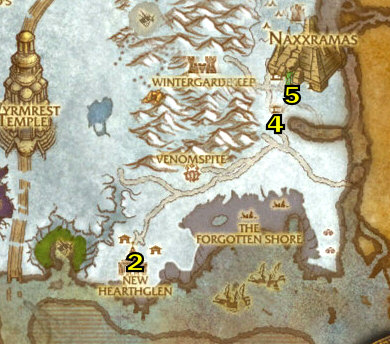
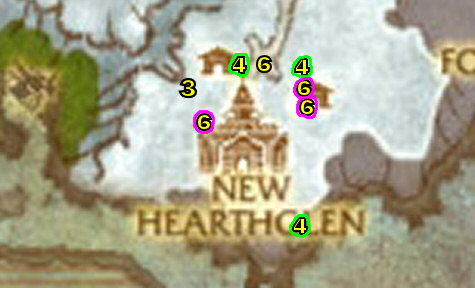
01) Go back to New Hearthglen and do the following:

02) "Torture the Torturer" (The barracks is at 69.71, and you need to go in the basement of the barracks, remember to use the Branding Iron rod on him).  After killing Torturer LeCraft, he will drop an item that starts "The Rod of Compulsion"

03) "The Spy in New Hearthglen" (Turn this in at 73.73 Behind the Abbey, not inside of it) ... Accept "Without a Prayer"

04) "Fire Upon the Waters" (This is done at the boat at the docks at 71.83, See Video)

05) "Without a Prayer" (Need to go to the small chapel at 69.76 and kill the named mob that is in there for the book).

06) Go turn in "Without a Prayer" (Turn this in at 73.73 Behind the Abbey) ... Accept "The Perfect Dissemblance"

07) "The Perfect Dissemblance" (Simply go use the Banshee's Magic Mirror on an Onslaught Raven Priest to get the disguise).

08) Then go back and turn in "The Perfect Dissemblance" (Turn this in at 73.73 Behind the Abbey) ... Accept "A Fall From Grace"

09) "A Fall From Grace" (Read quest description to see what you have to do, See Video).  NOTE:  Make sure you have your disguise on while doing this quest.

10) Then go back and turn in "A Fall From Grace" (Turn this in at 73.73 Behind the Abbey) ... Accept "The Truth Will Out"

11) "The Truth Will Out" (The Diary is upstairs in the house at 68.76)

12) Once done, hearth (or go back) to Venomspite and turn it in ALL quests ... Accept "Do Unto Others" and "The Denouncement"

13) "The Denouncement" (Jordan=upstairs in the barracks at 69.71,  Zierhut=72.77, Goodman=70.70,  Mercer=67.75).

14) GROUP: If you can find a group you can do "Do Unto Others" (This is done in the big cathedral, at 70.76, the High General is located back inside the cathedral.  She has a lvl 80 right next to her but he doesn't attack).  If you can't find a group you can skip it, or try again later, there is not follow up quest.

15) Once done hearth (or go back) to Venomspite and turn in "The Denouncement" and "Do Unto Others" (if you did it).

Ruby Dragonshrine

12) Fly to Wyrmrest Temple.

13) Make Wyrmrest Temple your new home.

14) Go to the top of Wyrmrest Temple and turn in "Seeds of the Lashers" ... Accept "That Which Creates Can Also Destroy"

15) Fly to Agmar's Hammer.

16) "Report to the Ruby Dragonshrine" (Turn this in at 42.50) ... Accept "Heated Battle"

17) "Heated Battle" (Done right in front of you).  Once done, turn it in ... Accept "Return to the Earth"

18) "Return to the Earth" (The quest objective is self explanatory; you don't have to go through the southern path, just bypass the aboms you'll be fine).  Once done, go back (to 42.50) and turn it in ... Accept "Through Fields of Flame"

19) "Through Fields of Flame" (The source of the corruption is inside the small cave (at 47.49), you need to kill Dahlia Suntouch).

20) Once that is done, go back (to 42.50) and turn it in ... Accept "The Steward of Wyrmrest Temple"

21) Go To Dragon's Fall (at 47.33) and turn in "Pest Control" ... Accept "Canyon Chase"

22) "Canyon Chase" (Just follow the snobolds and then kill Icefist when you see him, See Video).  Icefist should also drop an item which starts "Disturbing Implications".  Once done, go back and turn it in.
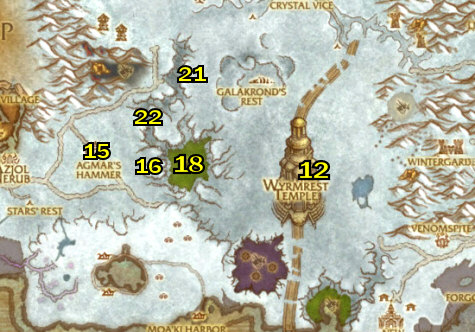
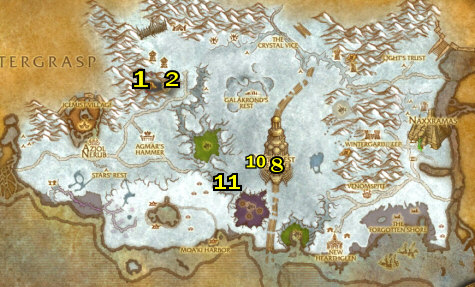
Nozzlerest Post

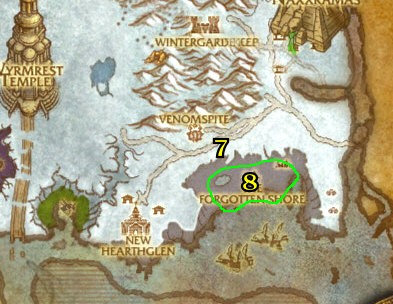
01) Go to The Dragon Wastes (at 48.24) and accept "Return to Sender"

02) Then go to Nozzlerest Post (at 54.23) and turn in "Return to Sender" ... Accept "Stocking Up"

03) Accept all other quests there: "Shaved Ice" and "Nozzlerust Defense"

04) "That Which Creates Can Also Destroy" (Just do the Reanimated Frost Wyrm, which are flying up in the air, remember to use the 'Seed' item to bring it down and weaken it).

05) "Shaved Ice" (The Ice Elementals are around 54.19).  Once done, go back (to 54.23) and turn it in ... Accept "Soft Packaging"

06) "Soft Packaging" (Done just west)

07) "Nozzlerust Defense" along with "Stocking Up" (Done at all the little 'dig sites' around the dragon wastes, there is one at 56.27 and 58.32, and more when you keep looking around).

08) Once those are done, go back to Nozzlerest Post (54.23) and turn them all in ... Accept "Something That Doesn't Melt" and "Hard to Swallow"

09) "Hard to Swallow" (Need to throw the Explosives into a Hulking Jormungar, just west when it opens it's mouth, See Video).

10) "Something That Doesn't Melt" (Look around the huge dragon bones all around 60.26 for the bone chunks).

11) Once those two are done, go back to Nozzlerest Post and turn them in ... Accept "Lumber Hack" and "Harp on This!"

12) "Lumber Hack" and "Harp on This!" (These are done up north around 49.19, use the shredder to do everything, and look for the signs on the trees to gather the lumber, and the elite mob may be wondering around at 45.12).

13) Once those two quests are done, go back to Nozzlerest Post (54.23) and turn them in ... Accept "Stiff Negotiations"

The Crystal Vice

01) "Stiff Negotiations" (Need to turn this in at The Crystal Vice, at 59.18) ... Accept "Slim Pickings"

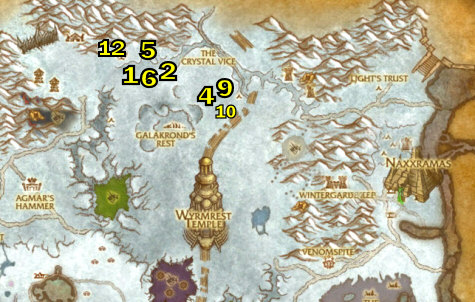
02) "Slim Pickings" (You must loot the big rock giant corpse in the cave at 56.11).

03) Once that is done, go back (to Crystal Vice, at 59.18) and turn it in ... Accept "Messy Business" and "Stomping Grounds" (at the big giant)

04) "Messy Business" (Use the scraper item once the Jormungar spit on you) along with "Stomping Grounds" (There is a lot of feeders in the cave north).

05) Once they are both done go back and turn them in ... Accept "Apply This Twice A Day"

06) Turn in "Apply This Twice A Day" (at the Giant) ... Accept "Really Big Worm" (at the Giant) and "Worm Wrangler" (at Zort)

07) "Worm Wrangler"

08) GROUP: If you can find a group, you can do "Really Big Worm" (Rattlebore is at the very end of the cave).

09) Once those are done go back and turn them in (If you did the group quest as well).

10) Go to Kor'fron Vanguard (at 43.16) and get the FP there.

Obsidian Dragonshrine

01) "The Obsidian Dragonshrine" (Turn this in, inside the cave at 35.30) ... Accept "No One to Save You" and "No Place to Run"

02) Grind your way outside of the cave (to 41.31) and do "No Place to Run" (See Video)

03) "No One to Save You" (Finish this quest up)

04) Once those two quests are done, go back inside the cave (at 35.30) and turn them in ... Accept "The Best of Intentions"

05) "The Best of Intentions" (Need to go into the furthest point in the cave, See Pic).  Once done, go back and turn it in ... Accept "Culling the Damned" and "Defiling the Defilers"

06) "Culling the Damned" along with "Defiling the Defilers".  Once they are done, go back and turn them in ... Accept "Neltharion's Flame"

07) "Neltharion's Flame" (Done at the furthest point in the cave, See Video).  Once done, go back and turn it in ... Accept "Tales of Destruction"

08) Hearth to Wyrmrest Temple.

09) Go to the lowest part of the Temple and turn in "Disturbing Implications" ... Accept "One of a Kind"

10) And still at the lowest part of the Temple (outside on the west side) turn in "The Steward of Wyrmrest Temple" ... Accept "Informing the Queen"

11) "One of a Kind" (Bonesunder is around 51.61, and it can be soloable, but be prepared)!  Once done, go back and turn it in ... Accept "Mighty Magnataur"

Mighty Magnataur  (GROUP)

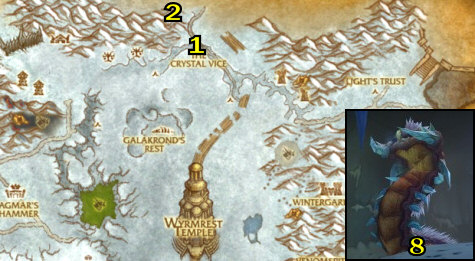
01) GROUP:  "Mighty Magnataur" You will most likely need someone else to help you on some of these mobs (especially Bloodfeast, and Iceshatter), as they are not easy.  They all have special quirks that make them very difficult if not kept in check.  If you can't find someone to help you with these mobs, you can just skip it and go to the 'Light's Trust' section below.  Here are the mobs:

02) (Bloodfeast ELITE, at 66.69) will periodically turn invincible and summon around 5 bloodworms. They die in several hits, but if not killed quickly, Bloodgore will heal himself back up to full.

03) (Iceshatter ELITE, at 67.50) periodically casts an aura that rapidly increases melee and casting time. Somewhere around 30% increase a stack, and VERY quickly stacking up. Can be stunned, bashed, pummeled, ect. to stop. If you don't stop it, you'll quickly find yourself taking forever and a day to attack.

04) (Drakegore at 67.40) is the easiest. He has an aura that does around 300 fire damage to anyone within 5 yards of him whenever he's hit with a melee attack. Just quickly kill him and the damage will be negligible.

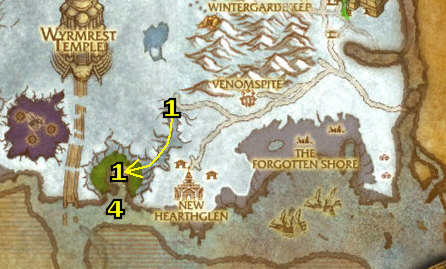
05) Once the 3 mobs are dead, go back to to the lowest part of the Wyrmrest Temple and turn in "Mighty Magnataur" ... Accept "Reclusive Runemaster"

06) GROUP: If you can find a group you can do "Reclusive Runemaster" (Dregmar Runebrand is at 72.49, he is a lvl 74 Elite) You only need to get his health down to about 20% to complete this quest.  If you did it, go back and turn it in ... Accept "Wanton Warlord"

07) GROUP: If you can find a group you can do "Wanton Warlord" (You need to blow the horn at 57.76 and kill Grom'thar). Once done, turn it in.

Light's Trust

01) "Mystery of the Infinite" (Go to the Bronze Dragonshrine, at 72.39 and use the Hourglass of Eternity quest item).

02) Go to Light's Trust at 83.26 and accept "The Cleansing Of Jintha'kalar"

03) "The Cleansing Of Jintha'kalar" (The mobs for this quest are right to your east, around 86.24)

04) "That Which Creates Can Also Destroy" (Just do Overseer Deathgaze, he is at 89.19, See Pic, remember to throw the seeds at him to weaken him).

05) Once those 2 are done, go back to Light's Trust (at 83.26) and turn in "The Cleansing Of Jintha'kalar" ... Accept "Into the Breach"

06) "That Which Creates Can Also Destroy" (Just do Turgid the Vile, he is in the Barracks at 85.47, remember to throw the seeds at him to weaken him, See Video).

07) Once done, hearth to Wyrmrest Temple.

Wyrmrest Temple

01) Next fly to Agmar's Hammer.

02) Turn in "The Forsaken Blight"

03) Accept "The Kor'kron Vanguard!" (At Agmar, in Agmar's Hammer)

04) Fly to kor'koron Vanguard, in Dragonblight.

05) Once there turn in "The Kor'kron Vanguard!" ... Accept "Audience With The Dragon Queen"

06) Then fly to Wyrmrest Temple.

07) Next go to the top of Wyrmrest Temple and turn in all quests and accept all new ones:  Turn in "Tales of Destruction" "Mystery of the Infinite" "That Which Creates Can Also Destroy" "Informing the Queen" and "Audience With The Dragon Queen" ... Accept "Report to Lord Afrasastrasz" and "Galakrond and the Scourge"

08) "Galakrond and the Scourge" (Turn this in at the big dragon right there.) ... Accept "On Ruby Wings"

09) "On Ruby Wings" (Use the Ruby Beacon quest item right there to get your dragon, then fly to do this at around 54.35)  You must kill Thiassi the Lightning Bringer (He is on top of the mountain at 54.31) in order to summon Grand Necrolord Antiok who drops the Scythe of Antiok.

10) Once that is done, go back to the top of the temple and turn in "On Ruby Wings" ... Accept "Return To Angrathar"

11) "Report to Lord Afrasastrasz" (Lord Afrasastrasz is in the middle of the temple).  Once there turn it in ... Accept "Defending Wyrmrest Temple"

12) "Defending Wyrmrest Temple" This is a daily quest.  You get to fly a dragon around and kill other dragons around the Temple, See Video for how to Destabilize the Azure Dragonshrine.  NOTE: If you do this quest within 2 minutes, you get an achievement).  Once done, go back to the middle of the temple and turn it in.

13) Then fly to kor'koron Vanguard, in Dragonblight.

14) Once there turn in "Return To Angrathar"  (then have fun watching the 5 minute cinematic video!)

The Battle For The Undercity

NOTE: this quest chain takes about a WHOLE HOUR to do, and you only get 70k XP for all of it.  If you are speed running I would consider skipping this quest chain, although it is a pretty cool epic quest line, if you are in no hurry I'd definitely do it.  In the end you get a very good quest reward called Medallion of Heroism, and the whole thing can be soloed.  The XP amount may change in the future so I will keep an eye on this.

01) Go accept "Darkness Stirs"  (The big orange dragon in front of you, 38.19)

02) "Darkness Stirs" (Armor is on the ground in front of Alexstrasza, a bit hard to see but it's there).

03) Go turn in "Darkness Stirs" (By flying to Warsong hold) ... Accept "Herald of War"

04) "Herald of War" Go to Orgrimmar (use the portal to orgrimmar that spawns), go to Thrall (33.37 in Orgrimmar) and turn this in ... Accept "A Life Without Regret"

05) "A Life Without Regret" (use the portal to the Undercity that spawns). Once through turn this in at the troll there ... Accept "The Battle For The Undercity"

06) "The Battle For The Undercity" This quest starts every 15 minutes or so, so you may have to wait a while before you can start it. You should see a counter at the top of the screen, It will let you know when the next battle begins. This quest takes a LONG time to do. You will do extra damage and get healed continuously throughout the battle. Once it is finally over, turn it in at Thrall.

07) When it teleports you back to Orgrimmar, now would be a good time to get new spells/abilities for your class.

08) Once done, hearth to Wyrmrest Temple.
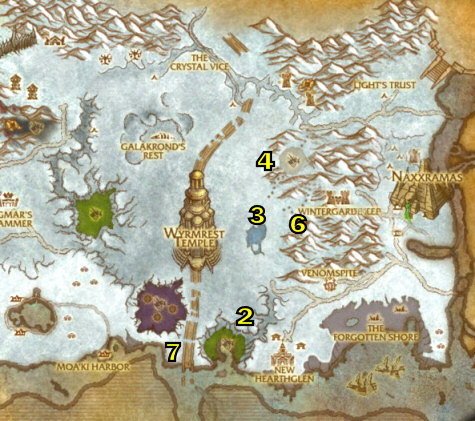
Grizzly Hills

01) Then fly to Venomspite.

02) Go east into the Grizzly Hills..

03) Go to Conquest Hold (at 21.64 in Grizzly Hills).

04) Then to continue on, please go to my Grizzly Hills Guide...

To continue on with this guide, please go to my Grizzly Hills Guide!

You can check the bottom of my 1-60 guide for general tips/tricks on how to level faster, along with hunter specific tips/tricks.

COMING SOON:  Recorded 1-80 speed runs!

Want to leave testimonials about my guide?  You can do that on my MySpace Page through leaving a comment!  First you have to be my friend first, and please do so!

For screenshots and to get to know Joana/Mancow better you can visit this part of my site here!  And if you are interested in signing up for my newsletter, you can do so at this page here!

Help me improve this guide!

If you feel that some quests should contain additional information that would be helpful, or if you have any additions or find any errors in this guide, PLEASE contact me here, make sure you leave "Northrend Guide Improvements" in the subject line so it filters correctly into my inbox.   I appreciate any feedback to make this guide better!

MORE GUIDES:  To check out more World of Warcraft guides that are decent buys, you can check out Ultimate World Of Warcraft Guide for WotLK PvP strategies and tips and they also offer lots of guides for free lifetime membership updates,  Luke's Gold Guide, which is great if you need a gold guide, and also the Penn's Profession's Guide for in-depth overview of WoW professions, this guide can give you some more pointers on the classes and such.  And for a complete list of WoW products you can purchase, please check out my Premium Guide List out.