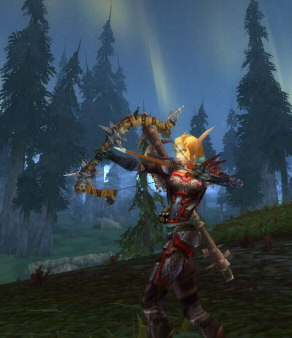
Introduction: This
zone was my favorite as far as "theme" is concerned! I love the
view in this zone. Not much else to say about this zone except
watch out for all the PVP quests! Does Arugal make a return
here? Oh yeah and the log ride was pretty cool! See Reference Map.
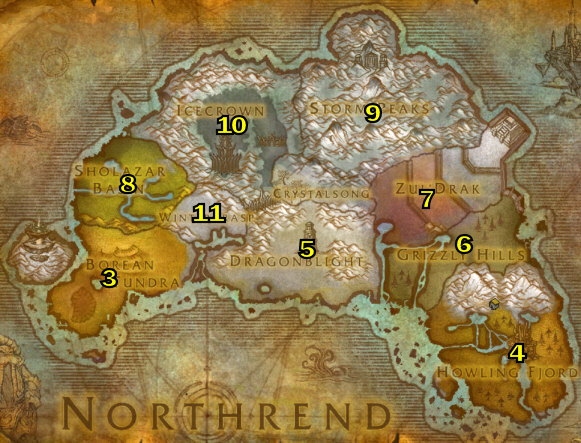
Interactive MAP MOD (MetaMap) Coordinates.
Go here to learn how to get map coordinates and Interactive Map Coordinates, which are very important to have when using my guide.
Help me improve this guide!
If
you feel that some quests should contain additional information that
would be helpful, or if you have any additions or find any errors in
this guide, PLEASE contact me here, make sure you leave "Northrend Guide Improvements" in the subject line so it filters correctly into my inbox. I appreciate any feedback to make this guide better!
World of Warcraft™ World
of Warcraft and Blizzard Entertainment are trademarks or registered
trademarks of Blizzard Entertainment, Inc. in the U.S. and/or other
countries.
If you are interested in making money referring people to buy my guide, you can follow the instructions on THIS PAGE HERE
about how to do this, generally with my affiliate program you earn 50%
of all the profit if you refer somebody to my site with your affiliate
link that buys my guide! TALK ABOUT EASY MONEY!
LEGAL:
Do not distribute this product in any way shape or form. Any
theft or unauthorized reproduction of this Guide is prohibited.
Violators will be prosecuted. Special markers have been encrypted
into this guide to identify the original buyer. Be WARNED if you
distribute this guide on the internet, I will know who it is.
PLEASE READ! (HOW TO USE THIS GUIDE):
08)"Quest Name" (this quest has a yellow highlighted number) Quests
that have a yellow highlighted number simply means it is numbered on
the map to the right. This saves time because some quests are not
numbered on the maps, so you know whether or not to look on the maps.
All
quests and mobs through out my guide are linked to wowhead. When
following my guide, you can use these links for further information on
the quests/mobs.
All video links are in RED.
You will need to download the Divx WebPlayer when prompted. And
you can double click on the videos when playing to make it full screen.
The checkboxes ()
next to each step are for your personal use only. I have included
them for each step incase you want to mark off which step in the guide
you are at. You do not have to use these if you don't want, I
have included them since it was requested by a lot of people.
Guide Color Codes: Accept a quest. Go do a quest. Turn in a quest. General mob/item link. Picture. Video link.
-COMING SOON- Download Printable Version of This Guide! -COMING SOON-
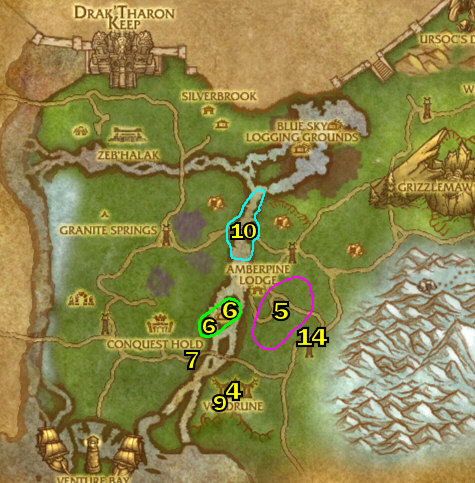
01) If you are not at Conquest Hold, go there (at 21.64).
02) Get FP (Flight Path) there.
03) Make Conquest Hold your new home.
04) Accept "The Magical Kingdom of Dalaran"
(In the Inn, from the blood elf). (NOTE: This quest requires you
to be level 74 to accept, and this quest takes you to the City of
Dalaran, the major city of Northrend).
07) "Learning to Leave and Return: the Magical Way"
(Simply use the crystal in front of you to go down to Crystalsong
Forest, and then use it again to go back). Once done, turn it in.
08)
At this level there is no quests to get in Dalaran, so just get the
Flight Path (at 72.45 in Dalaran) and hearth back to Conquest Hold (if
hearthstone is still on a cooldown, just fly back). If you are
bored feel free to walk around the town!
06) "Blackriver Brawl"
(This is a PVP Daily quest that is accepted at 26.65, this quest is
quick and easy and is done around 28.62). Once it is done turn it
in.
09) "The Thane of Voldrune" Need to mount the dragon in Voldrune (at 27.78) then kill Thane
(who is up at 27.73). To beat him, get close and keep using all 3
abilities non-stop, as soon as the cooldown is done for each press them
again, if he shoots his attack that rains down blue stuff move out of
the way a bit. See Video.
10) "A Minor Substitution" (The place I recommend to go kill the Grizzly Bears is all up and down along the river around 29.54 in the water).
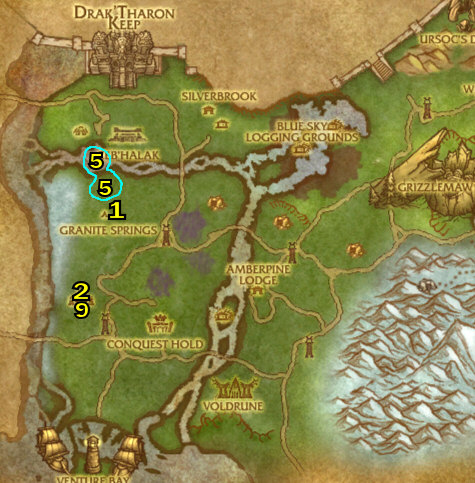
18) NOTE: "Good Troll Hunting"
This is a PVP quest, and at the time of this writing I have no idea
why. You don't have to accept it if you don't want. If you
are on a PVP server accept it.
02)"Vial of Visions"
(Talk to the female troll standing a couple of yards away to buy the
imbued vials, then head due north towards the lake (at 14.40), on the
way stop to collect 3x Haze Leaf, once you hit the lake just loot the Waterweed Frond down in the lake). Once done, go back (to 9.17) and turn it in ... Accept "Subject to Interpretation".
Also if you are having trouble with the steps in this guide, that is
because you are not using a genuine copy of the guide. The full
version can be purchased at "joanas world com"
03) Once done, go back to Granite Springs (at 16.47) and turn in "Filling the Cages" ... Accept "Truce?" (from the troll in the cage).
04) "Truce?"
(Just right-click the dagger in the tree stump next to the cage, then
'use' it to cut your hand, then talk to the caged troll, then turn it
in). ... Accept "Vial of Visions"
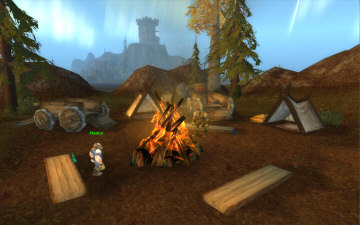
05) "Filling the Cages" Talk to Budd in the tent, then go to the troll village (at 43.10), then talk to Budd to trap a troll, then cage it, See Video.
NOTE: As in the beta you must not engage the troll you wish to trap.
Tell Budd to hit him when you're about 20 yards away from the target.
If you screw up, you have to run all the way back to the camp to pick
up the retard again.
07) "Scourgekabob" (Just pick up a mummified troll, walk over to where Radiosity is by the fire and right-click it in your inventory). Turn it in right there at Mack Fearsen ... Accept "Seared Scourge"
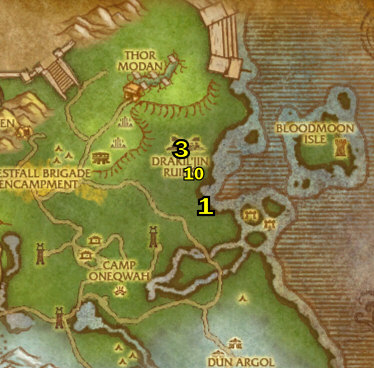
09)Go do the follow next 2 steps together (steps 10 - 11) at the Ruins of Drak'Zin, around 13.20:
10) "Subject to Interpretation"
(Kill the bears there until you get 5 mojo, then use Drakuru's Elixir
at the Brazier in the middle of the Ruins (at 13.60), you cant miss it,
go up the steps you can see the fire). Turn it in right there ...
Accept "Sacrifices Must be Made"
11) "Shimmercap Stew" Get the Ice Mucus Eyes from the Ice Serpents around the troll village, we will get the Sweetroots and Snowcaps later.
12) "Shimmercap Stew" Get the Shimmering Snowcaps at around 11.55 in the lake. NOTE: You will get the Sweetroots later on along with the blueberries.
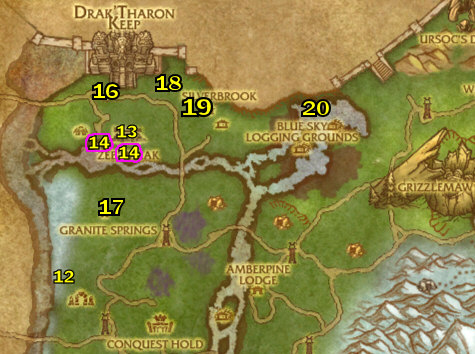
13) Go up north to Zeb'Halak (Around 11.31)..
14) "Shimmercap Stew" (Pick up the Sweetroots around there) along with "Sacrifices Must be Made" (The Eye of the Prophets is at the top of the temple there, and is looted from the statue. Zim'bo spawns at 2 locations at the Ruins, one at 14.38, and another at 17.39, and the Brazier is at the top of the temple).
20) "Heart of the Ancients"
NOTE: before doing this quest, you may want to accept the quests in the
next section first. The goblin corpse is up at the very top of
the structure at 32.32, in that little room. Turn it in ...
Accept "My Heart is in Your Hands"
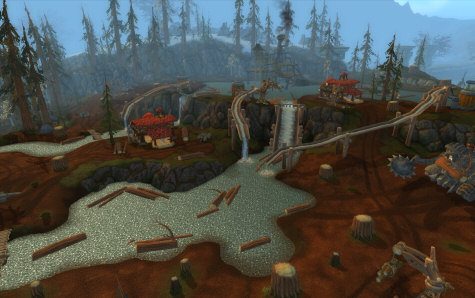
Blue Sky Logging Grounds (PVP)
01)
The following are all PVP Daily quests that are accepted (at 34.32) and
done for XP. If you are on a PVP server, I say just do them. It's up to
you if you want to do it on a PVE server. I say just do them on a PVE
server anyway, as long as you feel you can get away without getting
ganked/killed, try to group up with some one, they're fun. Once they
get done, turn them in. Also all of these are Daily quests which can be
done once per day.
02) NOTE: The quest descriptions are self-explanatory on them:
07) NOTE: There is an NPC there called Darrok
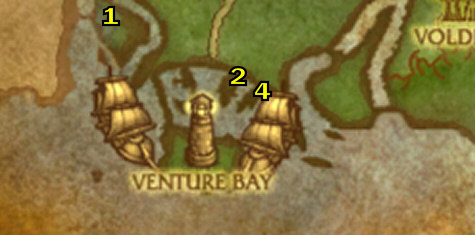
(at 14.38) who can send you on a journey to Venture Bay, which is
another PVP quest hub, located south-west at 19.16. If you are in
the mood for more PVP, then you can have him take you there, if not,
then skip to the 'Northern Grizzly Hills' section.
Venture Bay (PVP)
01) Same thing as above, the following are all PVP Daily quests that you can do for XP (at 17.70):
02) "Seeking Solvent" (The Element is found inside the hut at 16.20, See Pic). Turning this quest in lets you accept "Always Seeking Solvent" (You only get Venture Coins as your quest reward for this, no XP)
03) "Smoke 'Em Out" (A trick I do for this is gather a whole bunch together, then throw the bomb).
04) "Crush Captain Brightwater!" (The captain is located on the boat at 17.22, He is an 81 elite, but somewhat easy to solo).
05)"Chill Out, Mon"
The chest is right there in front of you where you are at, but you need
to be alive in order to kill the trolls for the Spirit Particles, so
talk to the NPC who gave you this quest to return to the living, then
use the quest item on the neutral trolls in the crypt, then pick up the
remains.
07)There is an escort quest that starts down in the crypt called "Dun-da-Dun-tah!"
Go ahead and do that after you get all the jars and the tablet.
Be careful though you will have to fight an elite mob, it's tough, but
it can be soloed though, try to get someone else to help if you can.
08) NOTE: The "Nice to Meat You" quest has you kill Duskhowl Prowlers, which are immediately right around the Ruins and the Longhoof Grazers
are further out from the Ruins). Don't intentionally work on this
quest right now, but if you come across these mobs feel free to kill
them for this quest, we will focus on finishing this quest up later on
(at the 'Eastwind Shore' section below).
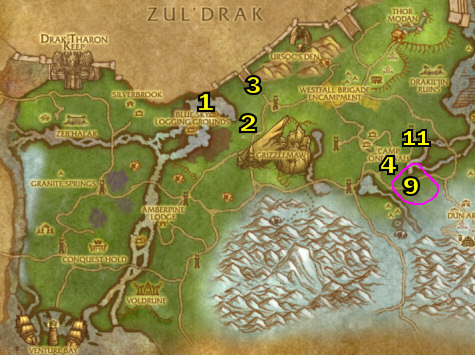
09) Once all those are done go back to Harkor's Camp (at 13.34) and turn in all finished quests ... Accept "Drak'aguul's Mallet"
11) "See You on the Other Side"
Use the gongs in the middle of the Ruins, then you die, then walk into
the crypt and turn this in (at 69.19), If you are confused then see
this See Video. ... Accept "Chill Out, Mon"
12)"Voices From the Dust" (The Tablet is in the underground passages on the north-west end at 69.19, See Pic) (The Brazier is outside at 71.26). Turn this in there at the Brazier ... NOTE: "Cleansing Drak'Tharon" is a Dungeon quest done in Drak'Tharon and can be done later with a full group.
13) Once done go back to Harkor's Camp (at 73.84) and turn it in ... Accept "Jin'arrak's End"
14) "Jin'arrak's End" (First you need to pick up the fruit basket in the crypt (at 11.19) See Video, then use the Spirit Dust quest item, then use the 'Infused Drakkari Offering' outside at the gongs).
15) Once done go back to Harkor's Camp (73.84) and turn it in.
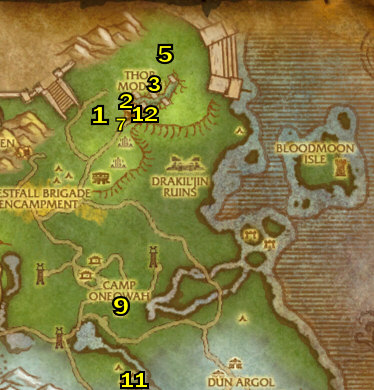
03) "Raining Down Destruction" (This is done up north a bit around 68.14, find the boulders in the area then throw it down onto the dwarves in the pit, See Video to see how one is done).
04) Once that is done, go back (at the top of the hill, 65.17) and turn it in ... Accept "Rallying the Troops"
05) "Rallying the Troops"
(Have to use the given quest item on the giants currently fighting
around 68.10, then kill the dwarf that comes out). Also if you
are having trouble with the steps in this guide, that is because you
are not using a genuine copy of the guide. The full version can
be purchased at joanasworld.com
06) Once that is done, go back (at the top of the hill, 65.17) and turn it in ... Accept "Into the Breach"
07) Go to the little journal on the ground (at 64.19) and accept "The Damaged Journal"
08)"The Runic Prophecies" (The Prophecies are along either side of the walls, and appear to be like doors).
09) Once done Hearth (or go back) to Camp Oneqwah.
10) Once that is done go back to Camp Oneqwah (at 65.47) and turn it in ... Accept "Pounding the Iron" and "The Runic Prophecies" (this one takes a few seconds for you to be able to accept it).
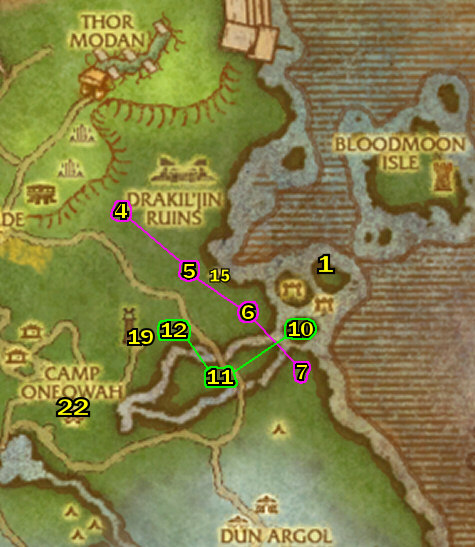
12) Go back to Thor Modan and do the following 3 quests together inside Thor Modan: (The entrance is at 15.19, See Video)
02) "A Bear of an Appetite" (Look for the Schools of Northern Salmon along the eastern coast then use the net on them).
03) "Runes of Compulsion"
(At each spot [steps 4 - 7 listed below] you have to kill all of the
rune-weavers to get the named mob to appear). NOTE: I recommend
starting at Durval then work your way down the shore to do the others
(or vice versa).
14) "Free At Last" (The Runed Giants
are all along the Eastwind Shore, note that Gavrock's Runebreaker item
only works about 25% of the time). While doing this quest work on
finishing "Nice to Meat You" (Kill Duskhowl Prowlers and Longhoof Grazers for the items, they are found all around the Eastwind Shore).
15) Once done go to Harkor's Camp (at 73.34) and turn in "Nice to Meat You"
22) Once done Hearth (or go back) to Camp Oneqwah.
23)Once done, go back to Gavrock, (at 19.33) and turn it in ... Accept "Free At Last"
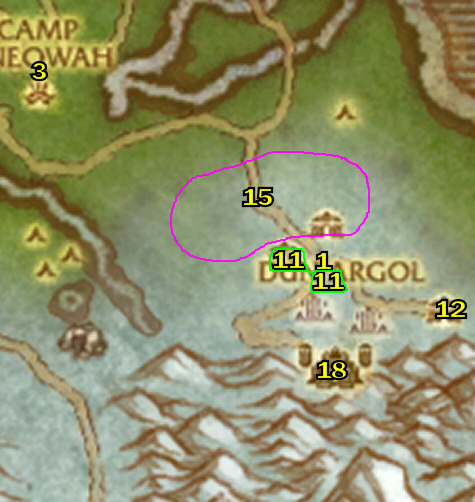
Dun Argol
01) "An Intriguing Plan" (This is done Dun Argol, around 16.59). You need to find 3 pieces to the Blueprint that randomly drop from the Iron Rune-Smiths there).
18) "Bringing Down the Iron Thane"
(This is done down in the building at 76.64, you need to use your Golem
to zap the Elite Golem to stun him, then kill Thane with your golem, See Video).
19) Once done Hearth (or go back) to Camp Oneqwah.
01)
The following quests are done right at Conquest Hold in the Pit there.
This is just like the quest chain that is found at The Ring of Blood in
Nagrand (In Outland) that has you kill 6 elites with a group. And just
like the one in Nagrand you can rack up a lot of quick XP, but you will
need a group to help you do them all as they are not soloable. You can
come back later if you find a group to do them.
02) All of these are accepted at the Goblin Grenlix Shduieggle by the entrance of the Pit (And are accepted and turned in, in that particular order):
01) "Vordrassil's Fall" along with "The Darkness Beneath"
(See below for the locations of each place). (You need to go to
the end of each tunnel and use the Orb on the 'black smoke').
07) Once done go back to Ruuna's Camp (at 44.47) and turn it in ... Accept "Out of Body Experience"
08)"A Sister's Pledge" (Turn this in the small cave at 64.43) ... Accept "Hour of the Worg" (NOTE: ACCEPT THIS QUICKLY OR THE NPC WILL DISAPPEAR, if she disappeared, then you can accept it back at 57.41)
03) "A Possible Link" along with "The Bear God's Offspring" (They are in the caves, First go to Orsonn at 48.58, then to Kodian at 66.62, as you are meeting up with the bear gods, grind away at some Furbolgs for the blood).
04) Then go to Camp Oneqwah (at 15.47) and Fly to Conquest Hold.
06) "Vordrassil's Seeds" along with "Destroy the Sapling" (These are done at Grizzlemaw around 50.42, the Sapling is at the very bottom of Grizzlemaw, at 16.42)
07) Once those two are done, Hearth (or go back) to Conquest Hold and turn them in.
08)Hearth to Conquest Hold.
09)GROUP: "Ursoc, the Bear God" To do this quest, first fly to Camp Oneqwah. Then go up to Tur Ragepaw
(at 52.24, if he is not there, that means someone else is currently
doing the quest). You will have three choices of him to fight in.
Either be a tank, healer, or do DPS. I personally had better luck
with the Bear form. But I simply could not solo this at level 75,
so I got one other person to help me do it. Once he's dead
remember to use the Ashes quest item on his corpse. NOTE:
You can use the ashes on his corpse even if he is killed by someone
else, so you can get by without even killing him.
10) Once "Ursoc, the Bear God" is done, hearth, or go back to Camp Oneqwah and fly to Conquest Hold, then turn in it in.
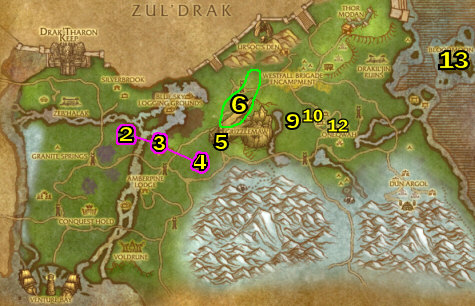
Zul'Drak
01)
From Conquest Hold, go up north through Drak'Tharon steps that lead up
into Zul'Drak (at 17.21 in Grizzly Hills), then go into Zul'Drak.
To continue on with this guide, please go to my Zul'Drak Guide!
You
can check the bottom of my 1-60 guide for general tips/tricks on how to
level faster, along with hunter specific tips/tricks.
COMING SOON: Recorded 1-80 speed runs!
Want to leave testimonials about my guide? You can do that on my MySpace Page through leaving a comment! First you have to be my friend first, and please do so!
For screenshots and to get to know Joana/Mancow better you can visit this part of my site here! And if you are interested in signing up for my newsletter, you can do so at this page here!
Help me improve this guide!
If
you feel that some quests should contain additional information that
would be helpful, or if you have any additions or find any errors in
this guide, PLEASE contact me here, make sure you leave "Northrend Guide Improvements" in the subject line so it filters correctly into my inbox. I appreciate any feedback to make this guide better!
MORE GUIDES: To check out more World of Warcraft guides that are decent buys, you can check out Ultimate World Of Warcraft Guide for WotLK PvP strategies and tips and they also offer lots of guides for free lifetime membership updates, Luke's Gold Guide, which is great if you need a gold guide, and also the Penn's Profession's Guide for in-depth overview of WoW professions, this guide can give you some more pointers on the classes and such. And for a complete list of WoW products you can purchase, please check out my Premium Guide List out.