Introduction: There
is no horde base in this zone, only neutral towns. You will be
dressing up as ghouls, exploding trolls, meeting up with altar gods,
mixing lab ingredients, giving your offerings to the wonderful statues,
controlling a Giant, watching the Lich King spare your life, and that's
all I can think of right now :) See Reference Map.
Interactive MAP MOD (MetaMap) Coordinates.
Go here to learn how to get map coordinates and Interactive Map Coordinates, which are very important to have when using my guide.
Help me improve this guide!
If
you feel that some quests should contain additional information that
would be helpful, or if you have any additions or find any errors in
this guide, PLEASE contact me here, make sure you leave "Northrend Guide Improvements" in the subject line so it filters correctly into my inbox. I appreciate any feedback to make this guide better!
World of Warcraft™ World
of Warcraft and Blizzard Entertainment are trademarks or registered
trademarks of Blizzard Entertainment, Inc. in the U.S. and/or other
countries.
If you are interested in making money referring people to buy my guide, you can follow the instructions on THIS PAGE HERE
about how to do this, generally with my affiliate program you earn 50%
of all the profit if you refer somebody to my site with your affiliate
link that buys my guide! TALK ABOUT EASY MONEY!
LEGAL:
Do not distribute this product in any way shape or form. Any
theft or unauthorized reproduction of this Guide is prohibited.
Violators will be prosecuted. Special markers have been encrypted
into this guide to identify the original buyer. Be WARNED if you
distribute this guide on the internet, I will know who it is.
PLEASE READ! (HOW TO USE THIS GUIDE):
08)"Quest Name" (this quest has a yellow highlighted number) Quests
that have a yellow highlighted number simply means it is numbered on
the map to the right. This saves time because some quests are not
numbered on the maps, so you know whether or not to look on the maps.
All
quests and mobs through out my guide are linked to wowhead. When
following my guide, you can use these links for further information on
the quests/mobs.
All video links are in RED.
You will need to download the Divx WebPlayer when prompted. And
you can double click on the videos when playing to make it full screen.
The checkboxes ()
next to each step are for your personal use only. I have included
them for each step incase you want to mark off which step in the guide
you are at. You do not have to use these if you don't want, I
have included them since it was requested by a lot of people.
Guide Color Codes: Accept a quest. Go do a quest. Turn in a quest. General mob/item link. Picture. Video link.
-COMING SOON- Download Printable Version of This Guide! -COMING SOON-
NOTE: The way this zone works, is there are 4 'tiers', each is a step up to Gundrak (which is a Dungeon all the way north-east), so you will be questing from bottom left and working your way up north-east.
NOTE: Throughout this zone, every mob has the chance to drop a Drakkari Offering, DO NOT sell these to the vendors, you will need these for quests later on through out this zone.
NOTE: If for some reason you hit level 77 sometime during this zone and you would like to get your Flying Ability
in Northrend ASAP (Since level 77 is the level that you are able to
learn Flying in Northrend), then go to my Scholazar Basin Guide and do
the first two sections there starting with 'Welcome to Sholazar Basin',
after finishing those sections you can come back to Zul'Drak to finish
it up. However, If you are near the end of this guide, I would
just recommend finishing Zul'Drak up before going to do this.
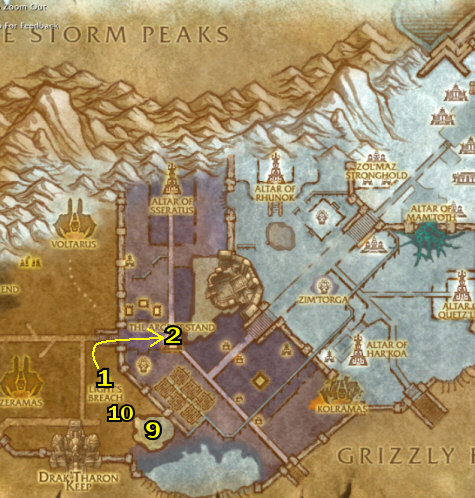
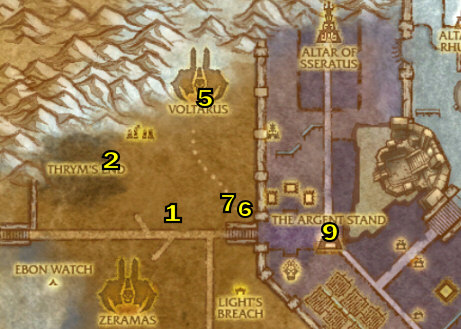
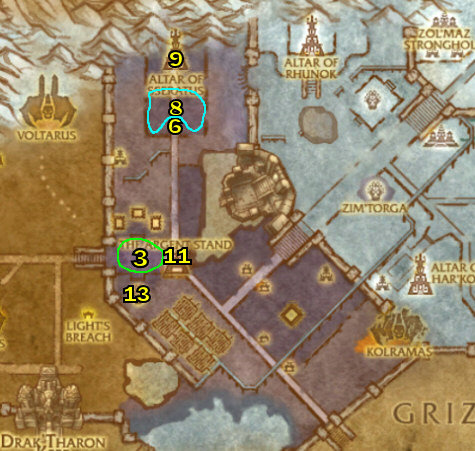
01) The first thing to do in Zul'Drak is to go to Light's Breach (at 32.75) and just get the Flight Path there for now.
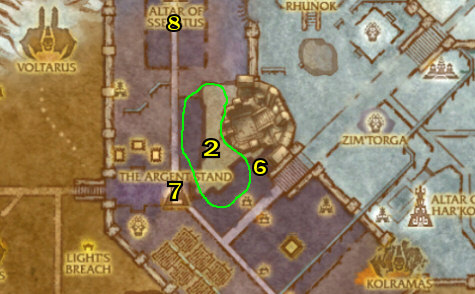
02)
Then go to The Argent Stand (at 40.66 in Zul'Drak). NOTE: To get
there, you need to go up the steps first (at 30.67), then go directly
east a bit.
03) Once there, make it your new home.
04) Get FP there.
05) Don't worry about anything else to do in Argent Stand for right now.
06) Once "Light Won't Grant Me Vengeance" is done, turn it in at Gerk
(who is at 17.57, floating in a red liquid barrel). Also if you
are having trouble with the steps in this guide, that is because you
are not using a genuine copy of the guide. The full version can be
purchased at "joanas world com"
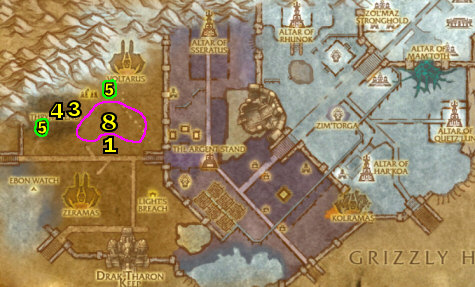
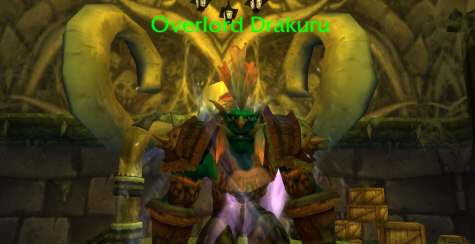
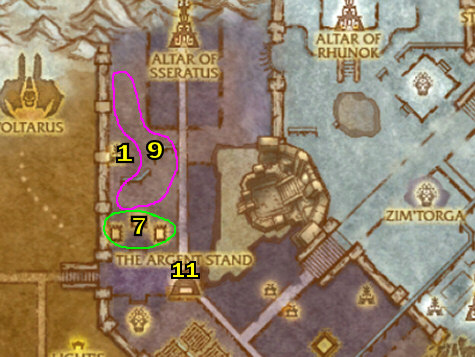
01) "Infiltrating Voltarus"
(For this quest, you need to use the teleporter on the platform, at
21.74, and in order for the teleporter to work you must have the
scourge disguise on). Once in Voltarus, locate Overlord Drakuru and accept "Dark Horizon"
02) "Dark Horizon" (Gorebag is inside Voltarus in the wing next to Drakuru on the left of you). Simply talk to Gorebag and watch the scripted flight tour of Zul'Drak. Once the flight is over turn this in at Drakuru.
03) Then go back down to the Reliquary of Pain (by using the green teleporter), then use the Stefan's Horn quest item to call down Stefan Vadu, turn in "Infiltrating Voltarus" ... Accept "So Far, So Bad"
05) Then use the green teleporter to go back down to Reliquary of Pain and do the following 2 quests:
06) "It Rolls Downhill" (Use the Scepter of Suggestion quest item on a geist
and send it to a crystal near the teleportation platform.... they'll
turn the crystals in on their own, but wait before controlling another
one until you get the crystal credit turn in.)
08)Then go back down to Reliquary of Pain and call down Vadu by using the horn, turn in "So Far, So Bad" ... Accept "Hazardous Materials"
09)Once
those are done, go back up in Voltarus (Remember in order to use the
teleporter you must have the scourge disguise on), once up there turn
in "It Rolls Downhill"
12) "Hazardous Materials" (The Scourgewagons are all around the Reliquary of Pain)
13) "Zero Tolerance" Done South of Reliquary of Pain at 36.11, Plenty of Servants around. The guy that you need to kill is on the stone platform. NOTE: DO NOT CAST YOUR SPELLS, It will take you out of your costume!
18) "Sabotage" (The 'Harvested Blight Crystals' are laying around in Voltarus contained in boxes)
19) "Fuel for the Fire"
(Done at the Frigid Breach, around 33.37). It's best to gather a
whole bunch of trolls together and then use the 'Burst at the Seams'
ability. Don't worry about the Chieftains, they automatically come out
at the 20th, 40th, and 60th troll kill, See This Video for a short gorey cinematic demonstration I have put together on YouTube.
21) "Disclosure"
Need to take the Blue teleporter in Voltarus. Once teleported
look directly in front of you and right-click the coffin, follow the
skeleton around.
23) Teleport down to Reliquary of Pain, call Vadu and turn in "Sabotage" ... Accept "Betrayal"
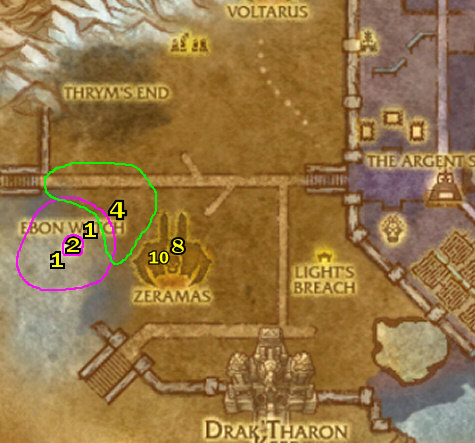
The Fight with Drakuru
01) "Betrayal" To start the fight with Drakuru, first talk to him, then you use your Scepter of Domination
quest item on one of the orange trolls there as soon as it spawns in,
your costume will then fade out and you will still have control over
the troll, then kill Drakuru. Please read the following tips on how to
beat him:
---> Constantly use the bear's abilities as soon as the cooldowns are up each time while also attacking Drakuru yourself.
--->
Drakuru has two different attacks, one he throws shadow bolts, and two
he lobs blight crystals at you which explode on the ground and leaves
an orange substance on the ground that hurt you, just keep strafing
around to avoid it.
---> As soon as your troll dies, grab another one.
--->
You can group up and have two or more trolls attacking Drakuru at the
same time, but someone will still be targeted for the Blight Crystals
attack.
---> Keep moving around avoiding the Blight Crystal attacks, this is VERY IMPORTANT, they do a lot of damage.
---> Your pet has an ability that will heal you, but bring a healing pot or be prepared to heal yourself too.
--->
If you die, you will automatically resurrect at the Argent Stand
graveyard (since there is no way you could get to your corpse), and you
can just go back and restart the event.
---> This is one of the harder quests to solo in WotLK, it is not easy to solo, but I managed it, See Video. (Please excuse the lag in the video!)
--->
BIG TRICK: You can loot the skull if someone else is working on and
completes the quest when you port up, in other words anyone can loot
the skull bypassing the fight.
--->
If you are unable to do it now, you can skip it and come back and do it
later if you like, there is no follow up quest. (Continue on at
the 'Gymer, King of Storm Giants' section below then.)
02) Once done, go back down to Reliquary of Pain, call Vadu and turn in "Betrayal"
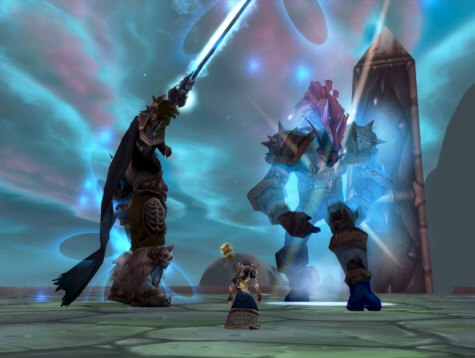
04) "The Storm King's Vengeance" (See Video) This quest has you control the big giant Gymer
around to kill 3 Elites and 100 undead. Talk to him to begin the
event. Keep spamming his abilities once you target the
Elites. Don't worry about killing the undead, kill them last if
you need to finish them up. Remember to pick up the Storm Clouds off of the ground to replenish your health! Here are the locations of the three Elites:
05)Algar the Chosen is over at Voltarus (around 21.42). He rides on a big frost Wyrm.
06)Prince Navarius is at 82.24. He is the one with the purplish shield around him.
07) And Thrym spawns in pretty much right where Prince Navarius is at once you kill him.
09) "Throwing Down" (The Nerubian Craters are just north-west, around 54.71 they look like this See Pic.)
10) "Leave No One Behind"
You must use the Bandage on the 3 Crusaders and then bring them back
one by one (to 57.72), they are all in small buildings, See below
[steps 11 - 13] for where to find the 3 NPCs:
08) "Mopping Up" along with "Argent Crusade, We Are Leaving!"
(These are done just north from where you are) (To talk to the
soldiers they need to be out of combat). NOTE: While doing this
quest you will find an item that starts "Strange Mojo"
09) Next go up in the Alter of Sseratus (80.29) and discover the Dead Sseratus on the ground there for the quest "Trouble at the Altar of Sseratus"
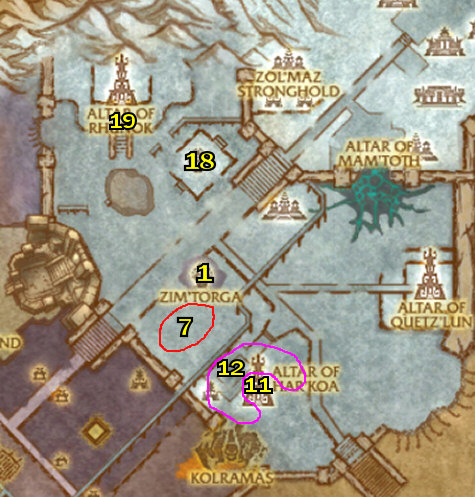
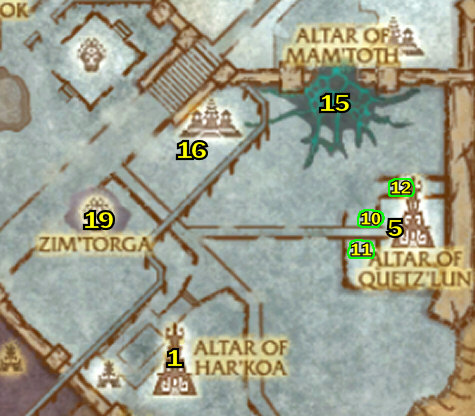
13) Go to the big statue of Zim'Abwa (at 36.72) and turn in "The Blessing of Zim'Abwa"
NOTE: The initial quest for each of the 3 statues in Zul'Drak gives you
a bit over 20,000 XP. And every time you turn in 10 more
additional Drakkari Offerings to one of the 3 statues in Zul'Drak you do not get any additional XP, you just get the buff again.
01) "Cocooned!" (This is done back around 54.31). Once this is done, go back and turn it in.
09) GROUP: If you can find a few other people you can do "Malas the Corrupter" (Malas the Corrupter
is at the top of Kolramas). Only a level 80 might have a chance
to solo it. There is no follow up so it can be skipped or done later.
10) Once you are done, go back (to 57.72) and turn in all quests there.
02) Go east a bit and do the following 3 quests at Drak'Agal [steps 3 - 5]:
03) "Gluttonous Lurkers" Be sure to read the quest description for this one. What you need to do is pick up 25 Zul'Drak Rats
in total and throw 5 rats at each basilisk to "pacify" them and collect
the crystal that you need. Killing the basilisks won't do
anything! Both the rats and basilisks in question are found in
Drak'Agal, all around 42.10.
05) "Lab Work"
(This is done right where you are at in the Lab) The 'Muddy Mire
Maggot', 'Withered Batwing', and 'Chilled Serpent Mucus' are found in
the room to your left as you come into Alchemist Finklestein's room. The 'Amberseed' is in the room to the right.
NOTE: "Troll Patrol"
is a Daily quest that I recommend doing, as it is quick for lots of XP.
If you complete it under 30 minutes you get even more XP and gold. The
first time doing it, you may not do it under 30 min. But after doing it
once you should be able to quickly do it the next day etc.. This quest
has you visit the four Argent Crusade posts and do the quest that they
have you do there, then return back at Commander Kunz (at The Argent Strand) to turn it in. Here are the 4 posts:
05)Alchemist Finklestein: (at 65.22) - Gives you "Troll Patrol: The Alchemist's Apprentice"
Accept it, then talk to him to begin. This is the hardest one.
You need to hurry up and get all the items Finklestein tells you to. It
is more of a memorization game, it helps to study where all of the
items are at in the lab before doing this. Luckily for you I made this Nifty Little Chart that marks all the stuff in the lab.
06) Once done, go to The Argent Stand and turn in "Troll Patrol"
07) Completing this Daily quest on time (that is, before the 30 min. timed buff wears off) gives you a follow up quest. It's an instant complete, which gives you around 30,000 experience, 18 gold 60 silver, a 'Fat Lute' and a bag with more goodies in it. Definitely worth it.
08)See Video to
see how I did it in 8 minutes. Even that time can still be improved by
probably 1-2 minutes. An epic flying mount does help a lot.
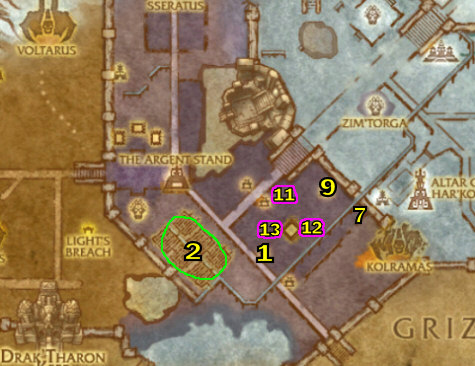
Amphitheater of Anguish (GROUP QUESTS)
01)
The entrance to the Amphitheater is at 75.38. Once again just
like the quest chain in Grizzly Hills and Nagrand, this one has you
kill 6 elites with a group. And just like the other ones you can rack
up a lot of quick XP, but you will need a group to help you do them all
as they are not soloable. You can come back later if you find a group
to do them.
02) All of these are accepted at the Goblin Gurgthock (at 28.36) (And are accepted and turned in, in that particular order):
09) "The Leaders at Jin'Alai"
Just kill the trolls until the named mobs appear then loot their
chests. It doesn't matter who kills them, anyone with the quest can
loot their chest; so there's no need to compete with other players. Gawani spawns at the NE end of the pool. Chulo the Mad at the SW end and Kutube'sa
right in the middle. They will 'yell' something to let you know
they spawned in. They're relatively easy non-elites to kill.
07) "Foundation for Revenge"
The trolls will only count when when you kill them close to a Soul
Font, (you will see the debuff on them when they get close), if they
don't have that debuff it won't count.
09) "Hell Hath a Fury" (Use the Hexxing Stick
at the 4 named mobs around the Altar. You may have seen a few of these
at the previous quests. Here are the locations of these mobs:
02) Then go west a bit over to Zol'Maz Stronghold, around 68.35, and do the following 3 quests [steps 3 - 5]:
03) "The Key of Warlord Zol'Maz" In order to get access to Warlord Zol'Maz, you first need to kill his 3 family members, they are in the 3 buildings there. You need to kill: Drek'Maz=68.35, Tiri=63.37, and Yara=67.32. Then combine the 3 items they dropped, and use that at the Zol'Maz Gate at 63.33, (then kill Warlord Zol'Maz to get the key, See Video).
10)"The Gods Have Spoken" (Need to kill Guardians of Zim'Rhuk around 59.44 for the first item, and then Altar Wardens
around 74.57 for the second item). I was able to easily do this
myself at level 76, but if you have another person to help it could go
by a little more efficiently. The drop rate seems to be around
40% or so.
13)"Rampage" (Done at 78.24, simply right-click all of Akali's Chain Anchors around Akali)
14) Once that is done, go back to Zim'Torga and turn it in ... Accept "Convocation at Zol'Heb"
15) GROUP: If you can find a group, you can do "Convocation at Zol'Heb" (This is done at 77.36) Once you get the Prophet of Akali's
health to around 70%, Har'koa spawns in to help you kill him. This
quest can be soloed, but it is not easy, you are better off trying to
get some help on this one.
01)
You should be about or almost level 77 by now, If you are under level
76.5 then I would highly consider doing some Dungeon quests such as Gundrak, or Drak'Tharon Keep to catch up. You will need to be level 77 to do the second section in my Scholazar Basin Guide.
You
can check the bottom of my 1-60 guide for general tips/tricks on how to
level faster, along with hunter specific tips/tricks.
COMING SOON: Recorded 1-80 speed runs!
Want to leave testimonials about my guide? You can do that on my MySpace Page through leaving a comment! First you have to be my friend first, and please do so!
For screenshots and to get to know Joana/Mancow better you can visit this part of my site here! And if you are interested in signing up for my newsletter, you can do so at this page here!
Help me improve this guide!
If
you feel that some quests should contain additional information that
would be helpful, or if you have any additions or find any errors in
this guide, PLEASE contact me here, make sure you leave "Northrend Guide Improvements" in the subject line so it filters correctly into my inbox. I appreciate any feedback to make this guide better!
MORE GUIDES: To check out more World of Warcraft guides that are decent buys, you can check out Ultimate World Of Warcraft Guide for WotLK PvP strategies and tips and they also offer lots of guides for free lifetime membership updates, Luke's Gold Guide, which is great if you need a gold guide, and also the Penn's Profession's Guide for in-depth overview of WoW professions, this guide can give you some more pointers on the classes and such. And for a complete list of WoW products you can purchase, please check out my Premium Guide List out.