Introduction: Your
arrival into the Basin is not a good one! Luckily you run into
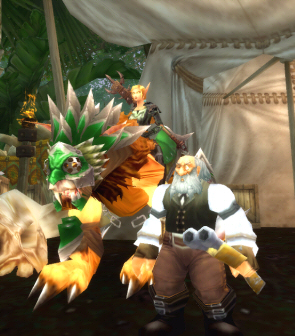
Mr. Nesingwary, which like always has beast hunting quests for you to
do! What a surprise! Or wait?? Hunt goblins....
? Yeah you'll see. Later on you come across Freya, a huge
anti-scourge giant, she has you do many tasks that are very
delightful! Then you come across the stupidest mobs in WoW (the
Oracles, which look like mutated murlocs) and (the Wolvar, aka teddy
bears). Which one do you want to side with? See Reference Map.
Interactive MAP MOD (MetaMap) Coordinates.
Go here to learn how to get map coordinates and Interactive Map Coordinates, which are very important to have when using my guide.
Help me improve this guide!
If
you feel that some quests should contain additional information that
would be helpful, or if you have any additions or find any errors in
this guide, PLEASE contact me here, make sure you leave "Northrend Guide Improvements" in the subject line so it filters correctly into my inbox. I appreciate any feedback to make this guide better!
World of Warcraft™ World
of Warcraft and Blizzard Entertainment are trademarks or registered
trademarks of Blizzard Entertainment, Inc. in the U.S. and/or other
countries.
If you are interested in making money referring people to buy my guide, you can follow the instructions on THIS PAGE HERE
about how to do this, generally with my affiliate program you earn 50%
of all the profit if you refer somebody to my site with your affiliate
link that buys my guide! TALK ABOUT EASY MONEY!
LEGAL:
Do not distribute this product in any way shape or form. Any
theft or unauthorized reproduction of this Guide is prohibited.
Violators will be prosecuted. Special markers have been encrypted
into this guide to identify the original buyer. Be WARNED if you
distribute this guide on the internet, I will know who it is.
PLEASE READ! (HOW TO USE THIS GUIDE):
08)"Quest Name" (this quest has a yellow highlighted number) Quests
that have a yellow highlighted number simply means it is numbered on
the map to the right. This saves time because some quests are not
numbered on the maps, so you know whether or not to look on the maps.
All
quests and mobs through out my guide are linked to wowhead. When
following my guide, you can use these links for further information on
the quests/mobs.
All video links are in RED.
You will need to download the Divx WebPlayer when prompted. And
you can double click on the videos when playing to make it full screen.
The checkboxes ()
next to each step are for your personal use only. I have included
them for each step incase you want to mark off which step in the guide
you are at. You do not have to use these if you don't want, I
have included them since it was requested by a lot of people.
Guide Color Codes: Accept a quest. Go do a quest. Turn in a quest. General mob/item link. Picture. Video link.
-COMING SOON- Download Printable Version of This Guide! -COMING SOON-
03) "Where in the World is Hemet Nesingwary?"
(Talk to the NPC to take the flight). This quest immediately
takes you to Scholazar Basin on a flying machine. The flying machine
then gets shot down and you fly on a parachute to the ground.
05)
Now before we begin doing that quest we just accepted, it would be best
to our interest to get a FP first in the middle of Scholazar Basin (at
50.62) down near the water almost. (Don't worry about accepting
any quests there yet).
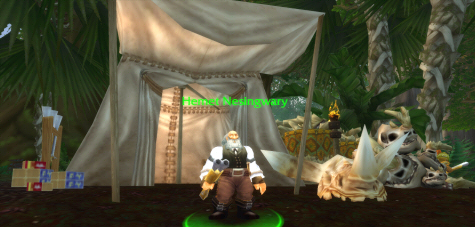
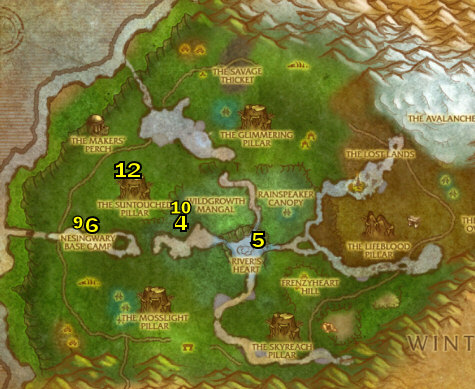
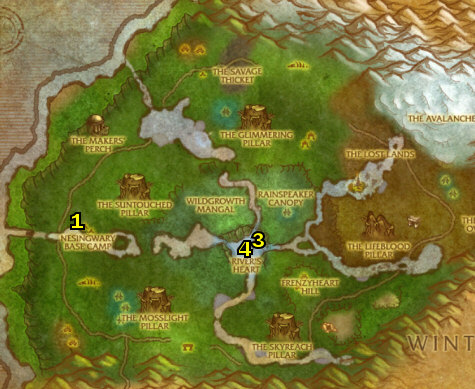
06) Once you get the flight path (at Lakeside Landing, 50.62) then go west to the Nesingwary Base Camp (at 27.58) and turn in "Welcome to Sholazar Basin"
12) "Venture Co. Misadventure" along with "Have a Part, Give a Part" (These quests have you go to Swindlegrin's Dig north-east (around 12.22) and pick up 9 Spare Parts
on the ground there, along with killing 22 Venture Company members,
pretty much any mob there will fit the bill for that). While you
are there try to accept and do the following escort quest first:
Also if you are having trouble with the steps in this guide, that is
because you are not using a genuine copy of the guide. The full version
can be purchased at "joanas world com"
13) "Engineering a Disaster"
(Accepted at 31.41, up on the wooden platform) If the NPC is not
there, means that somebody else is currently doing the escort quest.
This quest is easy.
15) NOTE: Turning in that quest just unlocked a flightpoint! The Spirit of Gnomeregan spawns on the left side of Weslex and now you can use it as a flightpoint.
Northrend Flying Mount Quests
NOTE:
YOU NEED TO BE LEVEL 77 TO CONTINUE THIS SECTION, If you are not level
77 by now, then go to step #9 in this section. Once you hit level
77 come back and do this section. It's important because you will
learn the 'Cold Weather Flying' for Northrend. This ability enables you to use the flying mounts you obtained from Outland to use in Northrend.
04) "An Embarassing Incident" (This quest has you go in the lake next to you and keep looking at the dirt mounds for the lost key, a lot of them will just spawn mobs, but keep on trying until the key shows up).
06) "Reconnaissance Flight"
The majority of this quest is a scripted flight, in which you just
watch. Eventually Pilot Vic asks you to take control of the
aircraft and to return to Lakeside Landing on your own. You only have a
few seconds to arrive before the aircraft explodes, so open your map
and guide yourself toward the River's Heart (The very center of the
map) ASAP. Remember once you get back press the 'Land Flying Machine'
to land it. Also look for the little circle of light-blue
crystals that pinpoints the landing area.
07) Once that is done turn it in.
08) NOTE: Turning in that quest unlocks your ability to learn 'Cold Weather Flying',
which enables you to use flying mounts in Northrend. You can use
the same flying mounts you obtained in Outland. This ability will
cost you 1000 gold though. If for some reason you do not have the
1000 gold right now, you can also learn this ability later in Dalaran
at Hira Snowdawn (61.45 in Dalaran), or Roxi Ramrocket (at K3 in Storm Peaks).
09)"Aerial Surveillance"
This quest has you use the new flightpath you just unlocked to fly to
River's Heart, which is the first FP we got when we first entered
Scholazar Basin.
10) NOTE: We will come back and do the quests in the River's Heart later.
09) NOTE: Don't worry about specifically killing the 60 mobs you need for "The Great Hunter's Challenge" as you will automatically get those by doing the other 'hunting' quests.
13)"Some Make Lemonade, Some Make Liquor" (Click on the vines
hanging from the trees all around 42.64, then pick up the fruit that
falls down, note that you may have to jump up to click the vines).
14) Go work on and finish the following 4 quests together [steps 15 - 18]:
02) "Still At It" (First you need to talk to Grimbooze's Assistant right next to Grimbooze,
then simply click on the items he tells you to, then loot the barrel
that spawns). TIP: Just stand on top of the bananas and you will
be able to stand still there and click on all the other items.
Once done, turn it in ... Accept "The Taste Test"
03) "Burning to Help" The Hydras
are located around 88.31 in the lake. To get the samples you just use
the container when you're afflicted with the poison attacks from the
hydras.
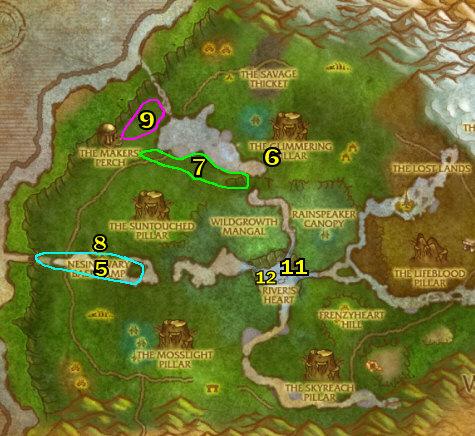
06)"Sharpening Your Talons" along with "Securing the Bait"
These are both done at The Savage Thicket, around 46.29, the hatchlings
are inside the eggs, kill the eggs, then pick up the Hatchlings.
08) "Post-partum Aggression"
TIP: Don't try to fight the beastie head to head, you will just end up
taking a dirt nap. Instead, ride around the camp in circles,
dropping traps and charging back to the Broodmother (at 46.21) when you can and using the Gore ability after you stun it. Let Hemet do all of the work! See Video.
09) "Reagent Agent" along with "My Pet Roc" (These are both done at The Bonefields around 56.25)
10) Once those 3 quests are done, go back to Dorian's Outpost (at 42.28) and turn them all in.
03) Once that is done, go back (to 14.42) and turn it in ... Accept "Returned Sevenfold"
04) "Returned Sevenfold" Thalgran Blightbringer is located at 66.44, just aggro him and use the Freya's Ward
when he starts to cast the Deathbolt. You'll have to use it 2-3 times,
just make sure you don't miss a reflect, or the Deathbolt hits you for
about 8,000 dmg, See Video.
10) Once those 2 quests are done, go back to Freya and turn them in ... Accept "The Lifewarden's Wrath"
11) "The Lifewarden's Wrath" (This is the first flying quest you do in Northrend). You need to use Freya's Horn on top of the Glimmering Pillar (at 41.37).
12) Once that is done, go back to Freya and turn it in ... Accept "Freya's Pact"
03) Next fly up to Maker's Overlook (up at 80.54) and accept the quest "A Timeworn Coffer" from the box right before the entrance of the Maker's Overlook, See Pic.
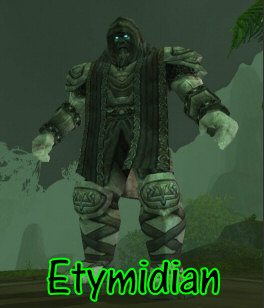
06) "The Etymidian"
Need to go through the waygate at 40.83, then It takes you to a
previously inaccessible location in Un'goro Crater (north of Marshal's
Refuge) known as The Shaper's Terrace, follow the path and you will see
a big Etymidian where you turn this quest in ... Accept "The Activation Rune"
07) "The Activation Rune" If you look right behind you, you will see a huge staircase leading up into the Sharper's Terrace, the Omega Rune drops from High Cultist Herenn who is straight ahead at the end of the terrace.
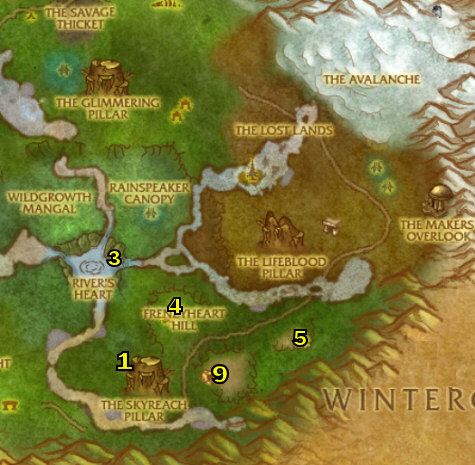
10) "Reclamation" Use the Omega Rune
to call out your Etymidian (at The Avalanche, due east). I
suggest you start from the bottom of the Avalanche (around 72.43) and
climb it killing the mobs on your way, so you learn your 5 abilities
that The Etymidian has by the time you arrive at the elites. For the 3
elites it would be useful to clean the area around each of them and
only concentrate on them. Be sure you are fully healed with life and
mana before every boss fight and DON'T use Titanic Surge during a boss,
you get hit 5 times harder during the Surge. Keep in mind the 'Maker's
Sanctuary' ability takes you out of combat and heals any mobs totally
up that you are currently fighting. See my fun YouTube Video I made. Here is the info for the 3 elites:
11)Bythius (72.10), Just spam Colossal Strike (Cleave) and Cataclysm at him, don't worry about his dog.
12)Urgreth
(78.37), Spam cleave and walked out of the AoE attack. Worth
saving the Reconstruction (heal) if you get a tick on you. See Video.
13)Hailscorn
(78.33), I just held on to Cataclysm (the AoE) and hit it every time
the swarm of undead appeared and mashed Colossal Strike otherwise. He
didn't cast the swarm about as often as I had Cataclysm up to kill
it. See Video.
14) Once that is done go to Freya to turn in "Reclamation".
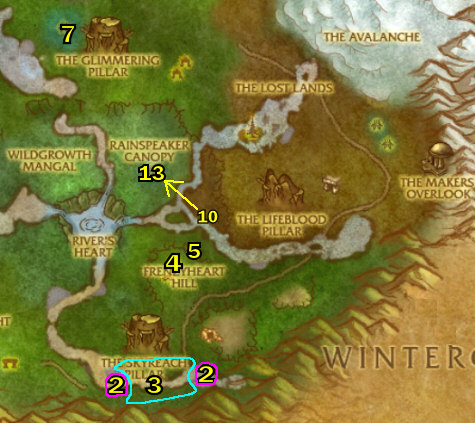
01) Go do the following 2 quests south around 52.17:
02) "The Underground Menace" Follow the sandy banks along the river and look for the rumbling loose ground like the worms from HFP. Run over it, Serfex the Reaver pops up. Level 77 non-elite. You can look for dead wasps on the ground, since Serfix likes to kill them.
03)"Just Following Orders" Go to the Injured Rainspeaker Oracle, at 58.62 and talk to it, kill the croc that pops out, then turn the quest in right there at the Injured Rainspeaker Oracle.
04) Once those 2 are done, go back to Frenzyheart Hill and turn them both in ... Accept "A Rough Ride"
05) "A Rough Ride" There's a big Croc just outside of town (at 57.68). Talk to it to accept the ride.
11)
NOTE: Turning in that quests makes you hostile with the Frenzyheart
Tribe and Friendly with the Oracles. Don't worry if you think you
made the wrong choice as this is part of the storyline between these
two factions and there is nothing you can do to control it.
05) "Gods like Shiny Things" Make sure you have Lafoo summoned. Look for shiny spots
on the ground, which are found all around the Canopy. Stand over
them and Lafoo will dig them up. Wait for him to dig them up and
loot them.
06) Once done, go back to Rainspeaker Canopy, 53.56 and turn them both in ... Accept "Making Peace"
07) "Making Peace" (Shaman Vekjik is up at 51.64) He will simply not accept making peace and knock you in the middle of the river.
08) Once done, go back (to Rainspeaker Canopy, 53.51) and turn in "Making Peace" ... Accept "Back So Soon?"
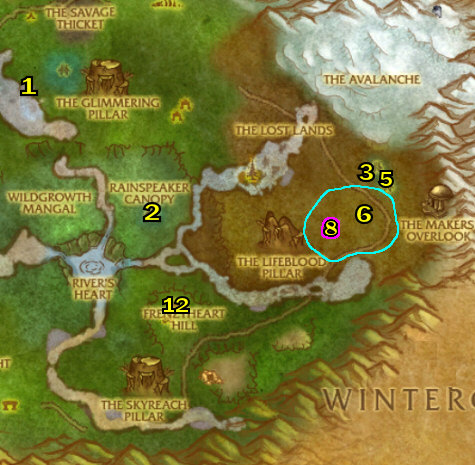
10) "Forced Hand" along with "The Lost Mistwhisper Treasure" (Treasure is located at 41.19 and the Warlord spawns in the same spot, Make sure Jaloot is summoned (by using the Jaloot's Favorite Crystal quest item) or you will not be able to loot treasure). Also all the other mobs you need to kill are in the same area.
07) Once those 2 quests are done, make sure Moodle is summoned and turn them both in at him ... Accept "A Hero's Burden"
08) "A Hero's Burden"
The 77 Elite you have to kill is in a cave and the entrance to the cave
is at 70.58. IMPORTANT: During this battle, when Artruis the Heartless's
health gets around 30% or so, both Zepik and Jaloot get unfrozen and
they both start attacking you. This is where you make the decision of
who you want to side with and do Daily quests from now on with. To make
the decision, simply kill either Jaloot (to become honored with
Frenzyheart Tribe, but hated with The Oracles) or kill Gorloc (to
become honored with The Oracles but hated with the Frenzyheart Tribe).
It really doesn't make that big of a difference of who you side with,
they will both supply daily quests and it is possible to redue this
quest to reside with the other faction in the future if you wish. This
quest is hard to solo, although I have seen a lvl 78 Paladin and a lvl
78 mage solo this quest, so you should get one or two other people to
help you out. See Video.
01)
The following Daily Quests can be done once per day. I recommend
just do them once and then just go to Storm Peaks. NOTE: There
are 8 total Daily quests, but only 4 of them are available each day, so
different days will have different quests, once all 8 are done though,
you get an achievement.
02) "Chicken Party!" (The Chickens are all around Frenzyheart Hill, and can be (and should be) picked up when mounted).
03) "A Hero's Headgear"
First obtain one of the Venture Co. Explosives from one of the mobs at
Swindlegrin's Dig (around 35.47), then go up to The Stormwright's Shelf
(around 21.64) and kill a Stormwatcher, use the Explosives on it's corpse, then loot the head.
05) "The Heartblood's Strength" First go to Suntouched Pillar (up at 33.52) and use the Vial given to fill it up with the water there. Then go north and kill a Goretalon Matriarch (at 51.61), they are red in color, See Pic. Combine the Water with the Heartblood, then go back to Frenzyheart Hill to turn it in.
07) "Kartak's Rampage" First go kill Sparktouched mobs (around 31.16) until one of them drops an Oracle Blood.
Then go over (to 23.83) and place the blood at the shrine there. Then
use the big ape like creature to finish killing the remaining 50
Sparktouched mobs. Once done, go to Shaman Jakjek (at 23.83) to turn this in.
01)
The following Daily Quests can be done once per day and generally are
easy and quick to do. I recommend just do them once and then just go to
Storm Peaks. NOTE: There are 8 total Daily quests, but only 4 of them
are available each day, so different days will have different quests,
once all 8 are done though, you get an achievement.
02) "Appeasing the Great Rain Stone" Just like the quest we did earlier: Make sure you have Lafoo summoned (by using the Jaloot's Favorite Crystal quest item). Look for shiny spots
on the ground, which are found all around the Canopy. Stand over
them and Lafoo will dig them up. Wait for him to dig them up and
loot them.
03) "Song of Fecundity" Done at The Stormwright's Shelf (up around 24.35). Use the Horn of Fecundity quest item on the Soaked Fertile Dirt mounds in the area.
04) "Power of the Great Ones" First go to The Lifeblood Pillar (at 65.60) and use the Dormant Polished Crystal quest item at the big red crystal there. Next go west over to (24.82) and use the Energized Polished Crystal quest item there (which makes you a lot stronger) and then kill 30 Frenzyheart mobs. Once this is done, turn this in at Lightningcaller Soo-met (at Sparktouched Haven, 33.74).
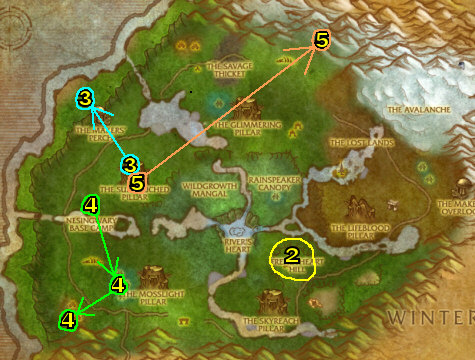
05) "Song of Reflection" Just fly to the tops of the four intact pillars and activate the Didgeridoo near the crystals in the center. You may have to take out some Cultist Saboteurs
at the top of the northern Glimmering Pillar, but otherwise there's no
fighting involved. The pillars are hard to miss, but here are the
coordinates anyway:
06) The Glimmering Pillar: 19.37
07) The Suntouched Pillar: 33.82
08) The Mosslight Pillar: 76.25
09) The Skyreach Pillar: 23. 59
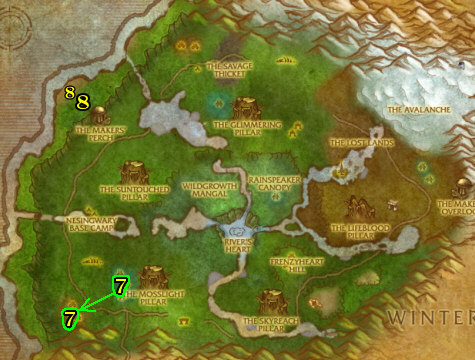
01) "Mastery of the Crystals"
Chest containing defenses is at 33.45, you can find the frenzyheart
around 30.78 (You can find them attacking the Oracle villagers).
If you let the crystals do all the work you won't be able to loot them,
so I suggest using an aoe type ability, or doing a little damage to
each one before you use the crystals.
02) "Will of the Titans" Fly to Sparktouched Haven (33.24), and kill Frenzyhearts until one of them drops a Tainted Crystal.
It has a very high drop percentage. Once you've got the crystal, take
it to the Great Lightning Stone (33.75), and activate it. This will
transform you into Soo-holu, a Spirit Beast which fights like a cross
between a rogue, feral druid, and DPS warrior. With the
Soo-holu's power go south-west a bit and kill the wolvar.
03) "Song of Wind and Water" Done at The Stormwright's Shelf (up around 14.65). Use the Drums of the Tempest to transform into Haiphoon. Initially you'll be in his water form, so go after one of the Storm Revenants. You'll have a Water Bolt for your attack and Frost Nova to hold it in place. Once it's low on health, use the Devour Wind power. This will kill the revenant and transform you into Haiphoon's air elemental phase. Now you'll want to go after an Aqueous Spirit.
Alternate between Lightning Bolt and Windshear, the latter of which has
a knockback, until its low on health. Then use Devour Water
to go back to the water form. Alternate between the two types of mobs
until you've completed the quest. There are a few things to be
aware of:
Be careful not to kill the quest mobs with Haiphoon's normal attacks. You must devour them to receive quest credit.
In addition to the elementals, golems called Stormwatchers patrol the area. They're not elite, and you can kill them in either form.
You can kill both water and air elementals in either form, but you can only use your Devour ability on the opposing element.
While
you're riding Haiphoon, you cannot loot. The corpses do seem to stick
around for awhile, though, so if you finish the quest quickly enough
you'll be able to loot them before they disappear.
04) "A Cleansing Song"
Atha is at Bittertide Lake (west of Glimmering Pillar). Ha-Khalan
is at River's Hear (middle of map). Koosu is at Wintergrasp
(south of Skyreach Pillar).
You
can check the bottom of my 1-60 guide for general tips/tricks on how to
level faster, along with hunter specific tips/tricks.
COMING SOON: Recorded 1-80 speed runs!
Want to leave testimonials about my guide? You can do that on my MySpace Page through leaving a comment! First you have to be my friend first, and please do so!
For screenshots and to get to know Joana/Mancow better you can visit this part of my site here! And if you are interested in signing up for my newsletter, you can do so at this page here!
Help me improve this guide!
If
you feel that some quests should contain additional information that
would be helpful, or if you have any additions or find any errors in
this guide, PLEASE contact me here, make sure you leave "Northrend Guide Improvements" in the subject line so it filters correctly into my inbox. I appreciate any feedback to make this guide better!
MORE GUIDES: To check out more World of Warcraft guides that are decent buys, you can check out Ultimate World Of Warcraft Guide for WotLK PvP strategies and tips and they also offer lots of guides for free lifetime membership updates, Luke's Gold Guide, which is great if you need a gold guide, and also the Penn's Profession's Guide for in-depth overview of WoW professions, this guide can give you some more pointers on the classes and such. And for a complete list of WoW products you can purchase, please check out my Premium Guide List out.