***Joana's 78-79 Storm Peaks Guide***


Introduction:
First you do work for the Goblins, then you do work for the Blue Women, then work for the orcs, then work for the Frost Giants, then work for the Taunka, then work for Thorim, then finally finish it off with helping the Earthen!  Isn't that nice?  BTW, Thorim's brother (Loken) 
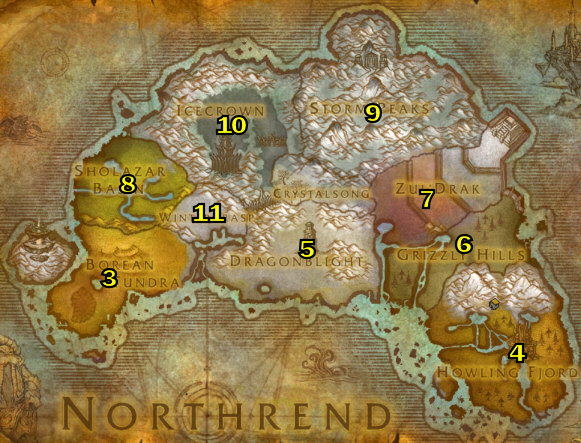
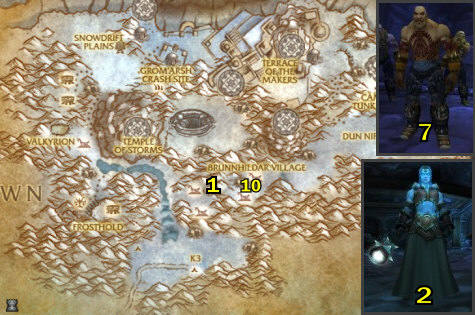
is a meany!  See Reference Map.

Interactive MAP MOD (MetaMap) Coordinates.

Go here to learn how to get map coordinates and Interactive Map Coordinates, which are very important to have when using my guide.


Help me improve this guide!

If you feel that some quests should contain additional information that would be helpful, or if you have any additions or find any errors in this guide, PLEASE contact me here, make sure you leave "Northrend Guide Improvements" in the subject line so it filters correctly into my inbox.   I appreciate any feedback to make this guide better!


If you have any general questions or comments on anything, you can contact me here:  joana@joanasworld.com  You can also visit my website:  WWW.JOANASWORLD.COM


World of Warcraft™
World of Warcraft and Blizzard Entertainment are trademarks or registered trademarks of Blizzard Entertainment, Inc. in the U.S. and/or other countries.


If you are interested in making money referring people to buy my guide, you can follow the instructions on THIS PAGE HERE about how to do this, generally with my affiliate program you earn 50% of all the profit if you refer somebody to my site with your affiliate link that buys my guide!  TALK ABOUT EASY MONEY!


Copyright 2008


LEGAL:  Do not distribute this product in any way shape or form.  Any theft or unauthorized reproduction of this Guide is prohibited. Violators will be prosecuted.  Special markers have been encrypted into this guide to identify the original buyer.  Be WARNED if you distribute this guide on the internet, I will know who it is.

PLEASE READ! (HOW TO USE THIS GUIDE):


08) "Quest Name"  (this quest has a yellow highlighted number)  Quests that have a yellow highlighted number simply means it is numbered on the map to the right.  This saves time because some quests are not numbered on the maps, so you know whether or not to look on the maps.


All quests and mobs through out my guide are linked to wowhead.  When following my guide, you can use these links for further information on the quests/mobs.


All video links are in RED.  You will need to download the Divx WebPlayer when prompted.  And you can double click on the videos when playing to make it full screen.


The checkboxes () next to each step are for your personal use only.  I have included them for each step incase you want to mark off which step in the guide you are at.  You do not have to use these if you don't want, I have included them since it was requested by a lot of people.


Guide Color Codes:
Accept a quest.
Go do a quest.
Turn in a quest.
General mob/item link.
Picture.
Video link.


-COMING SOON- Download Printable Version of This Guide! -COMING SOON-

Members Area Menu

01) Introduction

02) Here is the order where you will be leveling:

03) 70-72 Borean Tundra

           OR:

04) 70-72 Howling Fjord

05) 72-74 Dragonblight

06) 74-75 Grizzly Hills

07) 75-77 Zul'Drak

08) 77-78 Sholazar Basin

09) 78-79 Storm Peaks

10) 79-80 Icecrown


Other Guides:

11) PVP ZONE:  Wintergrasp

12) Joana's Death Knight Leveling & Strategy Guide

13) User Submitted Death Knight Guides


Main Members Area


Great WotLK Products:  WotLK Secrets Guide  -  70-80 Alliance Guide  -  Luke's Gold Guide

(Northrend Levels 70-80)

78-79 Storm Peaks

NOTE: Through out this zone you will find a drop called Relic of Ulduar, do NOT sell these to the vendors, you will need them for later quests.


K3

01) Go to the town of K3 at 40.85 (in Storm Peaks).

02) Turn in "Luxurious Getaway!" (This quest was accepted in Dalaran, in the sewers, you may not have it, if not don't worry about it).

03) Accept all quests in K3: "Clean Up" "Reclaimed Rations" "Expression of Gratitude" "They Took Our Men!" and "Equipment Recovery"

04) Make K3 your new home.

05) Get the FP there.

06) Go do the following 5 quests [steps 7 - 9]:

07) "Clean Up" Done just west of K3, (around 38.86), need to pick up Charred Wreckage from the ground.

08) "Reclaimed Rations" along with "Expression of Gratitude" (Kill Gnarlhide at 30.85 while also picking up Dried Gnoll Rations).  NOTE: there is another gnoll camp at 35.83 where Dried Gnoll Rations can also be obtained.

09) "Equipment Recovery" along with "They Took Our Men!" (These 2 quests are done at Sifreldar Village up around 40.72)

10) Once those 5 quests are done, hearth back to K3.

11) Turn in all of those quests and accept new ones:  Accept "Leave No Goblin Behind" "Just Around the Corner" and "Ample Inspiration"

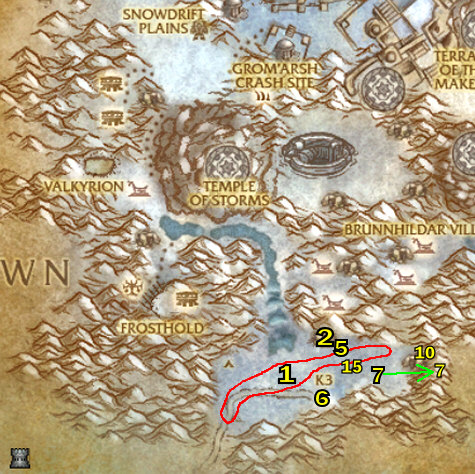
12) "Just Around the Corner" This quest is a little tricky, you have to pick up Sparksocket's Tools at 35.88, but you cannot fly in there to get it, nor just walk right to it easily, you have to avoid the land mines, it is kind of a maze to figure out how to get to it.  Just Watch This Video to see how to get to it.

13) Once you got the tools, go back to K3 and turn it in ... Accept "Slightly Unstable"

14) Turn in "Slightly Unstable" (Right there in K3) ... Accept "A Delicate Touch"

15) "A Delicate Touch" Go over to Garm's Bane, at 43.81, the best thing to do is stand in one area and put down tons of the land mines close together because it takes 2 to kill any of the invaders, See Video.

16) Go over to Tore Rumblewrench (at 41.80) and accept "Moving In" and "Ore Repossession"

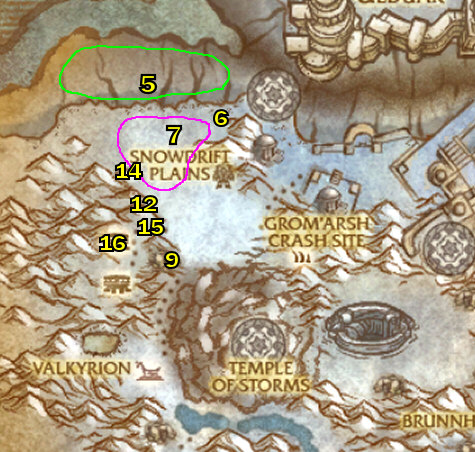
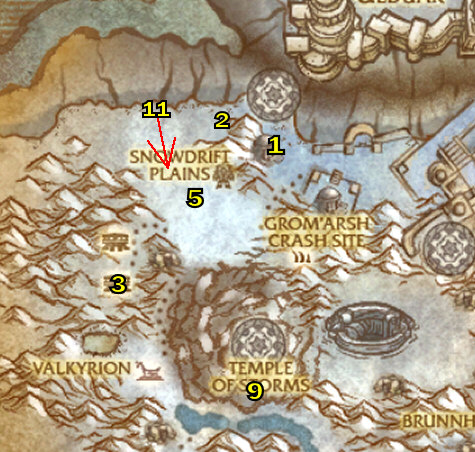
01) "Ample Inspiration" Pick up the U.D.E.D. Dispenser right next to you. Then find an Ironwool Mammoth around the middle section of Snowblind Hills and throw the U.D.E.D. at it, then pick up the Carcass meat quick, because they disappear fast.

02) "Moving In" along with "Ore Repossession" These are done in the Crystalweb Caverns, the entrance to the cave is at 40.78. The Impure Saronite Ore drops from the Snowblind Diggers in the cave (look for the wall of crates, there are a lot of diggers behind them).  NOTE: While you are in the cave you will come across an Injured Goblin Miner (there are actually 3 of them, but they all contain the same quest), he gives "Only Partly Forgotten" Accept that, and do it as well, the Icetip Venom Sac drops from an Icetip Crawler (Which are the purple looking spiders deep in the cave).

03) Once these 3 quests are complete, turn in "Only Partly Forgotten" at one of the Injured Goblin Miners in the cave ... Accept "Bitter Departure"

04) "Bitter Departure" (You have to talk to him to begin the easy escort quest)

05) Then go to Tore Rumblewrench (at 41.80) and turn in "Know No Fear" and "Demolitionist Extraordinaire".  Also if you are having trouble with the steps in this guide, that is because you are not using a genuine copy of the guide. The full version can be purchased at "joanas world com"

06) Go to K3 and turn in all completed quests, and accept new ones: Accept "Opening the Backdoor"

07) "Opening the Backdoor" The Transporter Power Cell is at 45.22, See Pic. The Teleportation Pad is at 50.22. Using the Power Cell at the transporter takes you back to K3...

08) Turn in "Opening the Backdoor" ... Accept "Know No Fear"

09) Go through the teleporter next to you and accept "A Flawless Plan" in front of you.

10) "Know No Fear" along with "A Flawless Plan" These quests are done in the cave, the entrance to the cave is at 48.80. To get to Frostgut, keep going upwards in the cave, you will eventually come to the end and see Frostgut's Altar, use the Hardpacked Explosive Bundle quest item near it, kill Frostgut.  Please note that the cave will actually not collapse on you, that must be some kind of corny scare tactic Blizzard put in there.  Make sure "Know No Fear" is done, then leave the cave.

11) Once those are done, go turn in "A Flawless Plan" (at 50.21) ... Accept "Demolitionist Extraordinaire"

12) Go through the portal to get to K3.

13) Turn in "Moving In" and "Ore Repossession"

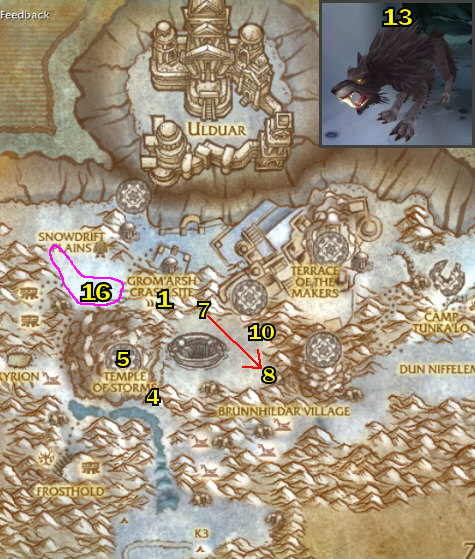
14) NOTE: The quest "When All Else Fails" automatically takes you to Grom's Crash Site, we do not want to do that yet, so we will skip it for now.

15) NOTE: "Overstock" is a DAILY quest that is the same thing you did earlier with the land mines with 'A Delicate Touch' quest.  I actually recommend just skipping this quest as it takes to long for the XP it gives, but for reference: Go over to Garm's Bane, at 43.81, the best thing to do is stand in one area and put down tons of the land mines close together because it takes 2 to kill any of the invaders, See Video.


Hyldnir Quest Line

01) "Discipline" (Quest objective is self explanatory).  The Exhausted Vrykul are the ones sitting down.

02) "The Crone's Bargain" Overseer Syra roams all around in the mines, so you may have to hunt her down.

03) Once you killed her and obtained the Runes, go back to 'Lok'lira the Crone' and turn it in ... Accept "Mildred the Cruel"

04) "Mildred the Cruel" Just go up the steps, look for yellow question mark, and turn it in ... Accept "Discipline"

05) "Leave No Goblin Behind" Go into the Forlorn Mines (entrance is at 42.69) and find 'Lok'lira the Crone' located right when you enter the mine on your left.  Turn this in at her and accept "The Crone's Bargain"

06) Once that is done, turn it in ... Accept "Examples to be Made"

07) "Examples to be Made" Garhal is right behind you on the same level.

08) Once that is done, turn it in ... Accept "A Certain Prisoner"

09) "A Certain Prisoner" Go back to 'Lok'lira the Crone' and turn this in ... Accept "A Change of Scenery"

10) "A Change of Scenery" To get to Brunnhildar Village, keep going up the steps and out of the mine, then turn this quest in at 'Lok'lira the Crone' just outside of the mine ... Accept "Is That Your Goblin?"

Brunnhildar Village

01) "Is That Your Goblin?" Talk to Agnetta Tyrsdottar (at 44.29) and then kill her.

02) Once that is done, turn it in ... Accept "The Hyldsmeet"

03) "The Hyldsmeet" (Just talk to 'Lok'lira the Crone' to complete the quest).  Once done, turn it in ... Accept "Taking on All Challengers"

04) "Taking on All Challengers" (Need to kill 6 Victorious Challengers around Brunnhildar Village).

05) Once that is done, turn it in ... Accept "You'll Need a Bear"

06) Go accept the following quests (inside the building at 48.31) in Brunnhildar Village: "Aberrations"  "Off With Their Black Wings" and "Yulda's Folly"

07) "You'll Need a Bear" (Turn this in at 53.25) ... Accept "Going Bearback"

08) "Going Bearback" Mount Icefang, right next to you to do this quest. See Video.

09) Once that is done, turn it in ... Accept "Cold Hearted"

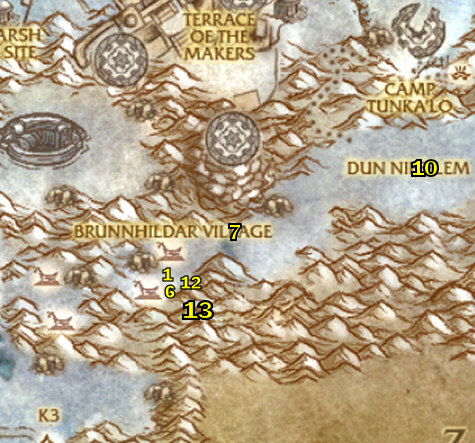
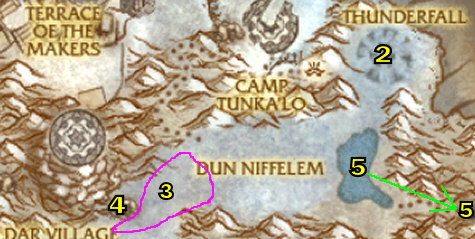
10) "Cold Hearted" What you have to do is fly over to Dun Niffelem (around 65.60) and mount a Captive Proto-Drake. Then rescue 3 Brunnhildar Prisoners below by using the 'Ice Shard' ability.  Note that you can only carry 3 prisoners at a time, See Pic.  Since you need to bring back 3 proto-drakes and 9 prisoners, do the math and that makes 3 trips back and forth to get this done. See This Video for how to do one trip.

11) Once that is done, turn it in (at 53.15) ... Accept "Deemed Worthy"

12) "Deemed Worthy" (Turn this in the Village at 41.21) ... Accept "Making a Harness"

13) "Making a Harness" Need to go south a tad around the cliffs, 41.35 and kill Icemane Yeti for the hides.

01) Once done go back (to 49.71) and turn it in ... Accept "The Last of Her Kind" and "The Slithering Darkness"

02) "The Last of Her Kind" along with "The Slithering Darkness" (These are both done in the cave at 55.63)  The Injured Icemaw Matriarch that you have to mount and return back (it guides itself back), is in the back of the cave, not to hard to find.

03) Once done go back and turn it in ... Accept "Into the Pit"

04) "Into the Pit" Go Into the Pit of the Fang, (which is the area in the middle of the village), get your Bear out and kill 6 Hyldsmeet Warbears.

05) Once you get back to Brunnhildar Village turn them both in ... Accept "The Warm-Up "

06) "The Warm-Up " Kirgaraak is the yeti that is chained up in the town, use the Reins of the Icemaw Matriarch quest item to get your bear out.  To beat him keep spamming all your abilities non-stop, See Video.

07) Once done go back and turn it in (the building at 49.71) ... Accept "Prepare for Glory"

08) Turn in "Prepare for Glory" (Near the mine entrance at 77.49) ... Accept "Lok'lira's Parting Gift"

09) Turn in "Lok'lira's Parting Gift" (Gretta the Arbiter is at 50.65 in the village) ... Accept "The Drakkensryd"

10) "The Drakkensryd"  Mount one of those blue Proto-Drakes next to you, and it will automatically fly to the temple where this quest is done.  Once there you need to use the Hyldnir Harpoon quest item to shoot at the dragons to jump and land on them, on each dragon you land on kill The Hyldsmeet that is on them, once you kill all 10, use the harpoon on one of the Column Ornaments at the top of the temple to propel yourself up into the top of the temple, note that you need to harpoon yourself up to a dragon that is flying high up to do that, See Video.

11) Once you get at the top of the temple turn this in at Thorim ... Accept "Sibling Rivalry"

12) "Sibling Rivalry" (Simply talk to Thorim to complete this quest).  Once done, turn it in ... Accept "Mending Fences"

Valkyrion

01) "Yulda's Folly" Go west into the building (at Valkyrion, 23.21) and kill Yulda the Stormspeaker.

02) Then accept the quest "When All Else Fails" in that same building at the Harpoon Crate.

03) Do the following 3 quests together at Valkyrion [steps 4 - 6]:

04) "Off With Their Black Wings" (The Nascent Val'kyr are the ones flying slightly in the air).

05) "Aberrations" (Read quest description. The eggs are all in the orange looking lava pool).

06) "When All Else Fails" Talk to the quest giver again to take you on the journey.  This quest takes you on a rocket over to Grom'arsh Crash-Site.

07) Once those are done, go back to Brunnhildar Village (at 48.11) and turn in all quests: "Aberrations" "Off With Their Black Wings" "Yulda's Folly" "Valkyrion Must Burn"

08) "Mending Fences" Done around 29.20, use the Thorim's Charm of Earth quest item on the Giants there (It requires a boulder for each throw which are picked up around the area).  NOTE: While doing this quest you will find an item that starts "The Refiner's Fire", accept it and start doing that as well, right in the same area.  Then kill Fjorn at 77.62 (The anvil is in the same spot), remember to throw a boulder at him as well.

09) Once you have all 10 Furious Sparks for the quest "The Refiner's Fire" turn it in at the Anvil (77.12) ... Accept "A Spark of Hope"

10) Hearth to K3.

11) Once at K3 accept "Valkyrion Must Burn"

12) "Valkyrion Must Burn" (The Valkyrion Harpoon Guns are at 65.51, use them to burn the hay stacks around the village).

Grom'arsh Crash-Site

01) Once at the crash site turn in "When All Else Fails"

02) Accept all quests there: ("Ancient Relics" you can also turn this in now if you have enough relics) "The Missing Bronzebeard" "The Missing Tracker" "Emergency Measures"

03) Get the FP there.

04) "The Missing Bronzebeard" (The note is at 35.64 in a 'Disturbed Snow' object on the ground, See Pic).

05) Go up to the top of the Temple of Storms (33.17) and turn in "Mending Fences" and "A Spark of Hope" ... Accept "Forging an Alliance"

06) Then go back to Grom'arsh Crash-Site (at 37.41) and turn in "The Missing Bronzebeard" ... Accept "The Nose Knows"

07) "The Nose Knows" (Khaliisi is down at 40.11).  Turn this in there ... Accept "Sniffing Out the Perpetrator"

08) "Sniffing Out the Perpetrator" Mount Frostbite (Khaliisi's pet), it then guides itself to where you need to go (but use Frostbite's abilities to slow down the iron dwarves behind you), once you get to the cave kill Tracker Thulin inside.

09) Once done use Fjordain's Communicator quest item to turn it in ... Accept "Speak Orcish, Man!"

10) Go up to Gimorak's Den (at 46.85) and as you enter it on your right you will see a troll (look for the yellow question mark on the minimap) and turn in "The Missing Tracker" ... Accept "Cave Medicine"

11) "Emergency Measures" along with "Cave Medicine" (These are both done right in the cave)

12) Once "Cave Medicine" is done go turn it in (at the troll near the entrance of the cave) ... Accept "There's Always Time for Revenge"

13) "There's Always Time for Revenge" Gimorak, can either be at the end of the cave or somewhere in the middle.

14) Once those are done, go back to the troll (near the entrance of the cave) and turn in "There's Always Time for Revenge".

15) Go to Grom'arsh Crash-Site (at 37.89) and turn in "Emergency Measures" and "Speak Orcish, Man!" ... Accept "Speaking with the Wind's Voice"

16) "Speaking with the Wind's Voice" Kill Stormriders for the item you need, they are found all along the Snowdrift Plains to the north-west, around 30.48.

17) Once it is done, go back up to the Crash-Site and turn it in.

18) Accept "Catching up with Fjordain"

Fjordain Bronzebeard

01) "Catching up with Fjordain" Simply use the Fjordain's Communicator item and talk to Fjordain, once the dialog is complete turn it in at Boktar ... Accept "Pieces of the Puzzle"

02) "Pieces of the Puzzle" The pieces of the Inventor's Disk are dropped by Library Guardians at the Inventors Library, around 38.43.  Once you obtain 6 Inventor's Disk Fragments, combine them to make the Inventor's Disk.

03) Use the Fjordain's Communicator item and turn this in ... Accept "Data Mining"

04) "Data Mining" The Databanks are just right outside of the Inventors Library, use The Inventor's Disk quest item on them.

05) Once that is done use the Fjordain's Communicator item and turn this in ... Accept "The Library Console"

06) "The Library Console" Turn this in right at the Inventor's Library Console (inside the building at 37.45) ... Accept "Norgannon's Shell"

07) "Norgannon's Shell" Use the Charged Disk quest item to summon Archivist Mechaton, then kill him.

08) Once that is done use the Fjordain's Communicator item and turn this in ... Accept "Going After the Core" and "The Earthen of Ulduar"

09) "Going After the Core" (Prospector Khrona's Notes are at 51.12 and Prospector Soren's Maps are at 59.51)

10) Once that is done use the Fjordain's Communicator item and turn this in ... Accept "The Core's Keeper"

11) "The Core's Keeper" Look for the tunnel on the side of the mountain at 56.58, fly inside and kill Athan at the end of it.

12) Once that is done use the Fjordain's Communicator item and turn this in ... Accept "Forging the Keystone"

13) "Forging the Keystone" Talk to Fjordain Bronzebeard at the top of the Temple of Invention, at 45.49.

14) Once done go to Grom'arsh Crash-Site (at 37.49) and turn it in ... Accept "Xarantaur, the Witness"

15) Also turn in "Ancient Relics" if it is completed, if it is not completed, then turn it in later once it is.

Dun Niffelem

01) Go to Dun Niffelem (at 62.10).

02) Get the FP there.

03) Go to King Jokkum (65.60) and accept "You Can't Miss Him" and "In Memoriam"

04) "You Can't Miss Him" (Njormeld is at Fjorn's Anvil, at 75.63).  Turn this in at him ... Accept "Battling the Elements"

05) "In Memoriam" The Horn Fragments are picked up off the ground around Thunderfall, 71.49; the pieces are pretty small and a bit hard to see.

06) Once that is done, turn it in.

07) Go back to Dun Niffelem (at 63.63) and turn in "Forging an Alliance" ... Accept "A New Beginning"

08) At the anvil there next to you (in Dun Niffelem) you can do a Daily Quest called "Hot and Cold", Accept it.

09) Accept "A Monument to the Fallen" (at King Jokkum, 65.60 in Dun Niffelem)

10) "Hot and Cold" Kill Brittle Revenants (around Frostfield Lake, 69.60) for 5 Essence of Ice, then go over to 77.62 and use the 5 Essence of Ice there on 5 Smoldering Scraps and then pick up 5 Frozen Iron Scraps.

11) "Battling the Elements" (Mount Snorri next to you and kill Seething Revenants).

12) Once those are done, go back to Dun Niffelem (at King Jokkum, 65.60) and turn in "In Memoriam"

01) Go over to Njormeld (at Fjorn's Anvil, at 63.63 in Dun Niffelem) and turn in "A Monument to the Fallen"

02) Also turn in "Hot and Cold" (at the Anvil there).

03) Accept "Forging a Head" (at Njormeld)

04) Go back over to (King Jokkum, 65.60) and accept "Jormuttar is Soo Fat..."

05) "Forging a Head" (Done around Frostfield Lake, 69.60).  Read quest objective.

06) Once done, go back to Dun Niffelem (at 63.63) and turn in "Forging a Head" ... Accept "Mounting Hodir's Helm"

07) "Polishing the Helm" (Kill Viscous Oils in the cave at 55.63)

09) Accept "Polishing the Helm" (A Daily Quest, accepted where you just placed the helm at with the previous quest, 64.59)

10) Go to the cave (at 55.63) and do the following 2 quests together:
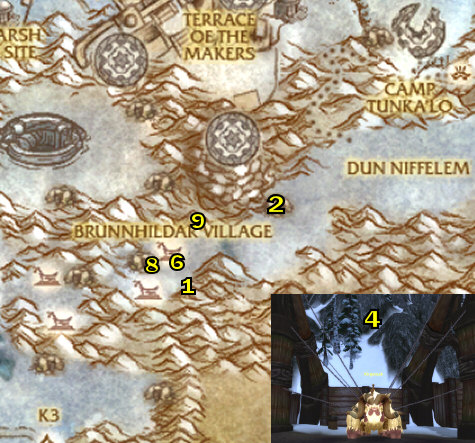
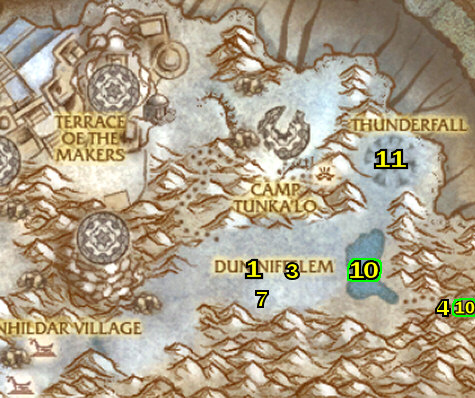
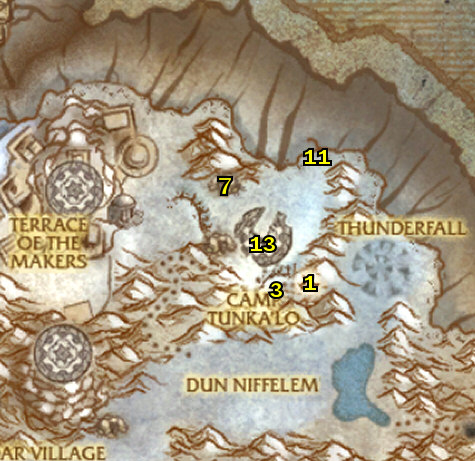
11) "Mounting Hodir's Helm" Do this at the north ice crystal in Dun Niffelem, See Pic, you can do it when mounted.

08) Once done turn it in (back at Njormeld 63.63).

12) "Jormuttar is Soo Fat..." Keep using the Everfrost Razor on the dead bears in there until you get the Bear Flank.  Once you 
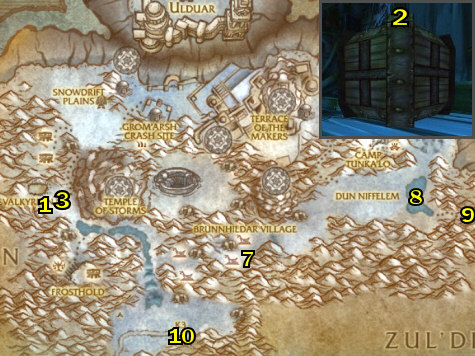
got the Bear Flank, use it at the small crater of rocks and shards, See Pic, Kill Jormuttar when he comes out.

13) Once those 2 quests are done, go back (to King Jokkum 65.60) and turn in "Polishing the Helm"

14) Also turn in "Jormuttar is Soo Fat..." (the big helm, up at 64.59)

15) I recommend just skipping "Blowing Hodir's Horn" (Daily Quest)

Dun Niffelem DAILY QUESTS:

01) I'd say if you are in level 78 do these Daily Quests, but if you are already level 79 (or close to it), just skip these for now.

02) "Blowing Hodir's Horn" (Done at Thunderfall, 11.49)

03) "Spy Hunter" (Kill Stormforged Infiltrators)

04) "Polishing the Helm" (Kill Viscous Oils in the cave at 57.63)

05) "Hot and Cold" Kill Brittle Revenants (around Frostfield Lake, 89.20) for 5 Essence of Ice, then go over to 17.62 and use the 5 Essence of Ice there on 5 Smoldering Scraps and then pick up 5 Frozen Iron Scraps.

Camp Tunka'lo

01) Go to Camp Tunka'lo at 37.80

02) Make Camp Tunka'lo your new home.

03) Get the FP there.

04) Turn in "Xarantaur, the Witness" Accept "The Witness and the Hero"

05) "The Witness and the Hero" The 3 scrolls are right there in the town, if you have trouble finding them then See This Video.

06) Once done, go back and turn it in ... Accept "Memories of Stormhoof"

07) "Memories of Stormhoof" The cave you need to go into is at 22.41, and Chieftain Swiftspear is way back at the end of the cave.  Just talk to him to complete the quest (this quest is currently bugged in a way, you can only talk to him if you are standing a couple feet in front of him).  And accept "Distortions in Time" from him.

08) "Distortions in Time" Use The Chieftain's Totem quest item on the swirly noisy spinney things in the cave.

09) Once that is done go back to Camp Tunka'lo at 65.51 and turn it in.

10) Turn in "Memories of Stormhoof" and "Distortions in Time" ... Accept "Where Time Went Wrong" and "The Hero's Arms"

11) "Where Time Went Wrong" along with "The Hero's Arms" (These 2 are done at The Howling Hollow, the entrance is at 67.39).  The Spear and Mail randomly drop from Scion of Storms there.

12) Once those 2 are done, hearth (or just go back) to Camp Tunka'lo at 65.51 and turn them both in ... Accept "Changing the Wind's Course"

13) "Changing the Wind's Course" (Done at the Temple of Life, around 64.46).  Just use The Lorehammer item there and use Stormhoof's abilities to get The North Wind's health down to around 10%, loot the horn, then use it to kill him. See Video.

14) Once done Hearth to Camp Tunka'lo.

Thorim

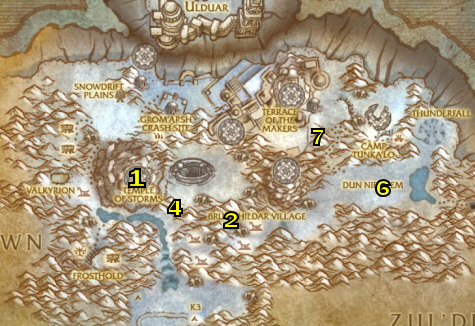
01) Go all the way over to the top of the Temple of Storms (at 33.27) and turn in "A New Beginning" ... Accept "Veranus"

02) "Veranus" (Pick up Proto-Dragon Eggs around the cliffs at Brunnhildar Village, around 74.27)

03) Once done, go back to the top of the Temple of Storms (at 33.57) and turn in "Veranus" ... Accept "Territorial Trespass"

04) "Territorial Trespass" The nest is up at 38.65, See Pic, use the eggs on the nest and wait for the dragon to come down to complete the quest.

05) Once done, go back to the top of the Temple of Storms (at 33.57) and turn it in ... Accept "Krolmir, Hammer of Storms"

06) "Krolmir, Hammer of Storms" Go to King Jokkum at 65.60 (it is faster to hearth to CampTunka'lo first then go there, but if hearthstone is still on a cooldown just fly there), talk to him, then follow the scripted dialog, once that is over, turn this quest in (at Thorim in front of you there) ... Accept "The Terrace of the Makers"
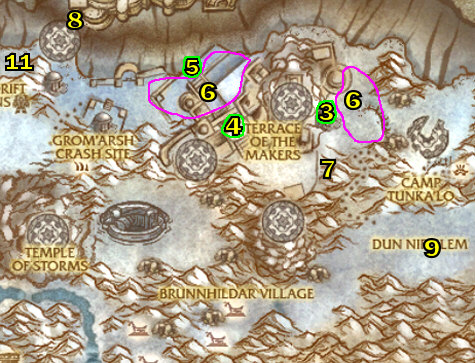
07) "The Terrace of the Makers" Turn this in at Thorim, at 26.81 (See Pic) ... Accept "The Earthen Oath" and "Loken's Lackeys"

01) Go do the following 2 quests around The Terrace of the Makers [steps 9 - 13]:  NOTE:  Remember for both of these quests, to use the Horn of the Peaks quest item to call forth an army of earthen that greatly helps kill things quick.  Learn to use the abilities that they have.  Focus on doing the "Loken's Lackeys" quest first.

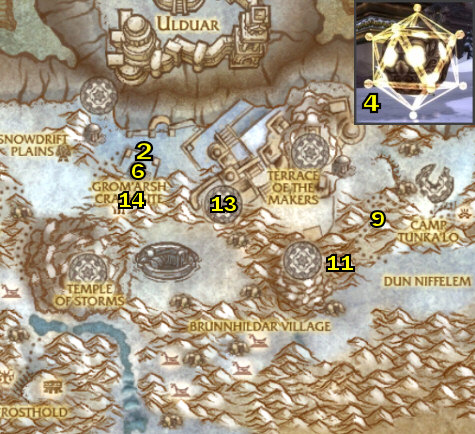
02) "Loken's Lackeys" Here are the locations of the 3 mobs you have to kill:

03) Duronn the Runewrought: 44.37, try to clear the adds first around him before you kill him, See Video.

04) Halefnir the Windborn: 28.75

05) Eisenfaust: 55.43, he is in the building up there on the side of the mountain.

06) "The Earthen Oath" (Kill Iron Sentinels & Dwarf Assailants).

07) Once those 2 quests are done, go back to Thorim (at 56.21) and turn them in ... Accept "The Reckoning"

08) "The Reckoning" Go to the Temple of Wisdom, Thorim is standing there at 35.31, talk to him to begin the fight, just watch the fight dialog go by to complete the quest.

09) Once done go to King Jokkum (at 25.60) to turn this in.  (It is faster to hearth to CampTunka'lo first then go there, but if hearthstone is still on a cooldown just fly there).

10) NOTE: "Whatever it Takes!" and "Diametrically Opposed" are both done in the Halls of Lightning, which is one of the dungeons at Ulduar. This can be done if a full group is found and you are prepared for this instance. It can be skipped for now.

11) Go up north-west to Bouldercrag's Refuge (at 70.16)

Bouldercrag's Refuge

01) Get the FP there.

02) Make it your new home.

03) Turn in "The Earthen of Ulduar"

04) Accept "Rare Earth"

05) "Rare Earth" The Enchanted Earth is mined down on the cliffs around 57.39, so you will need your flying mount to fly down around the cliffs to get them.

06) Once done go back to Bouldercrag's Refuge (at 30.36) and turn it in ... Accept "Fighting Back" and "Relief for the Fallen"

07) "Fighting Back" along with "Relief for the Fallen" Kill Stormforged Raiders/Reavers and heal Fallen Earthen Defenders with the Telluric Poultice quest item, all down just right outside of the refuge.

08) Once those 2 are done, go back and turn them in ... Accept "Slaves of the Stormforged" and "The Dark Ore"

09) "Slaves of the Stormforged" along with "The Dark Ore" (Both of these are done in the cave at 27.49)

10) Once done, hearth (or go back) and turn them in ... Accept "The Gifts of Loken"

11) Also accept "Facing the Storm"

12) Go kill Stormforged War Golems (around 24.44) until one of them drops a Dark Armor Plate, which starts "Armor of Darkness", accept it.

13) "Facing the Storm" along with "Armor of Darkness" and "The Gifts of Loken"  The Stormforged War Golems drop the Armor Samples.  Here are the 3 locations for The Gifts of Loken:

14) Loken's Favor: 44.48

15) Loken's Power: 26.27

16) Loken's Fury: 44.42

17) Once all 3 are done, go back and turn them in ... Accept "The Armor's Secrets"

01) "The Armor's Secrets" Entrance to Mimir's Workshop is at 73.39, Attendant Tock is inside towards the back on the right.

02) Once done go back and turn it in ... Accept "Valduran the Stormborn"

03) "Valduran the Stormborn" Valduran the Stormborn is found at 24.52 inside the building. You must use the Bouldercrag's War Horn item to start the battle, this will call two elite npc's to help you in the fight.

04) Once done go back and turn it in ... Accept "Destroy the Forges!" and "Hit Them Where it Hurts"

05) "Hit Them Where it Hurts" along with "Destroy the Forges!" (All of the forges are right around 28.44, and looks like this).

06) Once done go back and turn them in ... Accept "A Colossal Threat"

07) "A Colossal Threat" (Colossus Attack Specs are at 29.44, and Colossus Defense Specs are at 30.45).

08) Once done go back and turn it in ... Accept "The Heart of the Storm"

09) "The Heart of the Storm" Entrance is on the side of the mountain at 32.63.  You need to be on a flying mount to get to it. You can fly right in and to the end where The Heart of the Storm is.

10) Once done, hearth (or go back) and turn it in ... Accept "The Iron Colossus"

11) "The Iron Colossus" Mount a Tamed Jormungar around 26.35, then to move you must be burrowed in the ground, go south a bit you will run into Iron Colossus, kill him by spamming your abilities non-stop.  NOTE:  Right before he slams the ground (you will get a msg on the screen to warn you ahead of time), quickly burrow under the ground to avoid it.

12) Once done, go back and turn it in.

To continue on with this guide, please go to my Icecrown Guide!

You can check the bottom of my 1-60 guide for general tips/tricks on how to level faster, along with hunter specific tips/tricks.

COMING SOON:  Recorded 1-80 speed runs!

Want to leave testimonials about my guide?  You can do that on my MySpace Page through leaving a comment!  First you have to be my friend first, and please do so!

For screenshots and to get to know Joana/Mancow better you can visit this part of my site here!  And if you are interested in signing up for my newsletter, you can do so at this page here!

Help me improve this guide!

If you feel that some quests should contain additional information that would be helpful, or if you have any additions or find any errors in this guide, PLEASE contact me here, make sure you leave "Northrend Guide Improvements" in the subject line so it filters correctly into my inbox.   I appreciate any feedback to make this guide better!

MORE GUIDES:  To check out more World of Warcraft guides that are decent buys, you can check out Ultimate World Of Warcraft Guide for WotLK PvP strategies and tips and they also offer lots of guides for free lifetime membership updates,  Luke's Gold Guide, which is great if you need a gold guide, and also the Penn's Profession's Guide for in-depth overview of WoW professions, this guide can give you some more pointers on the classes and such.  And for a complete list of WoW products you can purchase, please check out my Premium Guide List out.