Introduction: Do
the quests ever end? This zone has the most quests out of any
zone in Northrend. But I really enjoyed questing in this
zone! It felt like with every quest I did I was getting closer
and closer to the Lich King! The new "Phase System" is really
played out a lot through out this zone. You will see things
change continuously after completing many quests thanks to this new
"Phase System". This zone really immerses you in the story that
way. Some cool highlights in this zone include watching the
Argent Crusade build an Outpost in 5 seconds, a flying horde base,
several quests involving you controlling Arthas when he was a Death
Knight, helping fellow death knights take over a base called The Shadow
Vault, and you get to control a Leaper! The Lich King himself
makes many appearances throughout this zone! Who will be the
first to kill the Lich King?
Interactive MAP MOD (MetaMap) Coordinates.
Go here to learn how to get map coordinates and Interactive Map Coordinates, which are very important to have when using my guide.
Help me improve this guide!
If
you feel that some quests should contain additional information that
would be helpful, or if you have any additions or find any errors in
this guide, PLEASE contact me here, make sure you leave "Northrend Guide Improvements" in the subject line so it filters correctly into my inbox. I appreciate any feedback to make this guide better!
World of Warcraft™ World
of Warcraft and Blizzard Entertainment are trademarks or registered
trademarks of Blizzard Entertainment, Inc. in the U.S. and/or other
countries.
If you are interested in making money referring people to buy my guide, you can follow the instructions on THIS PAGE HERE
about how to do this, generally with my affiliate program you earn 50%
of all the profit if you refer somebody to my site with your affiliate
link that buys my guide! TALK ABOUT EASY MONEY!
LEGAL:
Do not distribute this product in any way shape or form. Any
theft or unauthorized reproduction of this Guide is prohibited.
Violators will be prosecuted. Special markers have been encrypted
into this guide to identify the original buyer. Be WARNED if you
distribute this guide on the internet, I will know who it is.
PLEASE READ! (HOW TO USE THIS GUIDE):
08)"Quest Name" (this quest has a yellow highlighted number) Quests
that have a yellow highlighted number simply means it is numbered on
the map to the right. This saves time because some quests are not
numbered on the maps, so you know whether or not to look on the maps.
All
quests and mobs through out my guide are linked to wowhead. When
following my guide, you can use these links for further information on
the quests/mobs.
All video links are in RED.
You will need to download the Divx WebPlayer when prompted. And
you can double click on the videos when playing to make it full screen.
The checkboxes ()
next to each step are for your personal use only. I have included
them for each step incase you want to mark off which step in the guide
you are at. You do not have to use these if you don't want, I
have included them since it was requested by a lot of people.
Guide Color Codes: Accept a quest. Go do a quest. Turn in a quest. General mob/item link. Picture. Video link.
-COMING SOON- Download Printable Version of This Guide! -COMING SOON-
09) "Into The Wild Green Yonder" Simply mount a skytalon in front of you and go north-west to Scourgeholme (around 79.66) and grab a Captured Crusader
and then bring him back to the Vanguard (at the Bonfire where all the
tents are at), you can only carry one at a time, so you will have to
make 3 trips.
03) "It Could Kill Us All" along with "The Stone That Started A Revolution" Both are done in Crystalsong Forest around the Unbound Thicket, 65.61. The Elven Masonry are objects found around the Ruins of Shandaral, 75.63 in Crystalsong Forest, and the Heartwood are objects picked up off the ground around The Unbound Thicket. The Crystallized Energy objects are dropped from the mobs there.
04) Once done go back (to 82.73 in icecrown) and turn them both in.
11) Once done, go back (to 82.73) and turn it in (or you can take a short cut and quickly go through the death gate portal).
12) Accept "The Crusaders' Pinnacle".
Also if you are having trouble with the steps in this guide, that is
because you are not using a genuine copy of the guide. The full version
can be purchased at "joanas world com"
09) "Hope Within the Emerald Nightmare"
Once in the 'nightmare' find Emerald Acorns on the ground around you
(look for the shiny sparkles coming from it). To leave the
'nightmare' right-click the buff at the top of the screen.
13) "The Touch of an Aspect" Fly to Wyrmrest Temple in Dragonblight, then go to the top of the temple and turn this in ... Accept "Dahlia's Tears"
14) Also accept "Mystery of the Infinite, Redux"
(From Chromie there). NOTE: You may need to be level 80 to accept this
quest, I am not sure at the time of this writing. Can anyone confirm?
15)"Dahlia's Tears"
What you have to do is go over to where the horde is fighting the
undead (at 42.50 in Dragonblight), when each battle is nearly over a Ruby Keeper will fly in and burn the undead, spawning patches of flowers which you can loot to receive the tears.
21) "The Will of the Naaru"
As soon as you accept this quest, an NPC will open up a portal to
Shattrath for you, go through it and turn this quest in at A'dal (The
NPC smack dab in the middle of the city) ... Accept "The Boon of A'dal"
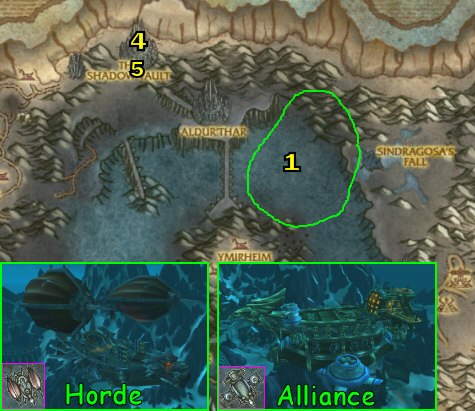
01)
Go to the flying ship Orgrim's Hammer (flying above Icecrown), you can
use your map to help you find it, make sure you go to the horde one and
not the alliance one. The horde one has several blimps on it while the
alliance one has propellers.
05) Once that is done, go down (to 44.24) and turn in "It's All Fun and Games" at Baron Silver (look for the yellow question mark on the minimap) ... Accept "Free Your Mind"
06)"Free Your Mind" The items for this quest are found right in the immediate area, around The Shadow Vault.
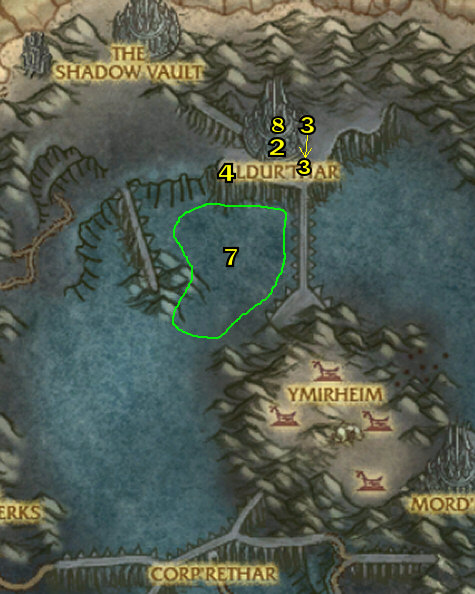
01) NOTE: The Vrykul's through out this zone drop Vrykul Bones, make sure you save these (and not sell them to vendors) as you will need them for a later quest.
03) "King of the Mountain" Mount Thunderbomb's Jumpbot
right there and jump your way up to the pile of bones (at 54.59), you
have to jump in certain spots to keep progressing upwards, once up
there plant the horde battle standard (by pressing "1"), See Video.
04) Once that is done, go back down (to 21.17) and turn it in.
06) Also accept "Assault by Ground"
Accepting this quest, immediately starts the escort quest event.
Go ahead and follow the orcs to complete the quest.
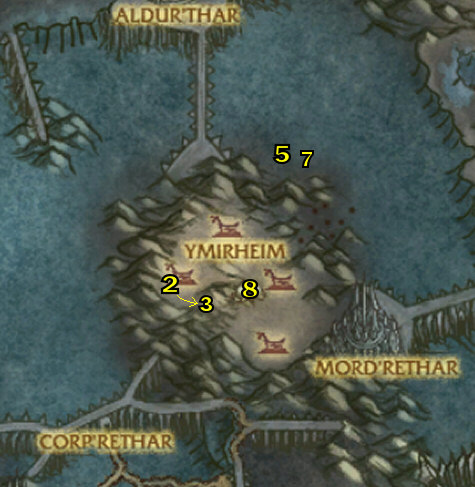
07) "Assault by Air" Mount the Kor'kron Troop Transport,
(at 59.45) you will then automatically fly over to Ymirheim, you will
have to wait about 45 seconds before you come in contact with the
Ymirheim Spear Guns that you have to shoot at, just shoot them to
disable them from firing at you, once you get all 4 'drops' complete,
just leave the vehicle to parachute down, See Video.
08) Go in to the Saronite Mines (at 26.57), walk straight inside a bit and accept "Mind Tricks" (from Darkspeaker R'Khem who is chained up)
09) GROUP: "Mind Tricks" The mob you have to kill for the key is just right behind you, Foreman Thaldrin,
He can be soloed but it is not easy, try and get some help if you
can. There is no follow up quest to this, so it can be skipped or
done later.
10) "Slaves to Saronite" Simply talk to the Saronite Mine Slaves in the mine, you have a chance that they will run out of the mine and give you quest credit, or turn hostile on you.
11) "Blood of the Chosen" (Finish this quest up by killing the Vrykul around Ymirheim).
04) NOTE: "Make Them Pay!"
is a PVP Daily Quest, which has you kill other Alliance players in
Icecrown. If you are on a PVE server you will be flagged for PVP
as long as it's in your quest list. It is up to you if you want
to do this or not. If you are on a PVP server I say accept it
anyways.
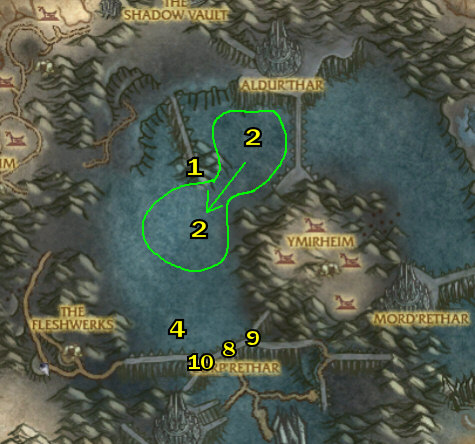
01) Go to the Savage Ledge (at 67.22) and do the following 2 quests together [steps 2 - 3]:
02) "Honor Challenge" Throw the Challenge Flag quest item at the Mjordin Combatants then duel and kill them, you can only throw the flag when you are out of combat, so you will need to do it from a distance.
08) "Get the Key" The mob you have to kill for this quest is right outside of Ufrang's Hall called Instructor Hroegar
(he roams around in the Savage Ledge), once you get his key go back
inside of Urfrang's Hall to turn this in (at the chained up NPC) then
Accept "Let the Baron Know"
09)Accept "Crush Dem Vrykuls!" (From the abomination Vile the abomination)
02) "Reading the Bones" By now you should be carrying at least 15 Vrykul Bones
(If not, you can turn this quest in later once you do). Please
note that you can keep turning in additional bones for more of these
power-ups.
03) Go to the Underhalls (The entrance is at 32.32), go straight through then make a left, go straight and accept "Revenge for the Vargul" (from Bethod Feigr). NOTE: As you kill the mobs within the cave here, use the Ebon Blade Banner quest item on the mob corpses.
04) "Revenge for the Vargul" Turn around and go straight forward down the steps into The Circle of Suffering room, then use the Bethod's Sword quest item in front of Thane Illskar. Kill the 3 mobs one-by-one to complete the quest.
07) "The Sum is Greater than the Parts" You need to go right over in the next room where Nergeld is standing at the end of the hall and mount him to do this quest. You need to kill Dr. Terrible
once he comes out. This quest is not easy, but it can easily be done,
it may take a few tries. You need to study what his abilities do and
you will be needing to use all 4 of them wisely to accomplish this
quest. See Pic for
what his abilities do. Basically the strategy is this: Keep Roaring the
mobs back (this is important) each time the cooldown is up for it. Or
in the meantime use a Stomp. Once Dr. Terrible comes out, continuously Punch him (keep pressing 1) while also Roaring the other mobs away. If you Roar Dr. Terrible
away as well (which we don't want) quickly use the Chained Grip ability
to bring him back to you so you can continue to Punch him. Also note
that the Dr can heal himself, if you see him rev up his healing,
quickly Stomp him, it will stop it. Hopefully this helps! See Video.
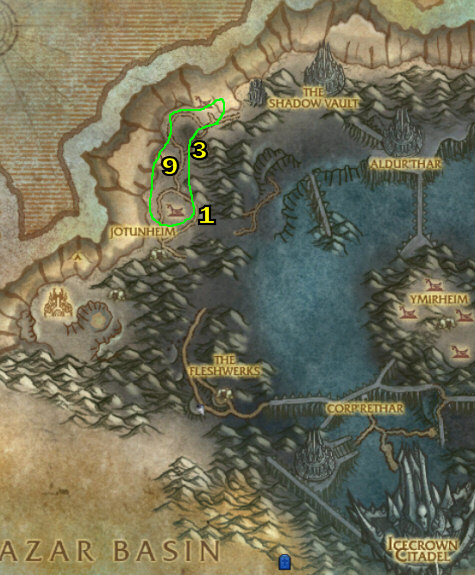
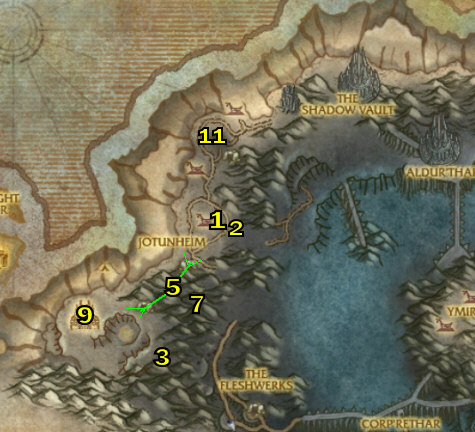
13) "Vandalizing Jotunheim" The banners are easy to find, they are big, look for the sparkles coming off of them, simply right-click them to burn them. See Pic.
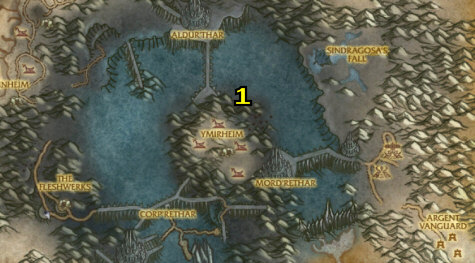
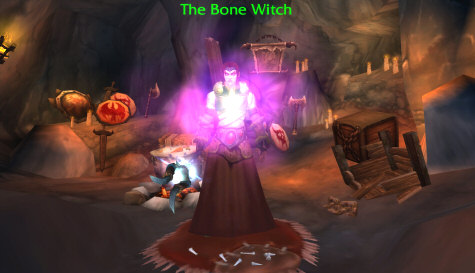
05) "Find the Ancient Hero" This is done in the cave (at 27.47), you need to keep talking to the Slumbering Mjordin (sleeping against the walls) until Iskalder
is revealed (you will know when he comes out because he is elite and
you will get a message on your screen), once he does appear use The Bone Witch's Amulet quest item on him. Then run him back to The Bone Witch (in the cave at 32.42).
07) "Not-So-Honorable Combat"
(This is done up at 28.52). It can be soloed but it is not that
easy. At least give it a try, the graveyard is right next to it,
If you can't do it or find a group to help you do it, then skip to the
'The Shadow Vault' section below for now, you can come back to this
later.
01)
This one has you kill 6 elites with a group. And just like the other
ones you can rack up a lot of quick XP, but you will need a group to
help you do them all as they are not soloable. You can come back later
if you find a group to do them.
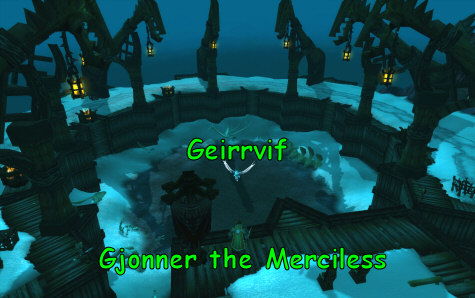
17) GROUP: "Second Chances" (See Video) You will most likely need a full group to help you do this quest, Archbishop Landgren is inside the cathedral at 9.47, once you kill him at least one person has to use the Arete's Gate quest item on his corpse.
19) GROUP: "The Admiral Revealed" (See Video) You will need a full group again. Grand Admiral Westwind
sits around the bottom of the Hidden Hollow in the Scarlet Onslaught
base in far-western Icecrown. The entrance to the cave is at 9.48.
04) "Destroying the Altars" Again all 4 Altars are around 37.71, and Zarod (Who looks like a Lich) is roaming in between them. Kill him and use his staff to destroy the Altars.
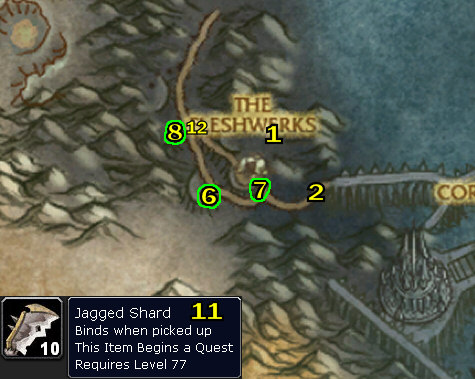
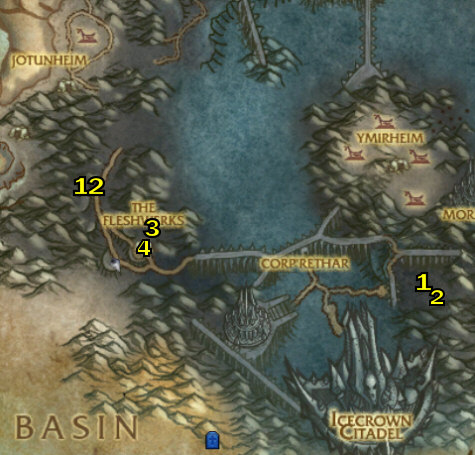
11) NOTE: While doing these quests you should find an item (that drops from a Spiked Ghoul) that starts "Jagged Shards". And start killing Ghouls around the Fleshwerks for the Shards.
12)"Jagged Shards" Make sure this quest is finished up.
13) ESCORT QUEST: "I'm Not Dead Yet!" There is an escort quest that starts at 31.64 from Father Kamaros. Accept it and do it, it's easy.
01)
NOTE: For this entire quest chain it is important to keep looking at
the minimap for the yellow questions marks for where to turn each of
them in at.
04) Once done go back (to 54.24) and turn it in ... Accept "Blow it Up!"
05) "Blow it Up!" Go right over (to 24.46, the little bombs sitting by the edge) and turn this quest in ... Accept "A Short Fuse"
06) "A Short Fuse"
Accepting this quest immediately shoots you in the pit and you land at
Naz'anak: The Forgotten Depths, underneath the water there is a 'Pulsing Crystal' where you turn this quest in at ... Accept "A Voice in the Dark"
07) NOTE: There is a Surface Portal down there that takes you back to the top, don't click on it now, we will use it later.
10) Once it is done, go back to the boy and turn it in ... Accept "Return to the Surface"
11) Go through the Surface Portal behind the boy.
Blackwatch
01) "I'm Smelting... Smelting!" Done around 58.23, simply use the Bag of Jagged Shards quest item at one of the three fiery tornado looking furnaces with a bunch of black smoke coming out of them.
05) Once those 2 are done, leave the cave and go back up to the Blackwatch (up at 35.26) and turn them both in ... Accept "Killing Two Scourge With One Skeleton"
06) "Killing Two Scourge With One Skeleton" The Burning Skeletons are the green bone arms sparkling randomly on the ground. Click the arms, and you will get a Burning Skeleton companion. Then bring them to the chained abominations around 32.20.
07) Once that is done go back up and turn it in ... Accept "He's Gone to Pieces"
10) "Putting Olakin Back Together Again"
This is all done in Sanctum of Reanimation (the entrance to the cave is
at 34.68). The thread is in the small room to the left as you
enter. The cleaver is at the end by the lab equipment. The 'Slab'
where you finally use the Crusader Olakin's Remains quest item at is located in the middle of the Sanctum of Reanimation, See Video.
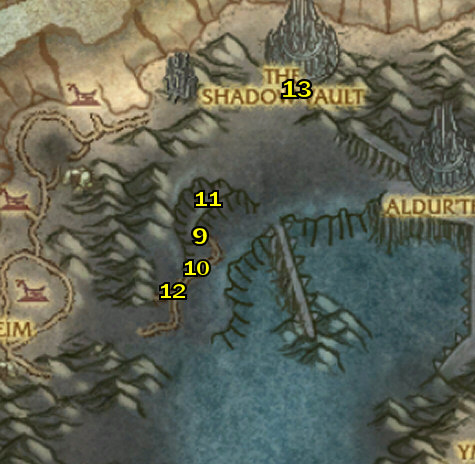
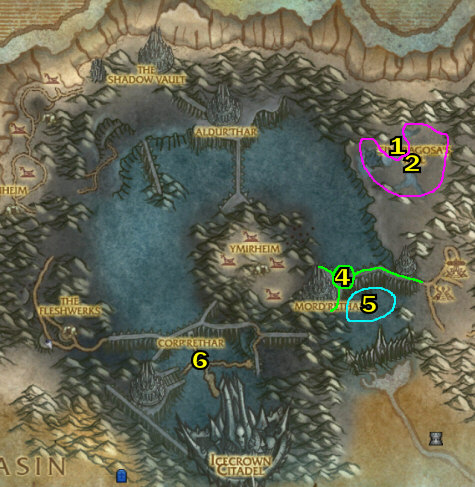
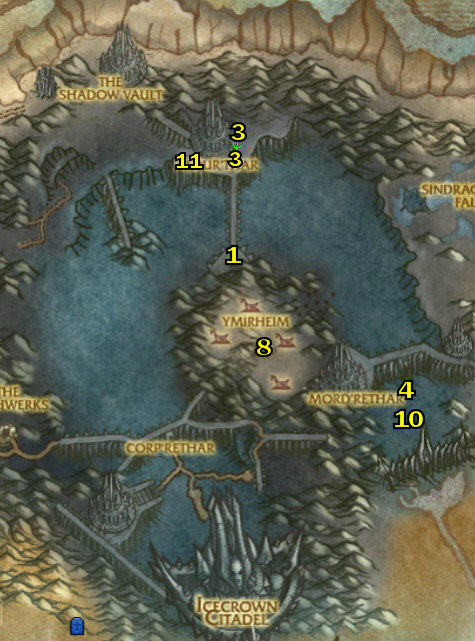
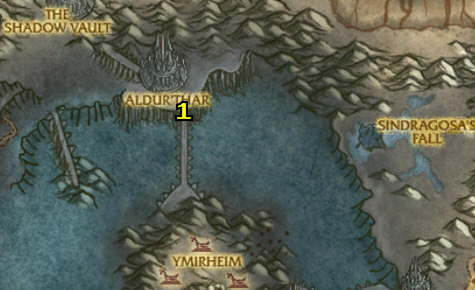
03) Go to The Shadow Vault (at 44.74) and accept "Parting Gifts"
04) "Parting Gifts"
Right-Click one of the red 'eye's just outside of the vault (at 74.24),
Click the Seize control.. option. You will then take control of a
Eidolon Watcher, get to know the abilities it has, as you will be using it for the next couple of quests.
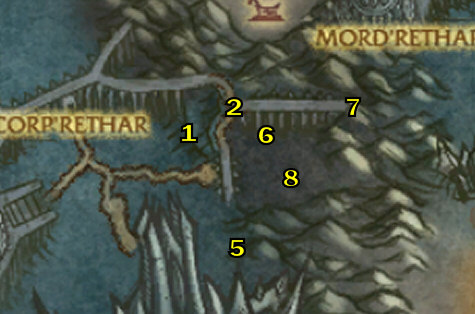
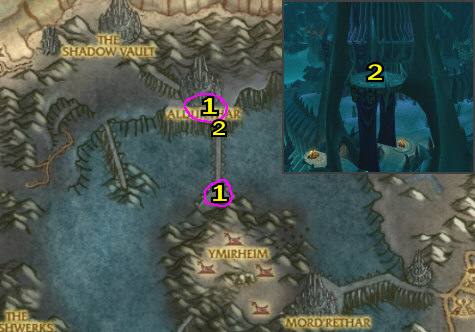
01)
Right-Click one of the red 'eye's just outside of the vault (at 74.14)
and then go south-west down the path and you will run into the Weeping
Quarry (around 79.33) where the following 3 quests are done together
[steps 2 - 5]: (See Video to see how to get there and start doing these quests)
02) NOTE: While doing these quests remember to use the 'Dephase' ability to clear away any mobs that are after you!
06) Once all 3 are done use the 'leave vehicle' button to return to The Shadow Vault and turn all 3 quests in ... Accept "Seeds of Chaos" and "Amidst the Confusion"
07) "Seeds of Chaos"
Talk to the NPC (that gave you the quest) to fly on a skeletal gryphon
and then use the 'Firebomb' ability to kill all the undead. Once
done, parachute down (by using the 'leave vehicle' button), and then do
the next quest:
08) "Amidst the Confusion" Here are the locations of the 4 objects you have to collect:
09) Schedule: 77.41 (on a little wagon that is next to a tent)
02) "New Recruit" Go up over to 57.68 (on the bridges), and attack a Lithe Stalker until it's health gets low enough to use the Sigil of the Ebon Blade quest item on em, then bring him back down to 53.71.
04) "The Vile Hold" Get control of the lithe stalker from the 'eye of dominion' just up the road behind Vereth the Cunning. Here are the locations of the places you have to explore:
05) Alat of Sacrifice: 56.79 (go up on the bridge then south a little)
06) Blood Forge: 28.31
07) Icy Lookout: 61.28 (go up on the bridge for this)
01)
Make sure you are still in leaper form (if your not go to the 'Eye of
Dominion' behind you to get it again) and do the following 3 quests
together: (See Video for a quick demonstration on what you are in for)
09) GROUP: "The Fate of Bloodbane" Orbaz Bloodbane is down at 54.86. He has 422k hitpoints and hits hard, so you will need a full group with a healer/tank for this one.
10) Once these 3 quests are done, go back (to 53.21) and turn in all 3 of these quests in ... Accept "The Fate of Bloodbane"
07) "Army of the Damned"
Accepting this quest will phase out all the surrounding mobs and let's
you see into the "past" with a number of Alliance Footmen standing
around. You're in control of the helmetless, Death Knight version
of Arthas Menethil. Basically what you need to do is kill the footmen
and then raise them as undead with the abilities you have. Here are his
abilities and tips on how to do this:
Deathstorm: Kills a LOT of footmen in front of you, but costs most of your mana pool Soul Cleave: Use this when you can't use any other mana, you can recover some mana back from this while using it. Gift of the Lich King (Raise Dead): Use this ability to raise the dead to get your quest credit. Consume Minions: Use this to sacrifice a ghoul and replenish mana and health back. Keep using this every time the cooldown is up. This is the strategy: Basically, first start off with a Deathbolt, then Raise Dead, then Sacrifice, and repeat until completed. See This Video for a cinematic demonstration I put together on YouTube.
08) Once it is done (Click the 'Leave Vehicle' button), turn it in at the boy there and Accept "Futility"
09) Go to The Broken Front (around 69.26) and do the following 2 quests together [steps 10 - 11]:
10) "Poke and Prod" To find the Adepts, just look for the greenish smokey stuff.
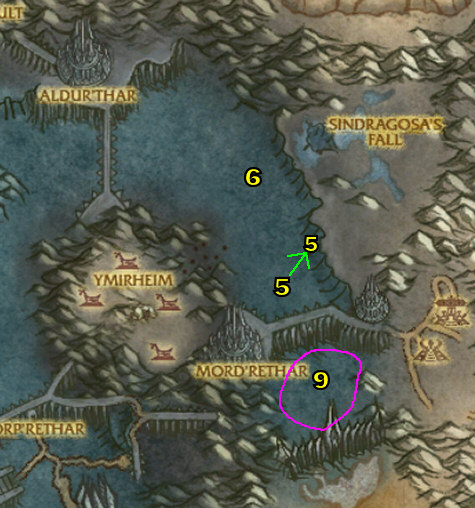
04) GROUP: "Against the Giants" This quest has you kill Pustulant Horrors
found all over the top of Mord'rethar around 65.59 and on the Ironwall
Dam around 70.72. Even though this quest is labeled as as a 5 man
group quest, I easily soloed this quest. This quest can be
skipped for now if you like.
07) "The Hunter and the Prince"
The object you need to pick up is like 30 yards away from the
boy. Once you pick up the rock you control Arthas again and have
to kill Illidan, See Video. Here are the four abilities, and the strategy to beat him:
Parry: You need to keep using this continuously to gain mana back. Cooldown is only a second, so keep pressing it! Deathstrike:
Don't use this! It wastes mana and does not do nearly enough
damage as the Annihilate ability. Save all your mana for
Annihilate. Stomp: This knocks Illidan back, but also uses a chunk of mana. Annihilate:
This is the ability that is going to do all your damage to him (but
costs a lot of mana), you can only use this from a distance (to get him
at a distance you need to use the 'Stomp' Ability first). The strategy is this:
keep using parry until your mana gets near to full, then quickly use
the Stomp ability followed quickly by the Annihilate ability, then
repeat.
10) Go to the goblin down below in Orgrim's Hammer and turn in "Volatility" ... Accept "Green Technology"
Green Technology
01) "Sneak Preview"
Simply fly around Aldur'thar, 22.34 to get all locations
discovered. The spots seemed kind of vague to me, most of these
can be visited around 53.34, and the south one was at 23.46.
03) "Fringe Science Benefits"
This quest takes a little bit to get used to. Basically you have
to talk to the NPC next to you to ride a 'bomber' and then kill a bunch
of undead out in the field to the east. Your bomber has 3
different modes, here are tips for each of them:
Anti-Air Turret:
Fires missiles at the gargoyles in the air. To aim this, simply hold
down the right mouse button then fire the missiles (just targeting the
mobs won't do anything). Bomber Bay: Simply lobs bombs to the ground. Please note that the abominations on the ground are the Captains. Engineering:
This mode allows you to beef up your shield and put out fires (if your
bomber is on fire). Your shield amount is listed at the top right of
the screen (as a buff), and has a cap of 100, so keep using the 'Charge
Shield' ability occasionally to get your shield back up to 100. Playing this for awhile and you can easily master it. See Video for a quick gameplay demonstration for it.
04) Once this is done, turn it in.
05) Now this opens up two Daily Quests you can do with the Bomber and they are: (these are optional to do right now)
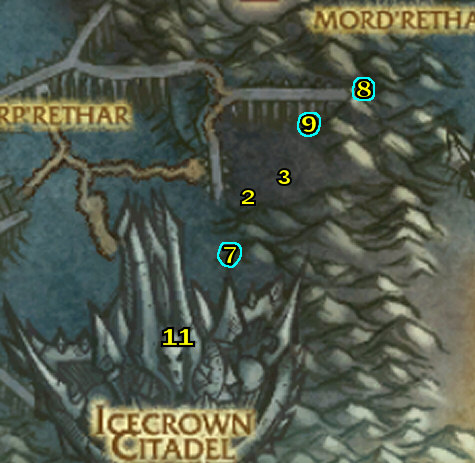
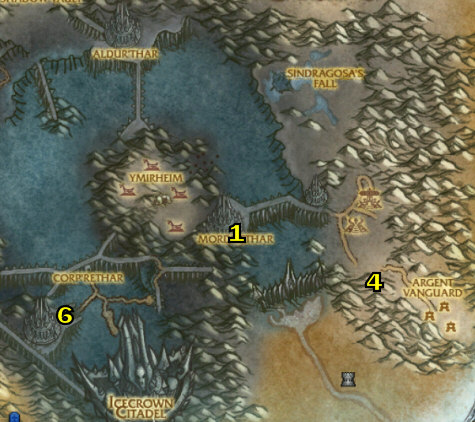
01)The following 2 quests are group quests done inside Mord'rethar vault (entrance at 63.22). You need to do "Against the Giants" in order to accept these.
02) GROUP: "Basic Chemistry"
The cauldrons are in the Mord'rethar vault (entrance at 63.22).
One player throws the fluid into the cauldron (by using the Pustulant Spinal Fluid
quest item), then periodically the cauldron will put out emotes telling
you to add more fluid. The quest item has a 90 second cooldown on
it, so at least two or more players will be needed to alternate their
fluids. See Video.
03) GROUP: "Coprous the Defiled" Coprous the Defiled
is right in the same area back in the vault. Simply kill him. It is
possible to solo this quest but it is not easy. TIP: Before he spits
his acid attack, hide behind a pillar and you wont get hit by it. See Video.
06) "Tirion's Gambit" Go kill a Cultist Acolyte
(they are patrolling up and down the stairs of the Cathedral of
Darkness at 46.26) to obtain a Cultist Acolyte Hood, put it on and then
go up the stairs (to 44.26, by a big blue fire) and talk to Highlord
Tirion Fordring to start an event that leads you to complete the quest.
Once it is over go through the portal which takes you back to the
Crusader's Pinnacle.
01) "Cannot Reproduce" All three cauldrons are right next to each other (at 49.34). Use the Partitioned Flask quest item at each of the 3 cauldrons there.
02) "Chain of Command"
While doing this quest remember that the named mob is always in the
BIGGER tent in the area that they are in. See the locations of
these mobs below:
07) "Drag and Drop" Done south of the bridge (around 53.46), kill the mobs there for the Orb of Illusion quest item you need, then throw it at the Dark Subjugators from a distance while out of combat.
09) Go to the goblin down below in Orgrim's Hammer and turn in "Cannot Reproduce" ... Accept "Retest Now"
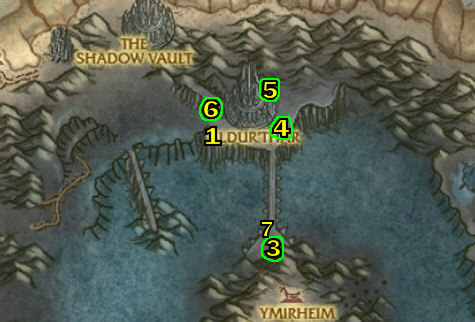
01) NOTE: Before starting the following quests make sure you drink the Diluted Cult Tonic quest item, you will see a 10 minute buff appear on the top of your screen, you can only loot Tainted Essences (which you will need later) while this buff is active! So continuously drink that potion to keep the 'buff' active.
03) "Not a Bug" Need to kill Cult Researchers
inside Aldur'thar (the entrance is at 51.32) for the 3 pages, then
combine them. This quest is kind of tough, so getting some help
would be good for this.
04) "Retest Now" Need to collect 10 Tainted Essences from any of the Cultist mobs around Aldur'thar (BUT REMEMBER: You must drink the Diluted Cult Tonic quest item, you will see a 10 minute buff appear on the top of your screen, you can only loot the Tainted Essences while this buff is active!). Once you obtain the 10 Tainted Essences, combine them to make a Writhing Mass,
then use the writhing mass at one of the 3 cauldrons (at 49.34). Each
cauldron gives you a different 2 hour buff depending on which one you
put the writhing mass in. Here is what each cauldron will give you:
Blue: +Spell Power Green: +Stamina Cyan/Light-Blue: +Attack Power
06) Go to the goblin down below in Orgrim's Hammer and turn in "Retest Now"
07)GROUP: "No Rest For The Wicked"
(Entrance to the vault is at 21.32) You gather the pieces of his
remains from crates around the room, but they all have a 2 minute
duration. Clear the room first, then loot the pieces. They form a
quest item that you use on the crystal in the middle of the back of the
room there. Alumeth
himself is substantially more difficult than most of the other group
quests in Icecrown. Immune to snares and stuns, melees cloth for 4.8k,
mind flays for 3k, shadow word pains for over 1k, fears, heals, and
mind controls. Bring a tank and some healing, you'll need
it. You need to get a group for this, if you cant, then you can
do it later, but this needs to be done in order to accept a follow up
quest.
08)"Raise the Barricades" This quest is simple. All you have to do is go over to The Valley of Fallen Heroes (around 50.40) and use the Barricade Construction Kit quest item on the flashing purple orbs around in the area.
04) "Before the Gate of Horror" There is a lot of Skeletal Reavers
around 23.65, I was able to easily solo this quest, but you may need to
find one other person to help you with it. Remember to use the Volatile Acid quest item on their corpses.
06) Travel south-east to Corp'rethar (around 47.28) and do the following 2 quests together:
07) "Shatter the Shards"
Each shard is surrounded by several non-elite watchers (two shards have
4, the shard on the upper level has 7). Kill the watchers, then attack
the shard with your weapon, loot the quest item. Pretty easy quest to
solo. Here is the locations of the 3 Shards you have to destroy:
13)
That concludes this guide for now. The beta ended right here (at
the previous quest). Have fun in Northrend and I hope this guide
helped you a lot! Good luck on your quest to kill the Lich King!
Icecrown DAILY QUESTS
Icecrown DAILY QUESTS
Since
there are SO many daily quests in Icecrown, I have included this
section as a quick recap on how to do all the Daily Quests in Icecrown.
01) "Drag and Drop" Done south of the bridge (around 13.46), kill the mobs there for the Orb of Illusion quest item you need, then throw it at the Dark Subjugators from a distance while out of combat.
02) GROUP: "No Rest For The Wicked"
(Entrance to the vault is at 11.32) You gather the pieces of his
remains from crates around the room, but they all have a 2 minute
duration. Clear the room first, then loot the pieces. They form a quest
item that you use on the crystal in the middle of the back of the room
there. Alumeth
himself is substantially more difficult than most of the other group
quests in Icecrown. Immune to snares and stuns, melees cloth for 4.8k,
mind flays for 3k, shadow word pains for over 1k, fears, heals, and
mind controls. Bring a tank and some healing, you'll need it. Try to
find a group, if you cant, then you can do it later, but this needs to
be done in order to accept a follow up quest.
03) "Not a Bug" Need to kill Enslaved Minions (the voidwalker looking things) then use the Rod of Siphoning quest item on their corpse to obtain 5 Dark Matter. Then right-click on the purple Summoning Stone (at 13.33, See Pic).
06) "Make Them Pay!"
Need to kill other Alliance players in Icecrown. If you are on a PVE
server you will be flagged for PVP as long as it's in your quest list.
It is up to you if you want to do this or not.
08) "Slaves to Saronite" Done in the Saronite Mines (at 56.17), Simply talk to the Saronite Mine Slaves in the mine, you have a chance that they will run out of the mine and give you quest credit, or turn hostile on you.
10)"Retest Now" Need to collect 10 Tainted Essences from any of the Cultist mobs around Aldur'thar (BUT REMEMBER: You must drink the Diluted Cult Tonic quest item, you will see a 10 minute buff appear on the top of your screen, you can only loot the Tainted Essences while this buff is active!). Once you obtain the 10 Tainted Essences, combine them to make a Writhing Mass,
then use that at one of the 3 cauldrons (at 49.34). Each cauldron gives
you a different 2 hour buff depending on which one you put the tainted
essences in. Here is what each cauldron will give you:
Blue: +Spell Power Green: +Stamina Cyan/Light-Blue: +Attack Power
01) "Riding the Wavelength: The Bombardment" and "Total Ohmage: The Valley of Lost Hope!"
These quests take a little bit to get used to. Basically you have
to talk to the NPC next to you to ride a 'bomber' and then kill a bunch
of undead out in the field to the east. Your bomber has 3
different modes, here are tips for each of them:
Anti-Air Turret:
Fires missiles at the gargoyles in the air. To aim this, simply hold
done the right mouse button then fire the missiles (just targeting the
mobs won't do anything). Bomber Bay: Simply lobs bombs to the ground. Please note that the abominations on the ground are the Captains. Engineering:
This mode allows you to beef up your shield and put out fires (if your
bomber is on fire). Your shield amount is listed at the top right of
the screen (as a buff), and has a cap of 100, so keep using the 'Charge
Shield' ability occasionally to get your shield back up to 100. Playing this for awhile and you can easily master it. See Video for a quick gameplay demonstration for it.
01) "Assault by Air"
Mount the Kor'kron Troop Transport, you will then automatically fly
over to Ymirheim, you will have to wait about 45 seconds before you
come in contact with the Ymirheim Spear Guns that you have to shoot at,
just shoot 4 of them and then leave the vehicle (you will parachute
down), See Video.
01) "Reading the Bones" Allows you to turn in 35 Vrykul Bones for various power-ups, this is technically not a daily quest, you can turn in as many bones you get for the power-ups.
Ymirheim (11.57)
01) "King of the Mountain" (This is a PVP Daily Quest). Mount Thunderbomb's Jumpbot
right there and jump your way up to the pile of bones (at 14.59), you
have to jump in certain spots to keep progressing upwards, See Video.
Death's Rise (70.47)
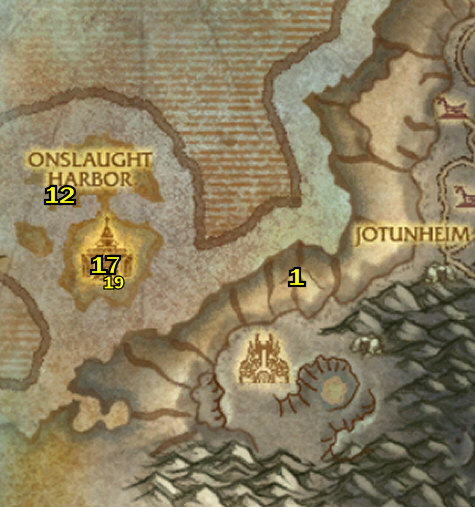
NOTE: All these Dailies are done around the Onslaught Harbor, 38.42:
03) "No Fly Zone" Kill Onslaught members outside (of the buildings there) and then use the Darkmender's Tincture quest item on their corpses.
You
can check the bottom of my 1-60 guide for general tips/tricks on how to
level faster, along with hunter specific tips/tricks.
COMING SOON: Recorded 1-80 speed runs!
Want to leave testimonials about my guide? You can do that on my MySpace Page through leaving a comment! First you have to be my friend first, and please do so!
For screenshots and to get to know Joana/Mancow better you can visit this part of my site here! And if you are interested in signing up for my newsletter, you can do so at this page here!
Help me improve this guide!
If
you feel that some quests should contain additional information that
would be helpful, or if you have any additions or find any errors in
this guide, PLEASE contact me here, make sure you leave "Northrend Guide Improvements" in the subject line so it filters correctly into my inbox. I appreciate any feedback to make this guide better!
MORE GUIDES: To check out more World of Warcraft guides that are decent buys, you can check out Ultimate World Of Warcraft Guide for WotLK PvP strategies and tips and they also offer lots of guides for free lifetime membership updates, Luke's Gold Guide, which is great if you need a gold guide, and also the Penn's Profession's Guide for in-depth overview of WoW professions, this guide can give you some more pointers on the classes and such. And for a complete list of WoW products you can purchase, please check out my Premium Guide List out.