Spugnort's PvP Guide

Guide Description: Spugnort's World of Warcraft Player vs. Player Guide.

Guide Render Format:  Condensed

Guide Sections:


General PvP Information

View Step Details General PvP Overview

Upon reaching level 70 and completing world quests, only two methods for character advancement exist.

1. Players can do Dungeon runs.

2. They can engage in Player Versus Player(PvP) activities.

The PvP aspect of the game tends to attract the more competitive of gamers, and is rewarding to players in a number of aspects.

  • The gear attained through pvp is as good as, if not better than gear attained through dungeon runs.
  • World of Warcraft is indeed a community based game, and there is no better way to become known within the community than to dominate the battlefield. 
  • There really is no better feeling in the game than seeing yourself at the top of the scoreboard.

View Step Details Important Character Statistics for PvP

The easiest way to start topping the kill charts is to properly gear your character.  In many cases a character with all Uncommon quality gear that chooses the right statistics (stats) will fare much better than a character wearing Rare quality gear with the wrong type of stats. Of course, the type of stats that should be chosen depend on what type of character is being played. In order from most important to least important, the best pvp stats are:

For physical damage classes  (Warrior, Rogue, Hunter, Enhancement Shaman, Feral Druid, Retribution Paladin):

  • Stamina
  • Critical Strike Rating
  • Attack Power
  • Resilience

For magical damage classes  (Mage, Warlock, Elemental Shaman, Holy Paladin, Shadow Priest,  Balance Druid):

  • Stamina
  • Spell Damage
  • Spell Critical Strike Rating
  • Resilience*

For healing classes  (Holy Priest, Holy Paladin, Restoration Druid, Restoration Shaman):

  • Stamina
  • Resilience
  • Healing

View Step Details The Honor System

What is Honor?

Honor is a form of currency.  It is used to purchase rare and epic quality items from certain NPC vendors. The primary pvp vendors for each faction are located in Stormwind and Orgrimmar.


Horde vendors

  • Main pvp vendors:
    • Lady Palanseer <Armor Quartermaster>: Thottbot
    • Sergeant Thunderhorn <Weapons Quartermaster>: Thottbot
    • Raider Bork <Mount Queatermaster>: Thottbot
  • Arathi Basin vendors:
    • Rutherford Twing <Defilers Supply Officer> : Thottbot
  • Warsong Gulch vendors:
    • Kelm Hargunth <Warsong Supply Officer> : Thottbot
  • Alterac Valley vendors:
    • Jekyll Flandring <Frostwolf Supply Officer> : Thottbot
    • Grunnda Wolfheart<Frostwolf Supply Officer> : Thottbot
  • Eye of the Storm vendors: 
    • -None-

Alliance vendors

  • Main pvp vendors:
    • Captain Dirgehammer <Armor Quartermaster> : Thottbot
    • Captain O'Neal <Weapons Quartermaster> : Thottbot
    • Lieutenant Karter <Mount Quartermaster> : Thottbot
  • Arathi Basin vendors:
    • Samuel Hawk <League of Arathor Supply Officer>: Thottbot
  • Warsong Gulch vendors:
    • Illiyana Moonblaze <Silverwing Supply Officer> : Thottbot
  • Alterac Valley vendors:
    • Gaelden Hammersmith <Stormpike Supply Officer> : Thottbot
    • Thanthaldis Snowgleam <Stormpike Supply Officer> : Thottbot
  • Eye of the Storm vendors: 
    • -None-

How Do I Earn Honor?

Honor is earned in several ways

  • Killing enemy players that are “green” or higher.  Level 62 is the lowest level opponent that will award honor to a level 70 player.
  • Killing faction leaders (Thrall, The King of Stormwind, etc)
  • Completing objectives within a battleground
  • Completing world PvP objectives.

Things that affect honor gain

  • Diminishing Returns:  In the diminishing returns system, players actually earn less and less honor each time they kill a certain player throughout the course of a day. After killing a person a number of times, 0 honor is awarded for a kill
  • Opponent level:  Higher level opponents award more honor.
  • If you are grouped:  Players in a party or raid group will split the honor earned for a kill evenly among all players within the group that are present for the kill.  Players do not actually have to damage the target in order to receive credit for the kill as long as they are in close physical proximity. This means that healers will earn just as much honor as damage dealers within the group.
  • If something else is attacking the enemy player:  You and/or your group will only be awarded honor according to their contribution in the kill.  If an enemy was fighting an NPC and at 10 percent health then finished off by your team, you will not be awarded full honor for the kill.

Honor Calculation

Honor is calculated daily at around 2 AM  (EST)  Players can see the estimated honor earned for that day by clicking on the PvP tab of the character sheet. If a player’s character earns enough honor to purchase an item throughout the day, he or she must wait until the next morning to make the purchase. 

PvP Rankings

When killing a player, something that looks like “HK:  Sergeant” will show up in the combat log.  This is simply a remnant of an old honor system, and has no impact on current gameplay. 

Maximizing Honor gain

  • Timing
    • The first thing to consider when trying to maximize honor gained per hour is what day of the week it is.  Blizzard has implemented a Battleground Weekend System* that starts on Friday and runs all the way through Tuesday morning of the next week. 
    • During the battleground weekend days, players will earn extra honor for participating in battle in one of the four different battlegrounds.  Once the weekend has begun, Battlemasters* will appear in each of the major cities detailing which battleground is awarding extra honor for the four day period.  A schedule outlining the various battleground weekends can also be found here.
    • It is important to play in the specific battlegrounds as their weekend arrives in order to attain the highest amount of honor in the shortest time played. 
    • The one exception to this is Alterac Valley weekend.   Alterac Valley (AV) games tend to take a longer time to finish than other battlegrounds.  While it is true that players earn some honor just for killing other players, the majority of the honor gained is earned through the completion of battleground objectives.  This is especially true during the battleground weekend period.  Also noteworthy, is that kills in AV are generally split among a large group of people, meaning less bang for the buck.
  • Playing to win versus “farming” kills
    • A common misconception among beginner pvpers is that the honor earned from standing around in the battleground doing nothing but racking up killing blows is as good as it gets; this thinking is 100% false. 
    • Farming kills is discouraged by the blizzard development team.  It is also considered bad sportsmanship within the general World of Warcraft player base.  Blizzard actually frowns upon kill farming so much that they have implemented a system of diminishing returns to stop players from doing it.
    • In the diminishing returns system, players actually earn less and less honor each time they kill a certain player throughout the course of a day. After killing a person a number of times, 0 honor is awarded for a kill. The entire scope of Diminishing Returns will be discussed later in this section.
    • In addition to the diminishing returns system, time spent farming kills makes games take longer and, in turn, slows the amount of honor players earn per hour. It truly is a lose/lose situation.

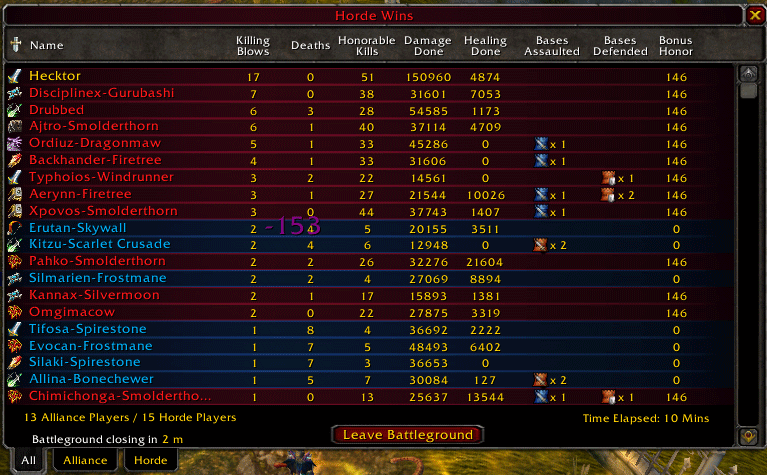
It is also important to note, that it is generally more entertaining to play each game in an efficient manner.  If the game is a win the honor comes in fast, and players get to sink their teeth into a whole new group of fresh opponents (which have likely not been killed previously in the day and will cough up the full amount of honor when they finally are).  If the game is a loss, some honor is still awarded for any objectives that were completed, along with a small amount simply for participating in the game, and players can queue for a new battle with better teammates against a team that may very well be much easier to beat.  In the eyes of most, this is clearly more rewarding than simply killing the same group of people over and over for little to no reward.

Reading Battleground Scoreboards

1. Name The name and server of all players that participated in the battle.
2. Killing Blows The number of opponents that each player dealt the last hit (killing blow) to during the match.
3. Deaths The number of times each player died in a battle.
4. Honorable Kills The amount of kills each player was credited for over the course of the battle.  This statistic is not associated with killing blows in any way.
5. Damage/Healing Done This is a much better judge of player performance than killing blows. 
6. Battleground Objective Depicts how each player directly contributed to specific battleground objectives (Flag Captures, Bases Assaulted, Towers Destroyed, etc).
7. Bonus Honor The amount of honor awarded to each player due to his or her teams accomplishment of battleground objectives.

Here is an example of a Battleground Scoreboard:

bgss


View Step Details The Arena System

Arena combat in World of Warcraft is an entirely separate entity from the traditional Player versus Player system.   To engage in arena combat, players must first obtain a Team Charter from either of these NPC's:

  • Steamwheedle Sam in Blades Edge Mountains at the Circle of Blood (52.6, 41.7)
  • “King” Dond in Nagrand at the Ring of Trials (65.8, 59.8)

Arena Team Charter Costs

Team Size Charter Cost
2v2 80g
3v3 120g
5v5 200g

After the Charter is purchased, the player needs to select a name and move within 5 yards of his or her teammates and click on the “Request Signature” button on the charter.  Once all signature spots have been filled, the player holding the charter must return to one of the arena organizers and turn the charter in.  Once this is done, the team is formed and ready to fight!

When the team is ready to fight, one player must invite the other player(s) that will be participating in the battle to a group (the group leader does not need to be the team captain).  After the group is formed, the team can queue for battle either at the arenas themselves (in Nagrand or Blades Edge Mountains) or at the Arena Battlemaster within each major city.


Arena Ratings

World of Warcraft uses an arena rating system based on the Elo Chess Rating System.  The system takes the score of each opponent and calculates their statistical chance of winning. The difference between the two probabilities is then used to determine the change in each team’s rating based upon the outcome of the match. To learn more about the Elo Chess Rating System see this article on Wikipedia.

Every Tuesday, when the servers are brought down for maintenance, each team’s arena rating is used to award a number of Arena Points.   These Arena Points are then used by players as currency to buy different items. 

To view these items see Vixton Pinchwhistle <Arena Vendor> - Thottbot.

The official formula for converting ratings into Arena Points, where X equals Team Rating and Y equals Arena Points is

If X>1500 then Y = 2894/(1+259*e^(-0.0025*X))
Else Y = 0.206*X+99


Arena Combat

When your team enters an arena, several things happen

  • Your team (as well as your opponent’s) enters a staging area, somewhat like that found in other battlegrounds
    • You cannot leave this staging area until the battle begins
    • All buffs are removed from combatants, and players receive an “arena preparation” buff.  This buff reduces the mana/rage/energy cost of all abilities to 0 
  • A countdown will begin
    • players will see brown text that shows when 60 seconds, 30 seconds, and 15 seconds remain before the battle commences
  • When the staging period is over, the door will open, and teams will be allowed onto the arena floor.  This is when the battle begins.

Victory Conditions

Each arena match continues until all players of one team have been defeated.  There are no flags to capture, and no bases to hold. The only thing that matters is the complete and total annihilation of the opposition.

There are certain things that speed up the completion of particularly lengthy battles. 

  • After about 30 seconds, tornadoes appear on the arena floor. These tornadoes have a knockback, and hit for about 1500 damage.  It is wise to avoid these at all costs (as well as trying to bait enemies into their path)
  • Eventually, crystals will appear on the battlefield that greatly increase stealth detection.  Be careful when using the crystals! They deal 2% of the player’s maximum health in damage every few seconds.  This is to prevent players from using this buff as a major advantage against stealth classes.

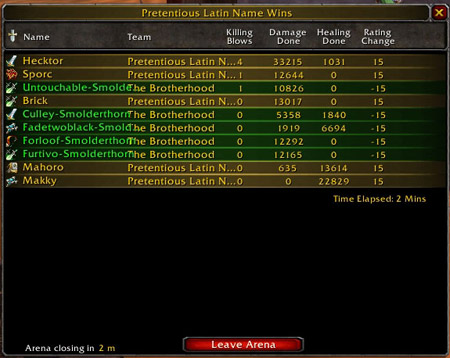
Once you’ve killed all of the opposing team, a scoreboard will appear that looks something like this:

arena


View Step Details PvP Gear Selection

This section of the guide is not necessarily a showcase of what pvp gear can be earned.   Instead, this section of the guide will focus mainly on what stats to stack, what types of weapon to choose, and what types of enchants to put on gear, etc.


druidDruid

The Feral Druid

  • Unlike other melee classes, the feral druid gets no benefit from weapons other than statistics. 
  • Blizzard has recently started to implement weapons made specifically for feral druids, however. 
    • Such weapons will say something like “equip:  Increases attack power in cat, bear, and dire bear forms by 450” on the tooltip.
    • Because of this, weapons are still the most important a feral druid can attain in terms of increasing damage done. 
  • Aside from weapon, item slots are typically just used to add statistics. 
  • See the stats section for what stats to look for when choosing pvp gear for non-weapon item slots.

Balance/Restoration Druids

  • If a druid chooses a talent build with a heavy emphasis in either of these trees, he or she will be a pure caster.
  • Casters really only care about the statistics on items.
  • Weapons are considered a very good source of stats such as:
    • Spell Damage
    • Healing
    • Spell critical strike rating
  • See the Statistics section of this guide when deciding how to gear your Balance/Restoration Druid.

hunterHunter

No matter what talent build a hunter chooses, the RANGED weapon is the most important item he or she can attain.  Melee weapons are used by hunters primarily as a stat boost (just like any non-weapon item).

Some things to look for when choosing a hunter’s ranged weapon

  • Speed
    • The slower the better.
    • Slower weapons have a higher damage range, which means bigger crits, bigger burst damage, and mega hurtin’ power.
    • A good benchmark for hunter ranged weapon speed is 2.9 or slower.
  • Top End
    • Weapons with higher top end (generally slower weapons) mean the capability for HUGE crits exists. 
    • Massive crits, and unreal burst damage are what separates an awesome hunter from all the rest in a player versus player situation. 

Other item slots

Aside from weapon, item slots are typically just used to add statistics.  See the stats section for what stats to look for when choosing pvp gear for non-weapon item slots.


mageMage

  Casters really only care about the statistics on items.  Weapons are considered a very good source of stats such as +spell damage, +stamina, and +spell critical strike rating; but nothing more.  See the Statistics section of this guide when deciding how to gear your mage.


pallyuPaladin 

As a hybrid, a paladin needs a very different gearset for each talent build he or she may choose. 

The Retribution Paladin

Retribution paladins must choose gear much like the pure melee classes (rogue/warrior).  As with the pure melee classes, the retribution paladin’s weapon is his/her single most important piece of gear. 

Things to look for when choosing a weapon

  • One-handed versus two-handed  
    • Retribution paladins will perform far better when using a two-handed weapon.  Period.
  • Weapon speed
    • Weapon speed matters even more for a retribution paladin than it does for any other melee class.
    • The majority of the paladin’s damage (other than auto attacking) comes from Seal of Command, and Crusader Strike. 
      • Both of these attacks are based purely on weapon damage. 
      • Because slower weapons will almost always have a higher top end, both of these attacks will hit much harder with extremely slow weapons (3.8 speed or slower is ideal).
  • Weapon Type
    • Paladins do not have any weapon specialization talents. 
    • Weapon type does not matter to a paladin.

Other item slots

Aside from weapon, item slots are typically just used to add statistics.  The statistics section of this guide shows what stats to look for when choosing pvp gear for non-weapon item slots.

The Holy Paladin

  • A holy paladin is generally considered a caster; melee stats do not matter. 
  • Casters really only care about the statistics on items.
    • Weapons are considered a very good source of stats such as:
      • spell damage
      • healing
      • spell critical strike rating
  • See the Statistics section of this guide when deciding how to gear your holy paladin.

The Protection Paladin

  • Do not spec heavily into protection if you plan to pvp.

priestPriest 

  • Casters really only care about the statistics on items. 
  • Weapons are considered a very good source of stats such as:
    • Spell Damage
    • Stamina
    • Spell Critical Strike Rating 
  • See the Statistics section of this guide when deciding how to gear your priest for PvP.

rogueRogue

As with all other melee classes, the most important item slot for a rogue is his/her weapon(s).

Things to look for when choosing a weapon

  • Speed
    • Much like warriors, rogues are most effective when using slower weapons in the main hand
    • A good benchmark for gauging one-handed weapon speed is 1.7 or slower for a dagger, 2.4 or slower for any other weapon type
  • Top End
    • Weapons with higher top end (generally slower weapons)  IN THE MAIN HAND mean the capability for HUGE crits exists 
    • Massive crits, and unreal burst damage are what separates a great rogue from all the rest in a pvp situation
    • Instant attacks, such as backstab and sinister strike only use main hand damage when damaging the target
    • Equipping a very fast weapon in the off hand means that casters will have a harder time getting spells to land, as well as the rogue having more chances to crit/hit/proc combat potency within a set time period
  • Stats
    • Most weapons are rich in stats
    • Some even have better stats than any other item in any other slot (of equal quality)
    • Picking a weapon with the right stats will increase the rogue’s viability tremendously
    • To see which stats you should look for in your weapons, visit the statistics section of this guide.
  • Weapon Type
    • Many rogue talent builds do not include specialization talents
    • Aside from daggers, weapon type only matters for a rogue if he or she chooses a talent build that is invested heavily in the combat tree (most PvP rogues don't)
    • In the combat tree, rogues have several “specialization” talents available.  These talents do a number of things, including stunning enemies, and increasing critical strike rating. 
    • Mace Specialization: Assuming the rogue has decided to go with a deep combat build and picked up the specialization talents, maces are arguably the best weapon type for pvp. 
      • While mace specialization does not directly increase damage output, it gives EVERY ATTACK made by the rogue a 5% chance to stun the enemy for three seconds.
      • The really nice thing about this specialization is that the 3 second stun is not subject to diminishing returns. 
      • Even if your opponent was just stunned by a warrior’s intercept or any of your stuns, the mace stun effect will still last the full 3 seconds. 
    • Sword and dagger specialization:  These are very good talents in their own right; both directly increase the damage done by the rogue. 
      • Dagger specialization is statistically a little bit better than sword spec.  
      • Sword specialization resets the swing timer.   This means that if the rogue was using a 2.6 speed weapon and performed a sinister strike attack 2.4 seconds after an auto attack that in-turn processed a sword specialization attack, the rogue would not auto attack again until 2.6 seconds had passed.  The only benefit the rogue actually saw in this situation is that his/her auto attack swing happened .2 seconds faster. 
      • Dagger specialization does exactly what the tooltip says.  It increases crit chance by a set percentage.  This can be translated into direct damage increases and no rocket science is needed to understand how it works. 
      • Rogues have quite a unique relationship with daggers.  Certain abilities can only be used when the rogue is wielding a dagger. These abilities typically hit for a truckload, cost a high amount of energy, and have an extremely high critical strike rate.  Dagger talent builds are considered the best for pvp in most situations due to their high burst potential and good supporting talents.  It is highly recommended that new rogues at least try a dagger build to see if it fits their playstyle.

shamanShaman

The Enhancement Shaman

An enhancement shaman’s performance, like most melee classes, is heavily dependant upon his or her weapon(s). 

Some things to look for when choosing a melee weapon

  • One-Handed versus Two-Handed 
    • Unlike the warrior, shamans are still capable of considerable burst damage while dual wielding. 
    • When deep enhancement talents such as Shamanastic Rage are taken into account, dual wielding one-handed weapons becomes the clear choice for the enhancement shaman at this stage in the game.
  • Weapon Speed
    • Much like rogues, enhancement shamans are most effective when using slower weapons in the main hand. A good benchmark for gauging one-handed weapon speed is 2.4 or slower.
  • Statistics
    • Most weapons are rich in stats.
    • Some even have better stats than any other item in any other slot (of equal quality). 
    • Picking a weapon with the right stats will increase the enhancement shaman’s viability tremendously. 
    • To see which stats you should look for in your weapons, visit the stats section of this guide.

Restoration/Elemental Shamans

  • If a shaman chooses a talent build with a heavy emphasis in either of these trees, he or she will be a pure caster.
  • Casters really only care about the statistics on items
  • Weapons are considered a very good source of stats such as:
    • Spell Damage
    • Healing
    • Spell Critical Strike Rating
  • See the Statistics section of this guide when deciding how to gear your Restoration or Elemental Shaman for PvP.


lockWarlock

  • Casters really only care about the statistics on items
  • Weapons are considered a very good source of stats such as:
    • Spell Damage
    • Stamina
    • Spell Hit Rating
  • See the Statistics section of this guide when deciding how to gear your warlock.

orcWarrior

The single most important piece of gear that a warrior can attain is his/her weapon. 

Things to look for when choosing a weapon

  • Speed
    • The slower the better
    • Slower weapons have a higher damage range, which means bigger crits, bigger burst damage, and mega hurtin’ power
    • A good benchmark for warrior two-handed weapon speed is 3.4 or slower
  • Top End
    • Weapons with higher top end (generally slower weapons)  mean the capability for HUGE crits exists
    • Massive crits, and unreal burst damage are what seperates a great warrior from all the rest in a pvp situation.
  • Statistics
    • Most two-handed weapons are rich in stats
    • Some two-handers even have better stats than any other item in any other slot (of equal quality)
    • Picking a weapon with the right stats will increase the warrior’s viability tremendously
    • To see which stats you should look for in a weapon, visit the stats section of this guide.
  • Weapon Type
    • Warriors can use every type of weapon in the game (except wands)
    • All weapon types are not created equal, however. In the arms tree, warriors have several “specialization” talents available.  These talents do a number of things; including stunning enemies and increasing critical strike rating.
    • Mace Specialization: Assuming the warrior has picked up the specialization talents, maces are arguably the best weapon type for pvp.  While mace specialization does not directly increase damage output, it gives EVERY ATTACK made by the warrior a chance to stun the enemy for three seconds and generate 2 rage.   The chance for this effect to occur varies with weapon speed.  See the next section for a table showing mace stun process (proc) rate.
      • The 3 second stun is not subject to diminishing returns.  This means that even if your opponent was just stunned by your intercept or a rogue’s kidney shot, the mace stun effect will still last the full 3 seconds.
      • Even small attacks like hamstring and pummel which only deal 63 and 50 damage, respectively, have a chance to proc the stun. Area of effect abilities such as whirlwind and cleave can also proc the mace stun effect.  With one whirlwind a warrior can potentially generate 8 rage and stun a total of four enemies for 3 seconds.
    • Sword and Poleaxe specialization:  These are good talents in their own right; both directly increase the damage done by the warrior. 
      • Poleaxe specialization is statistically a little bit better than sword spec
        • If the warrior has picked up the flurry talent, poleaxe specialization creates charges (which helps damage output), while sword specialization removes charges (which hurts damage output). 
        • Sword specialization resets the swing timer.   This means that if the warrior was using a 3.8 speed weapon and performed a hamstring attack 3.4 seconds after an auto attack that in-turn processed a sword specialization attack, the warrior would not auto attack again until 3.8 seconds had passed.  The only benefit the warrior actually saw in this situation is that his/her auto attack swing happened .4 seconds faster. 
        • Poleaxe specialization does exactly what the tooltip says.  It increases crit chance by a set percentage.  This can be translated into direct damage increases and no rocket science is needed to understand how it works. 
    • The weapons to stay away from are those without a specialization (such as maces) as well as one-handed weapons. 

The dual wield versus two-handed dilemma

Ever since WoW was released, warriors have been trying to figure out if dual wield or two handed warriors were better.  The answer is simple.  Warriors who use two-handed weapons will perform better in player versus player situations than their dual wield counterparts.  Dual wield simply lacks the burst damage potential that is needed in most pvp situations.  In addition to this, choosing talents for dual wield means that the warrior must give up Mortal Strike.

Other item slots

Aside from weapon, item slots are typically just used to add statistics.  See the stats section for What stats to look for when choosing pvp gear for non-weapon item slots.


View Step Details Mace Stun Procrate

Who does this affect?

This table refers to all maces being wielded by a warrior.

Mace Specialization Basics

Mace specialization will give you a 5% chance to stun your opponent. To make this a more viable specialization for slow two-handed weapons a change was made to calculate the chance to proc based upon base weapon speed. In other words the slower your weapon the higher the chance to stun your target. This gives a great advantage to slower weapons when you factor in instant attacks, such as mortal strike.

Weapon Speed

Approximate Proc Rate

3.8
11 Percent
2.8
8 Percent
1.7
4 Percent

View Step Details Diminishing Returns

In the diminishing returns system, players actually earn less and less honor each time they kill a certain player throughout the course of a day. After killing a person a number of times, 0 honor is awarded for a kill.

Example:

Player A Kills Player B 40 honor is earned
Player A kills Player B again 20 honor is earned
Player A kills Player B again 10 honor is earned
Player A kills Player B again 5 honor is earned
Player A kills Player B again 0 honor is earned

This shows very clearly how honor earned from kill farming falls to almost nothing very quickly within World of Warcraft's diminishing returns system.

Diminishing returns does not apply to honor earned from winning or losing games, or completing pvp objectives, however.  If a person were to play for 18 hours in one day and win 45 games, that person would earn the full amount of honor for each and every win during that day. 


View Step Details Power-Ups

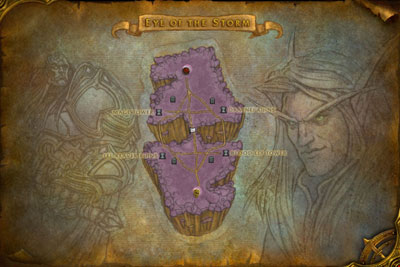
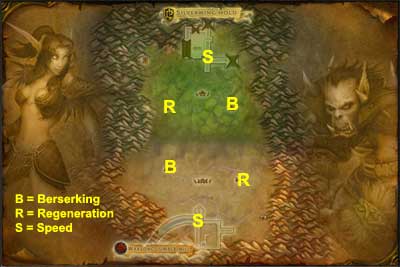
Each battleground (other than arena) has a set of power-ups that is not found in the outside world.  These power-ups can be highly useful if used properly.

buffThe Berserker Buff

  • This is a 60 second buff that increases all damage dealt by 30% as well as increasing all damage taken by 10%. 
  • When watching pvp videos, or looking at screenshots of very large critical strikes, odds are the player you’re looking at has this buff. 
  • When playing a damage dealing class, it is almost always a good idea to grab this buff any time you see it on the battlefield. 
  • The only situation in which it is unwise to pick up this buff is when playing a pure healer, or carrying a flag across the battlefield in warsong gulch (due to the 10% increased damage taken)

buffThe Restoration Buff

  • This is a short duration buff (10 seconds) that restores 100% of the players health and mana.
  • It is often better to grab this buff than it is to eat or drink, because you can continue moving about the battlefield while regenerating health and mana. 
  • This buff is cancelled if the player is attacked or attacks another player. 
  • Only pick up this buff if you find yourself extremely low on health, mana or both. 
  • If you still have more than half health/mana, chances are someone on your team needs it more than you.

buffThe Run Speed Buff

  • A short duration buff (10 seconds) that increases the player’s run speed by 100%. 
  • In many cases this buff is not very useful.
  • The only setting in which it is a great help to a player is when he or she is running a flag in Warsong Gulch, where it can often mean the difference between a win and a loss when picked up by the flag carrier.
  • In any battleground other than Warsong Gulch, if you see this buff you should still pick it up, so a member of the opposing team cannot use it against you.


View Step Details Tricks of the Trade

Keybinds

Most beginner players (and even some advanced ones) move with the keyboard and use the mouse to click abilities (this is commonly referred to as "clicking").  The vast majority of top tier players, however, move and select targets with the mouse, but use key-bindings to execute all attacks and abilities. 

Using keybinds has several advantages over clicking

  • Faster reaction times
    • Moving the mouse to the ability's icon and then clicking takes much longer than simply pressing one button.
  • Less chance for error.
    • Many clickers find themselves often using the wrong ability because the cursor was not in the correct spot when they clicked.
  • Frees up the mouse for more advanced movement
    • Using the keyboard to move results in very slow turning, very difficult strafing, and often melee players will find themselves unable to attack due to being out of range.  
  • By holding down the right mouse button and using the mouse to move the camera and turn the character while only using the keyboard for running and strafing
    • Players have a much higher turn rate.
    • Players have the ability to utilize more complex movement patterns to fool enemies.
    • Melee players will find it much easier to maintain the proper melee range while engaged in combat.
  • Rather than having to focus on where to move the mouse to click on a certain ability, players can watch:
    • The locations of other players
    • The health level of allies and opponents
    • What spells enemies are casting
    • Battlefield environmental factors

For many players, the transition from clicking to using keybinds is a difficult one; it feels awkward and ungainly at first.  The players who stick with it for a day or two, however, will notice a drastic increase in pvp performance.


Macros

Macros will allow you to bind more than one action to a single button. They also allow you to change the operation of a button depending on the stance of character (ex. stealthed versus no-stealth). This will allow you to make a powerful combination with less reaction time between clicks or mouse movements.

To see how to make some of your own macros see our free guide for: Macro - How To

For a list of premade class specific macros visit these free guides from Spugnort's World:
Druid Utility Macros
Hunter Utility Macros
Mage Utilility Macros
Paladin Utility Macros
Priest Utility Macros
Rogue Utility Macros
Shaman Utility Macros
Warlock Utility Macros
Warrior Utility Macros


Mouse Sensitivity

One of the easiest things a player can do to improve performance is to open up the user interface options and set mouse sensitivity and mouse look speed to the highest settings. 

Just like switching to keybinds, this will take a bit of time to get used to, but the payoff will be great.

By doing just these two simple things, a player effectively increases his or her reaction time by a large margin.  All mouse movements are magnified, and where players may have had to previously move their mouse all the way across the mousepad (if not further) to move the cursor from one side of the screen to the other, this same action will only require a few inches of movement, and so, a fraction of the time.


Buff Synergies and Stacking

  • Many classes have cooldown abilities that increase damage output.
  • Examples of this are:
    • Arcane Power
    • Death Wish
    • Adrenaline Rush
    • Bestial Wrath
    • Power Infusion
  • It is best to use these cooldowns in conjunction with
    • trinkets that increase attack power or spell damage
    • other cooldowns that increase damage
    • the berserking power-up
  • When buffs, powerups, and cooldowns are used in this manner, they actually increase in effectiveness and provide a better benefit than that listed on their tooltip. 
  • Players who use buffs in this manner will outperform players who use them separately by a considerable margin


World PvP Objectives

View Step Details Halaa (Nagrand)

  • Halaa is a PvP Town located at 42,45 in Nagrand.
  • It is located on an island, and is only accessible by flying mount, or through the use of one of four bridges.
  • When one faction controls the town, NPC’s will spawn that are friendly to that faction, and hostile to the other. 
    • NPC’s consist of 15 guards and three different vendors.
  • For each enemy player you kill in Nagrand, a Halaa Battle Token will appear in your inventory.
    • Tokens are awarded only to the player/group that deals the killing blow to the enemy player.
    • All players within a a group that are in range of the kill will recieve a battle token for each player killed.
    • Battle tokens are used as a currency to purchase specific items from vendors within Halaa.
halaa

When your faction controls Halaa

  • All NPC’s within the town will be friendly.
  • You can make purchases from each of the three different vendors within the town.
    • Alliance vendors
      • Quartermaster Davian Vaclav
        • Sells items that require Halaa battle and research tokens to purchase
      • Cendrii
        • Sells food/drink and a special item known as Halaani Whiskey
      • Aldraan
        • Sells items that require halaa battle and research tokens to purchase
    • Horde Vendors
      • Quartermaster Jeffrey Norellique
        • Sells items that require Halaa battle and research tokens to purchase
      • Embelar
        • Sells food/drink and a special item known as Halaani Whiskey
      • Coreiel
        • Sells items that require halaa battle and research tokens to purchase
  • You will be able to pass through the town freely (this is helpful to players who don’t have a flying mount, as it takes a considerable amount of time to run all the way around an enemy-controlled Halaa).
  • All players of your faction will be granted a 5% damage buff while in Nagrand.

When the opposing faction controls Halaa

  • All NPC’s in the town are hostile, and will attack you on sight.
  • Players of your faction cannot safely travel through the town
  • Players of your faction will not have access to the vendors located within the town

Siezing control of Halaa

  • At each bridge leading into the town, there is a wyvern roost.
  • When halaa is controlled by the enemy faction, players will be able to interact with the wyverns.
    • Upon interacting with a wyvern, a player receives 10 Fire Bombs and begins taking a ride on the wyvern itself (think of a flight path).
    • The wyvern will fly over halaa allowing the player to drop bombs on enemy players and NPC ’s within the town.

Fire Bombs 

  • The stack of fire bombs that a player receives upon interacting with a wyvern will appear in an open inventory slot.
  • Players can use a bomb either by opening the inventory, right clicking the bomb, and then moving the area of effect indicator to the intended drop spot on the ground, or by dragging the bombs to an empty slot on the action bar (this is preferred).
  • Once the player has placed the area of effect indicator and clicked the mouse, the bomb will drop.
  • Bombs deal around 1000 damage when dropped, and have a damage over time component that deals 1% of the target’s health every tick.
    • The DoT component is fairly useless against enemy players, but will tick for about 12,000 against enemy guards, making it quite effective.

View Step Details Hellfire Peninsula

  • The world pvp objectives in Hellfire Peninsula are located around 38,53.
  • They consist of three towers.
    • Broken Hill
    • The Overlook
    • The Stadium
  • Players capture towers by turning on their PvP flag (type /pvp, or attack another player who is flagged for PvP) and standing inside the tower.
    • Players on flying mounts will not contribute to the capture process.
  • Players killed in Hellfire Peninsula will drop either Marks of Honor Hold (Alliance)  or Marks of Thrallmar (Horde)
    • These marks can be turned in at a vendor within Honor Hold/Thrallmar to purchase specific items.
  • Alliance Vendors
    • Warrant Officer Tracy Proudwell
    • Alliance Field Scout
  • Horde Vendors
    • Battlecryer Blackeye
    • Horde Field Scout
halaa

When your faction controls all three towers

  • All players of your faction will be granted a  zone-wide  5% damage buff.
  • This buff is persistent in all Hellfire Citadel instances.
    • Hellfire Ramparts
    • Blood Furnace
    • The Shattered Halls
    • Magtheridon’s Lair

View Step Details Terrokar Forest

  • The southern region of Terokkar is known as the Bone Wastes.
  • There are five “Spirit Towers” located in a circular fashion around the Ruins of Auchindoun, which are located within the Bone Wastes.
  • Every 6 hours these Spirit Towers are up for contention.
  • The faction that is able to gain control of all 5 towers first will hold them for the entire 6 hour duration.
  • Players capture towers by turning on their PvP flag (by typing /pvp or attacking an enemy player who is flagged for PvP) and standing near the tower.
    • Players on flying mounts will not contribute to the capture process.
map

When your faction has control of the graveyard
  • All players of your faction will be granted a zone-wide buff that does three things
    • Increases damage dealt by 5%
    • Increases experience gained by 5%
    • Allows players to loot Spirit Shards off of bosses within all Auchindoun instances.
  • This buff is persistent in all Auchindoun Instances.
    • Mana-Tombs
    • Auchenai Crypts
    • Sethekk Halls
    • Shadow Labyrinth

View Step Details Zangarmarsh

  • The Zangramarsh PvP objectives are located around 48,50 on the map.
  • They consist of an east and west beacon and a central graveyard. 
  • To gain control of the graveyard, players must first control both beacons.
  • To establish control of a beacon, players must flag for pvp (type /pvp or attack a flagged enemy player) and stand near the beacon until it becomes controlled by their faction.
    • Players on flying mounts will not contribute to the capture process
  • Once a faction controls both beacons, a player must interact with either the Alliance Field Scout or the Horde Field Scout (depending on faction)
    • The Horde Field Scout is located just outside Zabra’jin at 32,50 on the map.
    • The Alliance Field Scout is located just outside Telredor at 64,47 on the map.
  • The field scout will issue a banner to the player.
    • This banner must be carried to the capture point within the central graveyard.
    • If the player reaches the capture point alive with the banner, the graveyard will fall under the control of his or her faction.
halaa

Tokens / Rewards

  • These are the same battle tokens issued in Hellfire Peninsula
    • These marks can be turned in at a vendor within Honor Hold/Thrallmar to purchase specific items.
  • Alliance Vendors
    • Warrant Officer Tracy Proudwell
      • Located at Honor Hold, in Hellfire Peninsula
    • Alliance Field Scout
      • Located just outside Telredor in Zangarmarsh at 64,47 on the map
  • Horde Vendors
    • Battlecryer Blackeye
      • Located at Thrallmar, in Hellfire Peninsula
    • Horde Field Scout
      • Located in the tower inside Zabra'jin in Zangarmarsh at 32,50 on the map

When your faction has control of the graveyard

  • All players of your faction will receive a 5% damage buff while in Zangarmarsh
  • Players of your faction will be able to make use of the graveyard.


PvP Battlegrounds

View Step Details Alterac Valley

In Alterac Valley the main objective is to push to the other faction's base, and kill the enemy General.

Horde Controlled Objectives for Alliance Characters

AB Map

Alliance Controlled Objectives for Horde Characters

Alliance AV Map


General Alterac Valley (AV) Information

Each faction can capture the five graveyards throughout Alterac Valley to gain control of a resurrection point.

There are several enemy officers within Alterac Valley that give honor when killed, and do not respawn for the duration of the battle.

  • There are six enemy lieutenants.
    • Killing a lieutenant grants bonus honor.
    • Killing all lieutenants will disable the respawn of certain enemy NPC's.
Example of a Horde Lieutenant
galvangar
Example of an Alliance Lieutenant
balinda
  • There are four enemy commanders.
    • Killing a commander grants bonus honor.
    • Killing all commanders will disable the respawn of certain enemy NPC's.
Example of a Horde Commander
commander
Example of an Alliance Commander
commander
  • There is one enemy captain.
    • Periodically gives all friendly playable characters a size, damage, and health buff.
    • Killing the enemy captain will:
      • Give bonus honor.
      • Disable the respawn of certain enemy NPC's.
      • Grant an extra periodic buff from your faction's captain (assuming s/he is still alive).

Captain Galvangar
galvangar

Captain Balinda Stonehearth
balinda
  • There is one enemy general.
    • Killing the enemy general will:
      • Grant additional honor. The amount of honor granted depends on how many locations your faction controls.
      • Win the game!!!
Drek'Thar
drek
Vaandar Stormpike
vaandar

Repeatable Quests

There are a number of battle quests which can be completed during an AV game.

  • The Cavalry Quest
    • Near each faction’s base there is a stable.
    • Players can obtain an item from the stablemaster that allows the taming of rams or wolves (depending on faction).
    • Players must also kill either rams or wolves (again depending on faction) and collect their pelts.
    • After the stables are full and enough pelts have been collected, your team can start a cavalry charge!
    • Players with revered or exalted reputation in AV can click on the cavalry units in order to issue commands once the charge has been initiated.
stablemaster
  • The Unit Upgrade Quest
    • The blacksmith in each faction’s base offers a quest requiring that Armor Scraps be turned in.
    • Scraps are dropped by players of the opposing faction as well as enemy NPC’s.
    • This quest is repeatable.
    • 20 scraps must be handed in per completion.
    • When this quest has been completed enough times, your team’s General will begin giving a periodic damage buff to you and your teammates.
    • Once enough scraps have been turned in, a player with Honored or higher reputation can direct the smith to upgrade all of your faction's NPC's.
      • Faction NPC's become higher level.
      • Faction NPC's become all around more powerful.
  • The Mine Supplies Quest
    • There is a mine located near each faction’s base.
    • The mine is initially controlled by hostile, non-faction NPC’s, but is easy to sieze.
    • To take control of the mine, players must simply kill a non-elite NPC in the back of the cave.
    • Once the mine is under your faction's control, the Quartermaster inside your base will offer a repeatable turn-in quest that requires players to collect supplies.
    • When enough turn-ins have been completed, a player with Honored or higher reputation can interact with the Quartermaster and call several elite NPC’s to your team’s aid.
      • These NPC’s will move through the battlefield attacking all enemy players and NPC’s they happen across.
  • The Arial Assault Quest
    • Each faction has a set of three Wing Commander NPC’s.
    • At the start of battle, these NPC’s are held captive by the opposing faction.
    • Players must interact with friendly wing commanders in order to set them free.
    • Once freed, they will begin moving across the map toward their faction’s main base.
    • If they reach the base alive, they will offer repeatable turn-in quests that require players to turn in one of three types of quest item.
    • Quest items consist of three types of meat (Horde), and three types of medals (Alliance).
    • When enough turn-ins have been completed, players with revered or exalted AV faction can obtain a beacon from the wing commander that can be used to issue an air strike that will rain destruction upon enemy players!
jeztor
wingcommander
  • The “Ultimate Unit” Quest
    • Players can turn in Storm Crystals or Stormpike Soldier’s Blood (depending on faction) in order to summon their faction’s “Ultimate Unit”.
    • Both quest items drop off of enemy players and NPC’s.
    • Alliance players must turn in the items to Arch Druid Renferal, who is located in the area behind the Dun Baldar North Bunker.
    • Horde Players must turn in the items to Primalist Thurloga, who is located in the cave beneath Frostwolf Keep.
    • Once either side has completed enough turn-ins, the Arch Druid or Primalist will make its way to the Field of Strife where it will begin summoning its faction’s “Ultimate Unit”.
    • Ten players must assist the NPC during the summoning ritual for it to be a success.
    • Upon completion of the summon, Ivus the Forest Lord (Alliance) or Lokholar the Ice Lord (Horde) will appear and march toward the enemy base, leaving a wake of destruction in its path!
primalist
druid

Towers and Bunkers within Alterac Valley

  • Each time your team destroys an enemy tower, a warmaster or marshal (depending on faction) will spawn to help defend your general.
  • It is important to spawn as many of these as possible because they have high health, hit hard, and delay the enemy team’s advancement.
  • Resurrection in Alterac Valley functions normally, but if a player’s insignia is taken, he or she can only be resurrected at a friendly graveyard by a Non-Playable Character (NPC) that casts a mass-resurrection every 30 seconds.
    • Hunters and Warlocks will have their current or most recent pet resurrected as well, even if that pet was not alive at the time of the player's death or if the pet has not been summoned since entering AV.
Horde Tower
tower
Alliance Bunker
bunker

Class Specific AV Information:

  • Due to the large number of combatants, and the addition of NPC's, Battles in Alterac Valley are substantially different from those of the other battlegrounds.
  • Players of different classes tend to find themselves in situations that require specific roles to achieve success.
    • Example: During a Warsong Gulch match, warriors may focus solely on damaging and killing enemies.  In Alterac Valley, however, warriors will find that they are of much greater benefit to the team if they hold the attention of enemies and keep would-be attackers away from the healing classes.
druid
Druid
  • Doing damage to enemies will work for the earlier stages of the battle, but during the last push, healing is a good way to go for balance/restoration druids.
  • The elite NPC's in the enemy base hit hard and have a lot of health.
  • If your team has no healing and everyone dies, the NPC’s will reset and regenerate all of their health.  When this happens, the enemy has more time to kill your NPC’s and/or reinforce theirs.
  • If healing on the team is adequate without your assistance, continue being a disruptive force by crowd controlling with cyclone, doing damage, and rooting opponents in place.
  • Feral druids, however, can often be more help to the team by shifting into dire bear form and “tanking” enemy NPC’s.
    • Feral druids are extremely hard to kill and make a wonderful damage sponge.
    • If you can successfully keep enemies attacking you instead of healers and damage dealers, you will be a great help to your team.

hunter
Hunter
  • As you will quickly discover, hunters are the kings of AV.
  • There is a great deal of terrain that can be used to gain a strategic advantage over enemies.
    • Combined with the hunters ability to deal massive amounts of burst-damage from the longest range of any class in the game, this makes Alterac Valley a hunter’s playground.
  • Use the terrain to your advantage and deal damage to enemy players and NPC’s.
    • Often they will be dead by the time they even figure out where you are. 

troll
Mage
  • Mages have great damage dealing capabilities in both single and multiple target situations.
  • Your main function will be to kill opposing players and NPC’s and use Polymorph/Frost Nova as crowd control.
pally
Paladin
  • The paladin is the lowest damage class in World of Warcraft.
  • Because of this, paladins are often a much better help to the team when acting as healers or tanks.
  • Paladin healing is somewhat unique, because they can stand on the front lines of the battle and contribute damage, hammer of justice enemies, and heal teammates all at the same time.
  • You will often be the last person standing in a battle, and can keep enemy players from capturing graveyards like no other. 

priest
Priest
  • Holy/Discipline Priests are some of the best healers in the game.
    • As such, they should stick to healing for the majority of the battle.
    • When no healing is needed, priests can help out by fearing and mana burning enemy players.
  • Shadow Priests are capable of extremely high damage.
    • It is often best for this type of player to remain in shadowform and deal as much damage as possible while fearing/silencing enemy players at every opportunity.
    • If the battle turns south, do not hesitate to drop out of shadowform and cast a heal or two on a friendly player. 

rogue
Rogue
  • Stealth is a rogue’s most powerful weapon in AV.
  • A team of 2 or 3 rogues can stealth behind enemy lines and cause quite a ruckus.
  • Rogues can capture undefended graveyards with ease, take out stray enemy targets and, in the later stages of the battle, convert to a pure damage dealing role. 
shaman
Shaman
  • Doing damage to enemies will work for the earlier stages of the battle, but during the last push, healing is a good way to go.
  • The elite NPC’s in the enemy’s base hit hard and have a lot of health.
  • If your team has no healing and everyone dies, the NPC's will reset and regenerate all of their health.  If this happens, the enemy team has more time to kill your NPC's and/or reinforce theirs.
  • If healing on the team is adequate without your assistance, continue being a disruptive force by interrupting enemy casters, doing damage, and snaring opponents.
gnome
Warlock
  • A warlock’s damage over time (DoT) spells are his or her best friend in Alterac Valley.
  • Stand at range and DoT up as many enemies as possible.
  • Throw in the occasional shadow bolt and fear and you will find you are a force to be reckoned with on the AV battlefield.
orc
Warrior
  • Doing damage to enemies will work for the earlier stages of the battle, but during the last push, putting on a shield and tanking is a good way to go.
  • The elite NPC’s in the enemy’s base hit hard and have a lot of health.
  • If your team has no tank and everyone dies, the NPC’s will reset and regenerate all of their health.
  • When this happens, the enemy has more time to kill your NPC ’s and/or reinforce theirs.
  • If you find the tanking is adequate without your assistance; continue being a disruptive force by interrupting enemy casters, doing damage, snaring opponents, and fearing opponents.

Basic Team Strategy (Alliance)

  1. Capture Snowfall Graveyard
    On the way south, alliance players should capture Snowfall Graveyard. The composition of the battlefield is such that the Horde completely ignore this graveyard in the majority of battles.

  2. Capture Iceblood Graveyard
    Once the capture process has begun on Snowfall, the entire Alliance offense should proceed directly to the Horde controlled Iceblood Graveyard.  If your team manages to capture Iceblood, the battle is generally over.  Horde towers are positioned poorly, and it is relatively easy to simply rush them over and over in “zerg” fashion until they fall. 

    Do not leave Iceblood undefended until it becomes fully controlled by the Alliance and players from your team can begin to resurrect there (the process takes five minutes).

  3. Capture Frostwolf Graveyard
    After taking the Iceblood Graveyard, push forward into the Frostwolf Graveyard. In most games, this graveyard is lightly defended and easy to capture.

  4. Capture Frostwolf Relief Hut and Kill Drek'thar ..... aka WIN!
    Once Frostwolf is under Alliance control, the team should push directly to the Frostwolf Relief Hut.  Players can easily mount and run past both Frostwolf towers, as they are positioned horribly and cannot even attack players fighting within the Relief Hut. 

    When the Relief Hut falls, all other graveyards are unimportant.  They may be left undefended while players move to secure the Relief Hut.  If the Frostwolf towers have not yet been destroyed, now is a good time to do so. 

    The next step is pulling the Warmasters.  In most games, the Horde will have managed to spawn at least three warmasters which should be killed before the general.  When one warmaster is pulled, everything inside the general’s room will aggro.  Because of this, it is best to have a hunter pull one back to a tank, and then feign death to reset the rest of the NPC’s.  Once the tank has control of the warmaster, damage dealing classes should take it down.  Note: the player tanking the warmaster WILL need heals or s/he will die.

    When all warmasters are dead, the entire offense can rush into the General Drek’Thar’s room and begin the fight.  Drek’Thar hits hard, and has a sweeping strikes ability that will often do heavy damage to melee players.  Heals are needed on the main tank as well as the damage dealing classes.   Drek’Thar will not leave his room for any reason, he will simply reset and go back to full health instead.  When engaged with him, it is of the utmost importance that no players from your team attempt to pull him outside, or your victory could be lost.  Once the general is dead, Game Over.  You Win!
avmap

Basic Team Strategy (Horde)

  1. Defend Iceblood Graveyard
    Do NOT lose Iceblood Graveyard.  It is wise to leave at least 10 players on defense here at all times.  In the majority of games, if Iceblood falls, the Horde will lose. 

  2. Capture Stonehearth Graveyard
    The offense should ignore Snowfall Graveyard and head directly to the Stonehearth Bunker.  Your defense will be killing alliance players at Iceblood.  These dead players have to resurrect somewhere, and it is much better that they do it at Snowfall (which does not matter in the slightest in terms of your advancement on their base) than at Stonehearth.  If they do resurrect at the Stonehearth Graveyard, your team will find it much more difficult to advance.
    Once the Stonehearth Bunker is destroyed, players should continue north and capture the Stonehearth Graveyard.  The offense should wait here until the graveyard is completely controlled by the Horde (This will take five minutes). 

    The offense should continue north to the Icewing Bunker. 

    Several players will often break off at this point to take the Stonehearth Outpost.  Doing this will stop the alliance from receiving some periodic buffs, as well as award additional rep/honor.  Skipping this step will not really slow your team’s progress, however, and some teams may elect to ignore it.

  3. Capture Stormpike Graveyard
    The team will then proceed north to take the Stormpike Graveyard.  It is important to leave a substantial defense (usually 10 or more) here until it is fully controlled by the Horde.
     
  4. Capture Stormpike Aid Station and kill Vandaar Stormpike... aka WIN!
    It is generally best to destroy the north and south Dun Baldar bunkers before attempting to capture the Stormpike Aid Station. Both bunkers are in range of the Aid Station flag, making it very difficult to capture until they are destroyed.  The best way to destroy the bunkers is to have the entire offense mount up, ride past any enemy players and NPC’s, and head directly for the north bunker. The bridge serves as a bottleneck, with enemy players and both bunkers able to easily attack your entire team. Fighting on it is rarely a success. 

    Once the bunkers are down, capture the Stormpike Aid Station and begin pulling Marshals.

    In most games, the Alliance will have managed to spawn at least three marshals which should be killed before the general.  When one marshal is pulled, everything inside the general’s room will aggro.  Because of this, it is best to have a hunter pull one back to a tank, and then feign death to reset the rest of the NPC’s.  Once the tank has control of the marshal, damage dealing classes should take it down.  Note: the player tanking the marshal WILL need heals or s/he will die. 

    When all marshals are dead, the entire offense can rush into General Vanndar Stormpike’s room and begin the fight.  Stormpike hits the tank hard, but is fairly easy to kill.   Vanndar Stormpike will not leave his room for any reason; he will simply reset and go back to full health instead.  When engaged with him, it is of the utmost importance that no players from your team attempt to pull him outside, or your victory could be lost.  Once the general is dead, Game Over.  You Win!
avmap

Advanced Tips

  • As always, communication is key. Do your best to make sure all members of your team are on the same page.
  • When the opposition has no players defending a graveyard, two or three players can easily take it.
    • Have one player mount up and ride past the NPC guards while the other player captures the flag.
  • Always keep people off the graveyard flags.
    • This should be your first priority when playing defense at any location on the map.
    • Even if your team is heavily outnumbered you can stall an offensive just by making it impossible for the enemy to capture the graveyard flag.
  • Kill as many named NPC’s as possible.
    • The more lieutenants, captains, and commanders your team kills, the less NPC’s it will have to deal with later on in the game.
    • Not only do the named NPC’s not respawn, but killing them prevents the respawn of certain unnamed NPC’s as well.
  • While the basic strategy calls for a straight line of progression north or south through the battlefield, it is possible for small groups of players to ride straight to Frostwolf or Stormpike graveyards and take them within the first minutes of the game.
    • If the small group manages to capture the graveyard, it is extremely important that they call for reinforcements immediately to prevent the opposing faction from simply retaking it.
    • If your team manages to hold the graveyard until it is completely controlled by your faction, you will find yourselves winning very quickly in the vast majority of games.
  • Tower and Bunker archers hit hard!  Do not fight players of the opposing faction while in range of their team’s archers. 

View Step Details Arathi Basin

The main objective of Arathi Basin is to control as many locations as possible. While a location is controlled, it generates resources for the controlling faction. The first faction to gather 2,000 resources wins.
AB Map

General Arathi Basin Information

  • Each team consists of 15 members.
  • Players fight for control of five different locations on the map
    • The Farm
    • Stables
    • Lumber Mill
    • Blacksmith
    • Gold Mine
  • In order to control a location players must “capture” it by right clicking on the flag and standing still without being attacked until the flag capture progress bar completes.
  • All five locations generate the same amount of resources. 
  • As each team gathers resources, its progress can be tracked on the top of the screen.
  • Resource Generation Table:  
# Locations Controlled
Resources Per Second
1
0.8
2
1
3
1.7
4
3
5
30
  • Resurrection in Arathi Basin functions as normal, but if a player’s insignia is taken, he or she can only be resurrected at a friendly graveyard by a Non-Playable Character (NPC) that casts a mass-resurrection every 30 seconds.
    • Hunters and Warlocks will have their current or most recent pet resurrected as well, even if that pet was not alive at the time of the player's death or if the pet has not been summoned since entering Arathi Basin.

Arathi Basin Strategies

There are several different strategies that, when executed properly, provide a solid framework to win in Arathi Basin. 


The “Hold 3” Strategy

  • The most common of Arathi Basin strategies. 
  • Commonly used in Pick-up Groups (PuG)
  • While not the fastest means to victory, will provide a win when executed properly. 

To execute this strategy, the team sends all the players from each group to take and hold a separate location on the map.  As long as three bases are held, no attempt is made to capture more. 

Advanced Tips

  • As with all battlegrounds, communication is essential for success. 
  • When players at any base spot an enemy movement, they should warn the rest of the team of the number of enemies, and the location they are headed.
  • Once three locations are controlled, players do not have to stay directly on the flag. 
    • It is often wise to move to an area between two friendly locations, ensuring quick reinforcements when either area is attacked.
  • If an overpowering enemy force is headed for a location, this means a hostile base is left vulnerable.
    • Players should shift and take control of the defenseless base.

Strengths:

  • Less communication needed than other strategies
  • Solid strategy for beginning players and/or players who do not know each other well
  • Provides a good framework for teams to build upon and modify to suit their particular play style, ability, and gear level

Weaknesses:

  • When enemies attack with a large force, it is often difficult for five players to hold the base.
  • Slow victories.
    • Battles will often last 25 minutes or more.
  • Lots of idle time while waiting on an enemy attack.

The “Continuous Offense” Strategy

  • Often used by guilds and established PvP teams.
  • Requires a great deal of coordination to be successful and, therefore, is hard to execute correctly in a PuG.
  • When things are running smoothly, this strategy can provide extremely fast wins (often around 5 minutes).

To execute this strategy, the team leaves only one person to take the Farm or Stables (depending on faction) while everyone else attacks Blacksmith, Lumber Mill, and Gold Mine.
 

Advanced Tips

  • Communication, communication, communication!  This strategy requires much more than most PuG’s can handle.
    • The use of a chat program like Ventrilo or Teamspeak is highly recommended. 
  • This strategy requires that constant pressure be kept upon the opposing team.
    • Never sit idly
    • Always be on the attack
    • Be sure to leave one player at each location to delay attacks until reinforcements arrive.
  • Within the first minutes of the battle, the enemy will most likely only have a one-man defense at the Farm or Stables (depending on faction).
    • If no resistance is met by one of your attack teams, proceed directly to this location and throw the opposition off balance.
  • The Blacksmith is the best strategic location on the map since attacks to any other location can be spotted pre-emptively by team members posted at the Blacksmith flag.
    • The largest attack force (typically 6-7 players) is sent here.
    • Remaining players are sent to the Gold Mine and Lumber Mill.
    • Often, a larger enemy force will be found at either of these two locations. 
      • If the battle is sure to be a loss, players should not rush in blindly.
      • Instead, they should pull back and attack another location, where the enemy forces are sure to be weaker.

Strengths:

  • Potential for extremely fast wins.
  • Fast, exciting games often result from the effective execution of this strategy.
  • Keeps the enemy off balance.
  • Uncommonly used, opponents are usually not prepared.

Weaknesses:

  • This strategy is very hard to execute without a highly coordinated team.
  • Players must be able to handle losing locations from time to time. 
    • One person cannot always fend off an attack, and the team must be able to quickly respond and regain possession of lost flags.
  • One person defenses require highly skilled players that are able to successfully delay enemy attacks until reinforcements arrive.

View Step Details Eye of the Storm

Eye of the Storm combines the gameplay of both Warsong Gulch and Arathi Basin into one, unique battleground. Each team consists of 15 players who fight to reach 2000 resources (they are technically called victory points) first.
AB Map

General Eye of the Storm (EOTS) Information

  • Points are earned by holding towers as well as picking up the flag and bringing it to a friendly tower.
  • Each team consists of 15 players.
  • The first team to reach 2000 points wins.
  • One flag is located in the center of the battlefield.  When this flag is taken to a friendly base it will award points depending on how many bases are controlled by your team.
  • Flag captures award 25 points for each tower controlled at the time of the capture.
  • Eye of the Storm is the only battleground that does not have a real location in the Warcraft game world.
    • The only way for players to access it is to speak with a battlemaster in a major city.
  • The Mage Tower, Blood Elf Tower, Dranei Ruins, and Fel Reaver Ruins are the four locations over which players fight for control.
  • Unlike Arathi Basin, different locations in Eye of the Storm do not have a flag that must be clicked in order to seize control.
    • Instead, there is a progress bar that fills faster as more players from a faction stand in a tower.
    • This means it will take considerably longer for one player to capture a location than it will take ten players.
  • Resurrection in the Eye of the Storm functions normally, but if a player’s insignia is taken, he or she can only be resurrected at a friendly graveyard by a Non-Playable Character (NPC) that casts a mass-resurrection every 30 seconds.
    • Hunters and Warlocks will have their current or most recent pet resurrected as well, even if that pet was not alive when the player died, or if the pet has not been summoned since entering EOTS.
  • In order to pick up a flag, players must right click on it.
    • Like Arathi Basin, there is a progress bar when the flag is first picked up.
    • If the flag is dropped by a player, the next person to right click on it will pick it up instantly.
  • In order to gain control of the flag from an enemy, players must first kill the member of the opposing team who is currently carrying it.
    • Once the enemy is dead, the flag will drop, and a friendly player must right click on it.
    • The player who clicks on a dropped flag first will instantly pick up the flag and can begin moving towards a tower controlled by his or her faction.
  • Victory Point Accumulation Table:
Nodes Captured
Points Per Second
1
0.5
2
1
3
2.5
4
5

Strategies

There are several different strategies that, when executed properly, provide a solid framework to produce a win in the Eye of the Storm.

The “Forget the Flag” Strategy

This is an innovative strategy that attempts to produce a win by holding more bases than the opposing faction, rather than capturing more flags.

To execute this strategy

  • Players split up into three groups (one larger offensive group, and two smaller defensive groups), attempting to capture as many bases as possible as quickly as possible.
  • One or two players are left to capture and defend either Mage Tower and Dranei Ruins or Blood Elf Tower and Fel Reaver Ruins (depending on faction).
  • The rest of the team will choose an enemy controlled tower and attack in full force.
    • The offense should consist of 10-13 players for maximum effectiveness
  • With an offensive force of this size, your team should be able to overpower any enemy defenses, as well as capture the tower extremely quickly.
  • As soon as this tower is under your team’s control, leave one or two players on defense and attack the remaining tower in full force.
  • The remaining tower will likely be harder to capture than the first, but pressure must be maintained as long as possible (this prevents your opposition from being able to mount an offensive). 

Advanced Tips

  • Communication and Planning!  Before the battle beings the entire team needs to know and agree with the strategy.
    • If players are attempting to rush the flag, your team will lose its numbers advantage, and may not be successful in capturing additional towers.
    • Plan out who will be on defense at each tower in advance, and make sure they are willing and able to communicate enemy offenses should there be any.
  • Once control of three or four bases has been established, it is beneficial to have a few players break off and start capturing flags.
    • By this point in the game, the majority of enemy players will be rushing to defense, or trapped in their spawn area; leaving the flag ripe for picking.
  • Strength in numbers.
    • Make sure that your entire offensive is bunched up in one large group.
    • With 10 or more players all together, you will be able to destroy most enemy defenses while suffering almost no damage at all.
  • Utilize Power-Ups.
    • There is a power-up spawn within each tower.
    • Grab the Power-up even if it is only the speed buff.
      • Chances are the power-up that respawns in its place will be more useful to your team.
  • When your team manages to capture three, and especially four bases, enemy containment is key.
    • Your defense will be spread thin so you must keep enemy players trapped in their last remaining base or their spawn area until the game finishes (it will only take a few minutes if you control all four)
  • Some teams find it beneficial to send one player to pick up the flag right away and hold it.
    • This prevents the other team from gaining any points at all through flag caps. 
    • Some players feel this is unsportsmanlike conduct. 
    • Also, since there is no flag to fight over, you may end up losing your numbers advantage at the towers.
    • It is something you can try, and see if it works for your particular team set up / code of ethics

Strengths

  • Extremely effective when the required level of communication and coordination is present
  • Very fast win potential
  • Players using this strategy generally feel it is more fun than others
  • Keeps the enemy off balance

Weaknesses

  • This strategy requires a team who is willing to listen, is able to communicate at high levels (a voice chat program like Ventrilo or Teamspeak is recommended), and restrain themselves from rushing blindly for the flag.
  • If the enemy team mounts a large offensive and runs straight for your towers, a game of “musical chairs” can often occur; resulting in the game taking longer to play out.
  • At least some healing is required for this strategy to play out as intended.
    • With no healers your offense may dwindle; losing the power to quickly dispatch enemy players.

The “Capture More Flags!” Strategy

This is a more traditional strategy in which players split into two tower groups and one flag group.  The tower groups rush to the two towers closest to your factions starting area, while the flag group attempts to run as many flags as possible. 

To execute this strategy

  • Divide the team up into three different groups of roughly equal size. 
    • Two groups will head for the towers located closest to your team’s starting area.
    • The third group heads directly for the flag spawn point in an attempt to secure it as quickly as possible.
  • Once your faction has control of the two towers, each tower group should send 1-3 players to aid the flag group. 
  • The other team will be generating just as many points from holding towers as yours, so it is imperative that your team captures most, if not all, of the flags that spawn during the match.

Advanced Tips

  • Communication!  While this strategy is much easier to execute for PuG’s, a group with a high level of communication will still see far better results than a group without. 
    • Players defending towers must call out the location of enemy offenses, along with their size and composition if possible.
    • This allows your team to send just enough reinforcements to stall the offensive, without sacrificing numerical superiority on the flag spawn location.
  • Never leave less than two players on defense at a tower.
    • One player defenses are subject to “Rambo” syndrome. 
      • This means that the player sees one or two enemies on the approach, thinks s/he can handle them alone and does not call for reinforcements.  Soon after, the player is killed, and still does not call for reinforcements because s/he is embarrassed. Now the tower has been compromised and likely occupied by enough enemy players to make its recapture quite difficult. 
      • Even if a single player does call out an offensive, often they cannot live long enough to hold the tower until help arrives. 
    • Leaving two players at each tower increases the chance of defensive success greatly.
  • If your team’s flag group finds they are unable to hold the flag spawn point, adaptation is necessary. 
    • Since the flag group will consist of 10+ players (after your faction has established control of its two towers), if an enemy offense is strong enough to displace it, they will have left one (or both) of their towers completely defenseless. 
    • When players from the flag group die; upon resurrecting they should move directly to one of said towers immediately and as a group.
    • When the tower is under control of your faction, several players from the opposing team will pull back to defend, at which point the flag spawn location can be retaken with relative ease.
  • Use a druid / shaman / hunter as the designated flag carrier.
    • As with Warsong Gulch, players are unable to mount while carrying the flag.
    • Because of this, players with run speed buffs are highly superior flag runners.
    • Most of the time, the flag runner will encounter very few enemies while en route to a friendly tower, so they can generally solo run and have no fear of death.

Strengths

  • Easy to use with Pickup Groups
  • Solid strategy for beginning players and/or players who are not well acquainted with one another
  • Commonly used strategy
    • Most players will follow some variant of this strategy naturally

Weaknesses

  • Games played using this strategy usually take 20 minutes (or longer)
  • If an enemy team is able to mount a heavy offense on either tower controlled by your faction it may fall before your team can send aid.

View Step Details Warsong Gulch

  • Warsong Gulch is simply a game of “Capture the Flag”.
  • Each faction's base starts with a flag that must be picked up, taken across the field, and touched to the other flag before a point is scored.
  • If an opponent picks up your team’s flag, you WILL NOT be able to capture the flag until your flag is returned to your base.
AB Map

General Warsong Gulch Information

  • The first team to capture the opposition's flag three times wins the game.
  • Each team consists of ten players
  • In order to pick up a flag, players must right click on it.
    • Unlike Arathi Basin, there is no progress bar.
    • When a player clicks on the flag, he or she will pick it up instantly.
  • In order to return a flag, players must first kill the member of the opposing team who is currently carrying it.
    • Once the enemy is dead, the flag will drop, and a friendly player must right click on it.
    • The flag will then instantaneously return to its base.
  • Resurrection in Warsong Gulch functions as normal, but if a player’s insignia is taken, he or she can only be resurrected at a friendly graveyard by a Non-Playable Character (NPC) that casts a mass-resurrection every 30 seconds.
    • Hunters and Warlocks will have their current or most recent pet resurrected as well, even if that pet was not alive at the time of the player's death or if the pet has not been summoned since entering Warsong Gulch.

Warsong Gulch Keys to Success

  • Druids are the “kings of the gulch”.
    • A druid flag runner is not susceptable to any form of Polymorph, Snare, or Root.
    • Druid travel form can run at a higher rate of speed with the flag than other characters.
    • Once reaching the friendly base, Druids can switch to dire bear form, which is one of the hardest classes in the game to kill.
    • When forming a pvp group for Warsong Gulch, it is highly recommended that players bring at least one Druid along.
  • Use the Power-Ups!
    • Warsong Gulch has the most easily accessible power-ups of any battleground.
    • Power-Ups are always located in the same spot on the map, and have a short respawn timer (between 30 and 60 seconds).
    • berserking Berserking

      resto Restoration

      speed Speed

  • Do not, under any circumstances, do any of the following while carrying a flag in Warsong Gulch:
    • Mount
    • Use an immunity shield (blessing of protection/divine shield)
    • Vanish
    • Feign Death
  • All of the above actions cause the flag to drop, meaning it will likely be returned by an enemy player.
    • The only exception to this rule is vanish.
    • If used carefully, the rogue can vanish to break roots or snares, and then quickly pick the flag back up and continue running.
  • Do not leave the flag carrier unprotected.
    • Whoever holds the flag becomes the most important person on the team; they must be kept alive at all costs until the flag is captured.
  • Use the graveyard to your advantage.
    • If you find yourself in possession of the flag with the enemy approaching, make your way to the friendly graveyard. It is very close to your base, and you can use it to get a numbers advantage over your enemy.
    • Using this tactic can turn a situation from one of certain death into one where it is almost impossible to be killed.


Druid Strategies

View Step Details General Druid Information

Overview

The Druid is a very versatile class that can do a little bit of everything. In PvP situations, druids have quite a unique arsenal to combat opponents with. This class is truly the definition of, "Easy to learn but difficult to master".


Druid Strengths

Difficult to crowd control, root in place, or snare. Extremely hard to kill in most cases. Very versatile.


Druid Weaknesses

Susceptable to Fear. Slow casting heals are difficult to cast against any class with interrupt abilities.


The Best all around PvP Talent Build

Feral


How to read the strategy section

  • Ability to Use
    • Details about the ability and why you are using it
    • How enemies can counter
    • What to do if they counter

View Step Details Druid vs Druid

druidThe Druid

Strategy

  • prowlBegin stealthed in Cat Form
  • pouncePounce
    • 3 second stun
    • Moderate damage over time effect
  • mangleMangle
    • Moderate-Heavy damage
    • Awards 1 combo point, 2 on a crit because of Primal Fury
    • Increases Shred and bleed damage by 30%
  • ffFaerie Fire (Feral), re-apply as needed throughout the battle
    • Reduces the target's armor
    • Costs no rage or energy
  • shredShred
    • Heavy damage
    • Awards 1 combo point, 2 on a crit because of Primal Fury
  • shredShred
    • Heavy damage
    • Awards 1 combo point, 2 on a crit because of Primal Fury
  • ripRip
    • You will have acucmulated 4 or 5 combo points, as well as having the mangle debuff up on your target, making this a very heavy damage over time finisher
    • Ignores armor
  • Switch to Caster Form
  • rejuvRejuvenation
    • Instant cast, health over time
  • bearSwitch to Dire Bear Form
    • Much better survivability against the other druid
  • enrageEnrage
    • Generates 20 rage over 10 seconds
    • Reduces BASE armor by 16%. This is a very small amount and will not hurt you in any way
  • mangleMangle every cooldown
    • Moderate-Heavy damage
    • The best Dire Bear Form attack
    • Increases Shred and bleed damage by 30%
  • lacerateLacerate as rage permits
    • Stacking DoT effect that ignores armor
  • bashIf the enemy druid shifts to caster form to heal, bash
    • 4 second stun
  • Repeat until the enemy druid dies (this could take a while)

*This fight can seem like it takes an eternity. The winner is usually the druid who is able to conserve mana and outlast his opponent.


View Step Details Druid vs Hunter

hunterThe Hunter

Strategy

  • prowlStart stealthed in Cat Form
    • You can often get the jump on hunters
    • Watch out for Flares on the ground
  • pouncePounce
    • 3 second stun
    • Moderate damage over time effect
    • Hunters will often stand on a Freezing Trap. When this trap pops, you will be frozen in place and unable to act for 12 seconds
    • If this happens, skip the next five steps of the strategy. Begin execution again at the "Shift to Caster Form while running toward the hunter" step
  • mangleMangle
    • Moderate-Heavy damage
    • Awards 1 combo point, 2 on a crit because of Primal Fury
    • Increases Shred and bleed damage by 30%
  • ffFaerie Fire (Feral)
    • Reduces the target's armor
    • Costs no rage or energy
  • shredShred
    • Heavy damage
    • Awards 1 combo point, 2 on a crit because fo Primal Fury
    • Hunters will often snare you and attempt to run out of melee range
    • If the hunter successfully moves out of your melee range, shift to Caster Form
    • Entangling roots
      • Roots the hunter in place for up to 12 seconds, allowing you to re-enter melee range
      • Before you shift back out of Caster Form, cast Nature's Grasp
        • When you enter melee and the hunter tries to snare you again, he or she will be rooted in place once again; allowing you to attack freely
    • The hunter PvP trinket removes root effects
    • Simply cast Entangling Roots again
  • shredShred
    • Heavy damage
    • Awards 1 combo point, 2 on a crit because of Primal Fury
  • ripRip
    • You will have accumulated 4 or 5 combo points, and your target will have the Mangle debuff, making this a very heavy damage over time attack
    • Ignores Armor
  • Shift to Caster Form while running toward the hunter
  • rejuvRejuvenation
    • Instant cast health over time
  • poisonAbolish Poison
    • Removes 1 poison effect every 2 seconds over an 8 second time period
  • barkskinBarkskin
    • Reduces your physical damage taken by 20% for 15 seconds
  • bearDire Bear Form
    • Dire Bear Form is much better at mitigating the hunters damage than any other form
  • chargeFeral Charge if the hunter has managed to distance himself 8-25 yards from you
    • Immobillizes the hunter for 4 seconds
    • The hunter PvP trinket removes roots and snares
    • You will still be within melee range, continue the execution of your strategy
  • mangleMangle
    • Moderate-Heavy damage
    • The best Dire Bear Form attack
    • Increases Shred and bleed damage by 30%
  • bashWhen the Feral Charge effect fades, Bash
    • 4 second stun
    • Prevents the hunter from kiting you effectively
  • mangleMangle
    • Moderate-Heavy damage
    • The best Dire Bear Form attack
    • Increases Shred and bleed damage by 30%
  • The Hunter should be dead
  • mangleIf the hunter is not dead, continue to Mangle every cooldown
  • lacerateLacerate as rage permits
    • Stacking DoT effect that ignores armor
  • chargeIf you find yourself low on health, Frenzied Regeneration
    • Converts rage into health
    • Can turn a loss into a win

View Step Details Druid vs Mage

mageThe Mage

Strategy

  • prowlBegin stealthed in Cat Form
    • You can usually open easily on a mage for large amounts of damage
  • ravageRavage
    • Heavy damage
    • Awards 1 combo point, 2 on a crit because of Primal Fury
    • The best way mages can counter this is to Blink, ending up safely out of your melee range
    • Dash to get back into melee range quickly
  • ffFaerie Fire (Feral)
    • Lowers the mage's armor
    • Prevents the mage from using invisibility
  • mangleMangle
    • Moderate-Heavy damage
    • Awards 1 combo point, 2 on a crit because of Primal Fury
    • Increases Shred and bleed damage by 30%
    • The mage will most likely be using Frost Armor, which snares you each time you successfully attack
    • If you are having difficulty maintaining melee range, you can shift into Caster Form and use Entangling Roots. Assuming the mage has already used Blink, he or she will be stuck
  • shredShred
    • Heavy damage
    • Awards 1 combo point, 2 on a crit because of Primal Fury
  • shredShred
    • Heavy damage
    • Awards 1 combo point, 2 on a crit because of Primal Fury
  • maimMaim
    • Moderate damage
    • Incapacitates the target for 5 or 6 seconds, depending on combo points
  • Switch to Caster Form
  • htHealing Touch
    • 3.5 second cast, large direct heal
    • Normally mages will Counterspell to interrupt any healing spell you cast
    • This should be prevented because the mage is incapacitated from Maim
  • rootsEntangling Roots
    • Roots the mage in place
  • catSwitch to Cat Form
    • If the mage has used frost nova, or any type of movement slowing effect, you will be free of it upon shapeshifting
  • mangleMangle
    • Moderate-Heavy damage
    • Awards 1 combo point, 2 on a crit because of Primal Fury
    • Increases Shred and bleed damage by 30%
  • shredShred
    • Heavy damage
    • Awards 1 combo point, 2 on a crit because fo Primal Fury
  • shredShred
    • Heavy damage
    • Awards 1 combo point, 2 on a crit because fo Primal Fury
  • biteFerocious Bite
    • You will have accumulated between 3 and 5 combo points, making this a heavy damage finishing move
  • The mage should be dead, even in high end gear

*Mages have the capability to dish out heavy damage within a very short time period. You must always be prepared for this, and be ready to shift into caster form and heal.

*Counterspell is always an issue when fighting a mage. A good way to get around this when healing is to begin casting Healing Wave but move after about 1 second to cancel the spell. The mage will often Counterspell you when you are not casting anything, rendering the spell useless.

*Stay away from health over time spells when fighting a mage. Mages have the ability to steal the buff and it will heal them instead of you!

*Ice Block is generally a non-issue for a Druid. If the mage ice blocks you can simply shift to Caster Form and heal.


View Step Details Druid vs Paladin

pallyThe Paladin

Strategy

  • prowlBegin stealthed in Cat Form
  • pouncePounce
    • 3 second stun
    • Moderate damage over time effect
  • mangleMangle
    • Moderate-Heavy damage
    • Awards 1 combo point, 2 on a crit because of Primal Fury
    • Increases Shred and bleed damage by 30%
  • ffFaerie Fire (Feral), re-apply as needed throughout the battle
    • Reduces the target's armor
    • Costs no rage or energy
  • shredShred
    • Heavy damage
    • Awards 1 combo point, 2 on a crit because of Primal Fury
  • shredShred
    • Heavy damage
    • Awards 1 combo point, 2 on a crit because of Primal Fury
  • ripRip
    • You will have accumulated 4 or 5 combo points, as well as having the mangle debuff up on your target, making this a very heavy damage over time finisher
    • Ignores armor
  • mangleMangle
    • Moderate-Heavy damage
    • Awards 1 combo point, 2 on a crit because of Primal Fury
    • Increases Shred and bleed damage by 30%
  • shredShred
    • Heavy damage
    • Awards 1 combo point, 2 on a crit because of Primal Fury
  • shredShred
    • Heavy damage
    • Awards 1 combo point, 2 on a crit because of Primal Fury
  • shredShred
    • Heavy damage
    • Awards 1 combo point, 2 on a crit because of Primal Fury
  • maimMaim
    • Moderate damage finishing move that will incapacitate the target for 5 or 6 seconds, depending on combo points
    • The paladin will be low on health and may use Divine Shield to heal to full
    • Do not alter your strategy
  • Shift to Caster Form
  • regrowthRegrowth
    • 2 second cast, direct heal with a health over time component
  • rejuvRejuvenation
    • Instant cast, health over time
  • catSwitch to Cat Form
  • Repeat the entire process from step two on; stopping only when the paladin is dead

*Paladins typically heal a lot but do not output insane amounts of damage. This battle can take quite a while because you cannot really burst the paladin down. Be patient and wait for him to burn through his mana pool. When he runs out of mana, you win!


View Step Details Druid vs Priest

priestThe Priest

Strategy

  • prowlBegin stealthed in Cat Form
    • You can usually open easily on a priest for large amounts of damage
  • ravageRavage
    • Heavy damage
    • Awards 1 combo point, 2 on a crit because of Primal Fury
    • As soon as the priest is hit, he or she will generally use Psychic Scream to fear you for 8 seconds
    • When the fear wears off, use Dash to get back into melee range quickly
  • ffFaerie Fire (Feral)
    • Lowers the priest's armor
  • mangleMangle
    • Moderate-Heavy damage
    • Awards 1 combo point, 2 on a crit because of Primal Fury
    • Increases Shred and bleed damage by 30%
  • shredShred
    • Heavy damage
    • Awards 1 combo point, 2 on a crit because of Primal Fury
  • shredShred
    • Heavy damage
    • Awards 1 combo point, 2 on a crit because of Primal Fury
  • maimMaim
    • Moderate damage
    • Incapacitates the target for 5 or 6 seconds, depending on combo points
  • Switch to Caster Form
  • htHealing Touch
    • 3.5 second cast, large direct heal
  • rejuvRejuvenation
    • Instant cast, health over time
    • The Maim effect will fade during the casting of this spell. Shadow priests could potentially silence you
    • Wait for the silence effect to fade and re-cast
  • bearSwitch to Dire Bear Form
  • mangleMangle
    • Moderate-Heavy damage
    • The best Dire Bear Form attack
    • Increases Shred and bleed damage by 30%
  • lacerateLacerate as rage permits
    • Stacking DoT effect that ignores armor
  • chargeIf you find yourself low on health, Frenzied Regeneration
    • Converts rage into health
    • Can turn a loss into a win
  • bashIf you find yourself low on health and have already used Frenzied Regeneration, Bash
    • 4 second stun
  • Shift to Caster Form
  • htHealing Touch
    • 3.5 second cast, large direct heal
    • The priest PvP trinket removes stun effects. S/he can potentially use it here and use Psychic Scream to fear you for 8 seconds.
    • Use your own PvP trinket to break the fear and continue execution of your strategy
  • rejuvRejuvenation
    • Instant cast, health over time
  • catSwitch to Cat Form
  • Repeat the entire process from step 2 until the priest dies

*Fights with priests can either take a very long time or a very short time, depending on the priest's talent build. Do not worry if it seems like the fight is taking forever. As with all healers, fights against priests can take a very long time. Just stick to the plan and wear the priest down. Once s/he is out of mana, the fight is over, you win!


View Step Details Druid vs Rogue

rogueThe Rogue

Strategy

  • bearStart in Dire Bear Form
    • Rogue stealth is superior to yours, the rogue will get the opener the majority of the time
    • Dire Bear Form is much better at mitigating the rogues damage than any other form
  • ffFaerie Fire (Feral) as soon as the rogue uses his opener
    • Reduces armor
    • Renders the rogue unable to stealth
    • Costs no rage
  • enrageEnrage
    • Generates 20 rage over 10 seconds
    • Lowers BASE armor. This is really very little and will not hurt you in any way
  • roarDemoralizing Roar
    • Reduces your opponent's melee attack power, lowering his or her damage output
  • mangleMangle every cooldown
    • Moderate-Heavy damage
    • The best Dire Bear Form attack
    • Increases Shred and bleed damage by 30%
  • lacerateIf rage permits, use Lacerate
    • Stacking DoT effect that ignores armor
  • bashWhen you reach about 50% health, Bash
    • 4 second stun
    • Most rogues expect a Bash later in the fight, you will catch them offguard
    • Some rogues will attempt to pre-emptively counter this by using Evasion, which makes the rogue dodge almost every attack
    • You have already countered the rogue's strategy by using Bash early. If the rogue uses evasion while you still have 50% health, simply wait for evasion to fade and then Bash
    • Once stunned, rogues will often use their PvP trinket to break free and continue attacking
    • Begin moving away from the rogue as soon as you bash. Even if the rogue immediately breaks the stun you will be out of melee range
  • Shift to Caster Form
  • rejuvMove away from the rogue while casting Rejuvenation
    • Instant cast health over time
  • poisonAbolish Poison
    • Removes 1 poison effect every 2 seconds over an 8 second time period
    • Many rogues will try to blind you while you are in caster form before you get a chance to cast Abolish Poison
    • If you cast Abolish Poison immediately after Rejuvenation, the rogue will have a hard time Blinding before you cast, even if he or she used the PvP trinket to break the stun
  • barkskinBarkskin
    • Reduces your physical damage taken by 20% for 15 seconds
    • Rogues will often try to stun you while you are in Caster Form due to the reduced armor you experience while in it
    • Use your PvP trinket to break free of the stun and continue the execution of your strategy
  • ffFaerie Fire (Feral)
    • Reduces armor
    • Renders the rogue unable to stealth
    • Costs no rage
  • mangleMangle every cooldown
    • Moderate-Heavy damage
    • The best Dire Bear Form attack
    • Increases Shred and bleed damage by 30%
  • lacerateIf rage permits, use Lacerate
    • Stacking DoT effect that ignores armor
  • chargeIf you find yourself low on health, Frenzied Regeneration
    • Converts rage into health
    • Can turn a loss into a win
  • The rogue will die

*At any time during the fight, a rogue can use Cloak of Shadows to remove all debuffs and then Vanish. This enables the rogue to get a second opener whenever he or she chooses. Stay in Dire Bear Form whenever this happens.
First try and use Demoralizing Roar on the rogue to pull him back out of stealth, this will not catch a good rogue though so if this fails follow the next step.
The rogue will be looking for you to try to shift to Caster Form and heal because you are much easier to kill; do not give him this opportunity.

*If you notice a rogue use Adrenaline Rush and you are not stunned, shift to cat form and use Dash to run out of melee range as quickly as possible


View Step Details Druid vs Shaman

shamanThe Shaman

Strategy

  • prowlBegin stealthed in Cat Form
  • pouncePounce
    • 3 second stun
    • Moderate damage over time effect
  • mangleMangle
    • Moderate-Heavy damage
    • Awards 1 combo point, 2 on a crit because of Primal Fury
    • Increases Shred and bleed damage by 30%
  • ffFaerie Fire (Feral), re-apply as needed throughout the battle
    • Reduces the target's armor
    • Costs no rage or energy
  • shredShred
    • Heavy damage
    • Awards 1 combo point, 2 on a crit because of Primal Fury
  • shredShred
    • Heavy damage
    • Awards 1 combo point, 2 on a crit because of Primal Fury
  • maimMaim
    • Moderate damage finishing move that will incapacitate the target for 5 or 6 seconds, depending on combo points
    • Allows you to heal without the shaman interrupting
  • Switch to Caster Form
  • htHealing Touch
    • 3.5 second cast, large direct heal
  • graspNature's Grasp
    • If the shaman attempts to melee you, s/he has a chance to be rooted in place
  • bearSwitch to Dire Bear Form
  • chargeFeral Charge
    • The shaman will be relatively low in health and will likely try to heal, Feral Charge will interrupt
    • Roots the shaman in place for 4 seconds
  • enrageEnrage
    • Generates 20 rage over 10 seconds
    • Lowers BASE armor. This is really very little and will not hurt you in any way
  • mangleMangle every cooldown
    • Moderate-Heavy damage
    • The best Dire Bear Form attack
    • Increases Shred and bleed damage by 30%
  • lacerateLacerate as rage permits
    • Stacking DoT effect that ignores armor
  • Repeat until the shaman dies
  • chargeIf you find yourself low on health, Frenzied Regeneration
    • Converts rage into health
    • Can turn a loss into a win

*Shamans don't really have any true counter to this strategy. You may find some shaman attempting to kite you using the earthbind totem and spell damage to kill you. This is a largely ineffective strategy, however, because the shaman will generally run out of mana before you. If this happens, the fight is over.


View Step Details Druid vs Warlock

lockThe Warlock

Strategy

  • prowlBegin stealthed in Cat Form
    • You can often get a nice opener on the warlock, bringing him or her to half-health or lower within a few seconds
  • ravageRavage
    • Heavy damage
    • Awards 1 combo point, 2 on a crit because of Primal Fury
  • Switch to Caster Form
    • The warlock will fear you
    • You can break the fear using your PvP trinket, but only if you are in caster form
    • Even if you break one fear, warlocks will simply cast fear again
    • Each time the warlock fears you after the first, it will last less time. Simply use Rejuvenation as soon as you regain control of your character and hope you are still alive by the time you become immune
  • ffFaerie Fire
    • Lowers the warlock's armor
  • curseDecurse if needed
    • If the warlock has used any curse on you, such as Curse of Agony or Curse of Tongues, you should remove it
  • rootsEntangling Roots
    • Many warlocks will try to run away from you while applying DoT's. This prevents that, at least for a while
  • regrowthRegrowth
    • 2 second cast, direct heal with a health over time component
  • rejuvRejuvenation
    • Instant cast, health over time
  • bearSwitch to Dire Bear Form
    • Feral Charge is only available in Dire Bear Form, and is an important ability to use to interrupt the warlock and hold him in place
  • chargeFeral Charge
    • Interrupts any spell the warlock is casting
    • Roots the warlock in place for 4 seconds
    • Warlocks will often use Death Coil at this point in time
      • Deals damage to you, heals the warlock, and gives the warlock time to get out of your melee range
    • Shift to Caster Form and cast Entangling Roots
      • Allows you to re-enter melee range
  • enrageEnrage
    • Generates rage over a period of 10 seconds
  • mangleMangle every cooldown
    • Moderate-Heavy damage
    • The best Dire Bear Form attack
    • Increases Shred and bleed damage by 30%
  • lacerateLacerate as rage permits
    • Stacking DoT effect that ignores armor
  • chargeFrenzied Regeneration
    • Converts rage into health
    • Can turn a loss into a win
  • bashIf you reach around 40% health and have already used Frenzied Regeneration, Bash
    • 4 second stun
  • htSwitch to Caster Form Healing Touch
    • 3 second cast, large direct heal
  • rejuvRejuvenation
    • Instant cast, health over time
  • curseDecurse if Needed
    • If the warlock has used any curse on you, such as Curse of Agony or Curse of Tongues, you should remove it
  • catSwitch to Cat Form
    • High damage output
    • The diminishing returns timer on Fear is only 15 seconds long. This means that, by now, the warlock will be able to fear you for about 20 seconds while you are unable to act
    • You should be at full health from your Healing Touch/Rejuvination combo. You must have enough health to outlast the warlock's Fear in order to win
  • mangleMangle
    • Moderate-Heavy damage
    • Awards 1 combo point, 2 on a crit because of Primal Fury
    • Increases Shred and bleed damage by 30%
  • shredShred
    • Heavy damage
    • Awards 1 combo point, 2 on a crit because of Primal Fury
  • biteFerocious Bite
    • The warlock should be low in health
    • You will have accumulated between 2 and 4 combo points, making this a moderate to high damage finisher
  • The warlock will die

*Warlock is a very tough matchup for a druid. They have many abilities for which you have no counter. In order to beat a good warlock you will need to heal several times, have enough health to outlast his or her Fear spells, and a bit of good luck


View Step Details Druid vs Warrior

warriorThe Warrior

Strategy

  • prowlBegin stealthed in cat form
    • Prevents the warrior from charging you
    • Allows you to get the opener in most situations
  • ravageOpen with Ravage
    • Heavy damage
    • Awards 1 combo point, 2 on a crit because of Primal Fury
  • ffFaerie Fire (Feral)
    • Reduces the target's armor
    • Costs no rage or energy
  • mangleMangle
    • Moderate-Heavy damage
    • Awards 1 combo point, 2 on a crit because of Primal Fury
    • Increases Shred and bleed damage by 30%
  • shredShred
    • Heavy damage
    • Awards 1 combo point, 2 on a crit because of Primal Fury
  • shredShred
    • Heavy damage
    • Awards 1 combo point, 2 on a crit because of Primal Fury
  • ripRip
    • You will have accumulated 4 or 5 combo points, and your target will have the Mangle debuff, making this a very heavy damage over time attack
    • Ignores Armor
  • Begin moving away from the warrior, switch to caster form
  • barkskinBarkskin
    • Reduces your physical damage taken by 20% for 15 seconds
    • Some warriors will use Intimidating Shout when you shift into caster form. This enables the warrior to land a high damage attack while you are in a low armor form
    • Use your PvP trinket immediately and continue moving away from the warrior
    • Warriors will often use Intercept to stun you for 3 seconds while they attempt to land a high damage attack
    • Barkskin is usable even while you are stunned. Use the ability just like normal and continue the execution of your strategy
  • rejuvRejuvenation
    • Instant cast health over time
  • bearSwitch to Dire Bear Form
    • You are much harder for a warrior to kill in Dire Bear Form than in Cat Form
  • enrageEnrage
    • Generates 20 rage over 10 seconds
    • Lowers BASE armor. This is really very little and will not hurt you in any way
  • mangleMangle
    • Moderate-Heavy damage
    • The best Dire Bear Form attack
    • Increases Shred and bleed damage by 30%
  • roarDemoralizing Roar
    • Reduces your opponent's melee attack power, lowering his or her damage output
  • mangleContinue to Mangle every cooldown
  • lacerateIf you have extra rage, use Lacerate
    • Stacking DoT effect that ignores armor
  • chargeIf you find yourself low on health, use Frenzied Regeneration
    • Converts rage into health
    • Can turn a loss into a win
  • bashIf you find yourself low on health and have already used Frenzied Regeneration, Bash
    • 4 second stun
  • regrowthShift to Caster Form, Regrowth
    • 2 second cast, direct heal with a health over time component
  • rejuvRejuvenation
    • Instant cast, health over time
  • bearShift back into Dire Bear Form and continue the Mangle/Lacerate combo
  • The warrior will die

*Some warriors are capable of very heavy damage. Mortal Strike warriors also cut your healing in half, making it harder to stay alive.
If you have already used Frenzied Regeneration and find yourself low on health, use Bash to stun the warrior for 4 seconds, shift to caster form and Cyclone the warrior, heal to full, and shift back into Dire Bear Form


Hunter Strategies

View Step Details General Hunter Information

Overview

The Hunter is one of the most exciting classes to play in a player versus player situation. The class is capable of extreme burst damage, and can dish out damage from beyond most enemy's reach. If you spend the time and make an effort to truly learn the intracacies of the class, you will find it is quite rewarding and very enjoyable.

It is implied within this guide that you will use the Rapid Fire cooldown whenever possible.


Hunter Strengths

Hunters have many instant cast damage abilities, short duration crowd control, and the ability to deal heavy damage from up to 41 yards away from opponents.


Hunter Weaknesses

If an enemy player is able to successfully get into your melee range and stay there while doing damage, the hunter's ranged prowess is stripped away and it becomes very difficult to win fights.


The Best all around PvP Talent Build

Marksman Hybrid


How to read the strategy section

  • Ability to Use
    • Details about the ability and why you are using it
    • How enemies can counter
    • What to do if they counter

View Step Details Hunter vs Druid

druidThe Druid

Strategy

  • trapDrop a freezing trap at your feet while you deploy your pet and use Hunter's Mark
  • viperIf the Druid is in caster form or moonkin form, Viper Sting, and continue to do so throughout the fight
    • In caster form, the druid can remove Viper Sting, but it is generally still worthwhile to use
    • In moonkin form he cannot remove the sting, making it extremely effective
  • If the Druid is feral, skip the previous step
  • multiMulti Shot
    • Increased critical strike chance, high damage attack
  • concussiveConcussive Shot
    • Allows you to maintain a safe distance from the shaman while you do damage
  • arcaneArcane Shot
    • Instant, moderate damage attack
  • steadySteady Shot
    • 1 second cast, high damage attack
    • Some Druids will attempt to cast Entangling Roots on you and move inside of your shot range
    • Use your PvP trinket to remove the roots and begin strafing again
  • If the druid is trying to melee, s/he will have reached you by now and popped the trap
  • frostMove to max range and drop a frost trap
    • Slows the Druid, allowing you to maintain a safe distance while doing damage
  • multiMulti Shot
    • Increased critical strike chance, high damage attack
  • arcaneArcane Shot
    • Instant, moderate damage attack
    • The Druid will be relatively low on health at this point and may attempt to heal
    • Silencing Shot to prevent healing for three seconds
    • If the druid is still alive when the silencing shot effect wears off and attempts to heal again, Scatter Shot
  • silencingSilencing Shot (if it was not already used to interrupt a heal)
    • low-moderate damage instant cast
    • Silences the druid for 3 seconds
  • Begin strafing around the frost trap as you continue to use Multi/Arcane/Silencing Shot until the druid is dead
    • Strafing around the trap is not generally needed if you are fighting a druid using either caster or moonkin form, you can generally stand in one spot and do damage

*As with other healing classes, this battle can potentially take a long time. Maintain a safe range, interrupt heals when possible, and use Feign Death/PvP trinket to prevent him from rooting you in place. Eventually the battle will turn out in your favor.


View Step Details Hunter vs Hunter

hunterThe Hunter

Strategy

  • trapDrop a Freezing Trap at your feet
    • This trap is placed to freeze the hunter's pet for the duration of the battle
    • Will mitigate all of the hunter pet's damage
  • viperViper Sting
    • Hunters have a very small mana pool
    • Keeping Viper Sting on the hunter will render him or her useless very quickly
  • multiMulti Shot
    • Increased ctirical strike chance, high damage attack
  • concussiveConcussive Shot
    • You are using this ability in hopes that the improved Concussive Shot stun effect will proc, giving you time to shoot at the hunter while he or she is unable to shoot back
    • Beast Mastery hunters can use Bestial Wrath and The Beast Within to become immune to any type of crowd control effect
    • Feign Death
      • The enemy hunter will lose his target and be forced to manually retarget you to begin shooting
      • The hunter pet will stop attacking until the hunter retargets you and deploys it again
    • When the hunter retargets you, move into melee range
      • If the enemy hunter uses concussive shot, use your PvP trinket to continue moving towards him or her
  • arcaneArcane Shot
    • Instant cast, moderate damage
  • silencingSilencing Shot
    • Instant cast, low-moderate damage attack
  • scatterScatter Shot
    • Prevent the hunter from attacking you while you wait on shot cooldowns
  • multiWhen the Scatter Shot Duration is about to end, Multi Shot
    • Increased ctirical strike chance, high damage attack
  • arcaneArcane Shot
    • Instant cast, moderate damage
  • viperViper Sting
    • Hunters have a very small mana pool
    • Keeping Viper Sting on the hunter will render him or her useless very quickly
  • multiMulti Shot
    • Increased ctirical strike chance, high damage attack
  • arcaneArcane Shot
    • Instant cast, moderate damage
  • steadySteady Shot
    • 1 second cast, high damage attack
  • Average geared hunters should be dead, or very near dead
  • If the hunter is not dead, Repeat the entire Multi Shot/Arcane Shot/Silencing Shot/Steady Shot combination until he or she is

*If the enemy hunter uses Rapid Fire or procs improved Aspect of the Hawk at any time during the fight, you should make an effort to move into melee range until the buffs fade. This will cause you to take a considerable amount less damage


View Step Details Hunter vs Mage

trollThe Mage

Strategy

  • trapDrop a Freezing Trap at your feet, while deploying your pet and casting Hunter's Mark
    • Many mages will try to enter melee range with you in order to render your ranged attacks useless
    • This will freeze the mage in place for 12 seconds, preventing him or her from taking any action and allowing you to regain a safe distance
  • silencingStand still on the trap and Silencing Shot
    • Instant, low-moderate damage shot
    • Silences the mage for 3 seconds, preventing fear from landing on you and allowing you to damage him or her freely
  • multiMulti Shot
    • Increased critical strike chance, high damage attack
  • arcaneArcane Shot
    • Instant, moderate damage attack
  • steadySteady Shot
    • 1 second cast, high damage attack
    • The mage will either attempt to Polymorph you or use Blink to get closer than your minimum shot range
    • If the mage Blinks in close
      • The Freezing Trap you planted earlier will pop, enabling you to regain a safe distance from the mage
        • Concussive shot to slow the mage's movement should he try to move in close again, and then continue the execution of your strategy
    • If the mage attempts to Polymorph you
      • Use Scatter Shot to disorient the mage, making him or her unable to act for 4 seconds, continue execution of your strategy
    • The mage will likely attempt to polymorph you again when the Scatter Shot effect fades
      • Feign Death
        • The mage will drop his target, and his Polymorph will stop casting
  • arcaneArcane Shot
    • Instant, moderate damage attack
  • multiMulti Shot
    • Increased critical strike chance, high damage attack
  • silencingSilencing Shot
    • Instant, low-moderate damage shot
    • Silences the mage for 3 seconds, preventing spells from landing on you and allowing you to damage him or her freely
  • steadySteady Shot
    • 1 second cast, high damage attack
  • arcaneArcane Shot
    • Instant, moderate damage attack
  • The mage, regardless of gear level, should be dead
  • If the mage is not dead, repeat the Multi/Arcane/Steady/Silencing Shot pattern while strafing away from the mage until he or she dies

*If a mage has Ice Block, s/he will take longer to kill.
Counter ice block by using either Scatter Shot or Silencing Shot right when it fades and continue execution of your strategy

*Mages have the ability to output enough damage to kill some players within a few seconds. Typically the mage will use Polymorph and then unload as much damage as possible before you get a chance to act.
Prevent the mage from Polymorphing you by utilizing Silencing Shot, Scatter Shot, Feign Death, and maintaining maximum possible range


View Step Details Hunter vs Paladin

pallyThe Paladin

Strategy

  • This battle is going to be very long, do not waste mana on stings, traps, Hunter's mark, or other unneeded abilities
  • viperDeploy your pet while switching to Aspect of the Viper
  • arcaneArcane Shot
    • Instant, moderate damage attack
  • multiMulti Shot
    • Increased critical strike chance, high damage attack
  • silencingSilencing Shot
    • 1 second cast, high damage attack
  • arcaneBegin strafing away from the paladin, Arcane Shot
    • Instant, moderate damage attack
  • multiMulti Shot
    • Increased critical strike chance, high damage attack
  • arcaneArcane Shot
    • Instant, moderate damage attack
  • multiMulti Shot
    • Increased critical strike chance, high damage attack
  • silencingSilencing Shot
    • 1 second cast, high damage attack
  • Continue Strafing away from the paladin while you use the Multi/Arcane/Silencing Shot combo
  • trapThe paladin may still be alive by the time you run out of mana, if so drop a Freezing Trap
    • The paladin cannot get out of the Freezing Trap unless s/he uses Divine Shield
    • You will be able to drop combat and drink to recover mana
    • If the Paladin uses Divine Shield, he or she can hit you and stop you from recovering mana; making the fight difficult
    • Begin to run away from the paladin
      • If you are able to get out of his melee range, the paladin will often stop and heal to full. This gives you time to run further away and begin drinking some more
      • Once you have recovered mana, continue the execution of your strategy
  • Auto Shot the paladin until he closes to melee range and pops the trap
    • The goal here is to do as much damage as possible while you are able
  • feignFeign Death and attempt to drink to recover mana
  • Resume Strafing away from the paladin while you use the Multi/Arcane/Silencing Shot combo until the paladin dies

*Paladins are able to cleanse all of your stings and Hunter's Mark for very little mana. Do not waste your mana by trying to use these abilities

*You will not be able to interrupt most of the Paladin's heals. You have to try to do high damage while conserving mana and hope that he runs out before you do

*This is potentially one of the longest battles you will see as a Hunter.

*If you need to gain ground on the paladin, Aspect of the Cheetah works wonderfully.


View Step Details Hunter vs Priest

priestThe Priest

Strategy

  • trapDrop a Freezing Trap at your feet while you deploy your pet
    • Do not waste mana on Hunter's Mark. The priest will simply dispel it.
  • viperViper Sting
    • The priest cannot dispel your sting, if the fight goes on long enough you will run him out of mana; rendering him useless
    • The priest may try to counter by using Mana Burn to drain your mana before you are able to drain his
    • Use Feign Death/Scatter Shot/Silencing Shot to prevent this spell from landing on you
  • concussiveConcussive Shot
    • The priest will begin to move towards you in an attempt to fear, this will give you a longer amount of time to do damage before s/he reaches you
  • silencingSilencing Shot
    • Low-moderate damage attack
    • Silences the priest for 3 seconds
  • multiMulti Shot
    • Increased critical strike chance, high damage attack
  • arcaneArcane Shot
    • Instant, moderate damage attack
  • By now the priest will have closed to near melee range
    • Do not allow yourself to be feared. Maintain at least an 8 yard buffer zone between you and the priest
  • arcaneBegin moving backwards, attempting to draw the priest over your freezing trap while you Arcane Shot
    • The priest cannot break out of your freezing trap
    • You will have 12 seconds to move away from the priest and begin attacking again
  • frostMove to max range from the priest, dropping a Frost Trap along the way
  • Continue with Multi/Arcane/Silencing/Steady shot while strafing away from the priest until he or she dies.

*Shadow Priests will often try to damage you faster than you can them. If this happens, utilize Feign Death/Scatter Shot/Silencing Shot to prevent their offensive spells from landing

*As with all healers, Priests can take a long time for a hunter to kill. Make sure you use Viper Sting every cooldown to effectively drain the priests mana. If the priest runs out of mana, you win.


View Step Details Hunter vs Rogue

rogueThe Rogue

Strategy

  • frostDrop a Frost Trap at your feet
    • Frost Trap is superior to Freezing Trap against rogues because they can simply Cloak of Shadows and resist a Freezing Trap, leaving you defenseless
  • markApply Hunter's Mark
    • You will still be able to see, and shoot at the rogue even if s/he attempts to stealth or Vanish
  • flareUse Flare near the area you are standing
    • If you are standing on a Flare the rogue cannot Vanish and use an opener on you, s/he is forced to use non-stealth abilities
  • concussiveConcussive Shot
    • Gives you more time to shoot before the rogue closes to melee range
    • Rogues can use Evasion and Sprint to catch you relatively quickly without taking as much damage
    • Do not alter your strategy if the rogue uses this as a counter. Evasion provides only a 25% dodge rate against ranged attacks. Most of your shots will still land.
  • serpentSerpent Sting
    • Instant cast for decent damage over time
    • Rogues can use Cloak of Shadows to remove all debuffs and then Vanish to get an opener on you
    • Most rogues will open with Cheap Shot and then Shiv to apply Crippling Poison
    • Use your PvP trinket
      • This will break you out of both the Cheap Shot stun and the Crippling Poison snare, allowing you to move freely
    • Immediately Scatter Shot
      • Confuses the rogue for 4 seconds, s/he will be unable to perform any action while under the effects of Scatter Shot
    • Move to range while reapplying Hunter's Mark
      • The rogue has already used Cloak of Shadows, he or she will be unable to remove Hunter's Mark again
    • Drop a new Frost Trap and continue the execution of your strategy
  • arcaneArcane Shot
    • Instant cast for moderate damage
  • multiMulti Shot
    • Increased critical strike chance, high damage attack
  • By now the rogue will have closed to melee range
  • scatterWhen the trap pops, Scatter Shot and begin strafing around the area
    • Before you are able to Scatter Shot, the rogue may use Blind to disorient you for 10 seconds. You will be unable to perform any action during this time
    • The rogue will attempt to bandage, restealth and get an opener on you
    • Make sure your pet is attacking the rogue, s/he will be unable to bandage or stealth
    • Scatter shot when Blind breaks and begin strafing again
      • Even if the rogue managed to re-apply Crippling Poison you should be able to move out of melee range
      • As a last resort, Use Deterrance and Use Raptor Strike and Wing Clip at the same time while continuing to strafe away from the rogue
  • silencingSilencing Shot
    • Instant cast attack, lower damage than the others but still worthwhile
  • arcaneArcane Shot
    • Instant cast for moderate damage
  • multiStop Briefly and Multi Shot
    • Increased critical strike chance, high damage attack
  • Rogues with average gear should be dead
  • If the rogue is still alive, Continue strafing the area
  • arcaneArcane Shot
    • Instant cast for moderate damage
  • multiStop briefly and Multi Shot
    • Increased critical strike chance, high damage attack
  • Even in high end gear, the rogue should be dead

View Step Details Hunter vs Shaman

shamanThe Shaman

Strategy

  • frostDrop a Frost Trap at your feet while you deploy your pet and use Hunter's Mark
    • All Shamans, regardless of talent build, will attempt to close to 20 yards or less since many of their totems/shocks have very short range
    • The Trap, combined with Concussive Shot, will allow you to stay outside of the shaman's effective range
  • viperViper Sting
    • Shamans can cleanse this sting, but many will not do it fast enough, and your sting will eat away at their mana
  • concussiveConcussive Shot
    • Allows you to maintain a safe distance from the shaman while you do damage
    • The shaman PvP trinket removes roots/stuns/snares. Many shamans will use that to remove Concussive Shot and move quickly towards you
    • If this happens you will need to begin strafing away from the shaman earlier, and will have to skip the Steady Shot steps of the strategy
  • multiMulti Shot
    • Increased critical strike chance, high damage attack
  • arcaneArcane Shot
    • Instant, moderate damage attack
  • steadySteady Shot
    • 1 second cast, high damage attack
  • steadySteady Shot
    • 1 second cast, high damage attack
  • arcaneBegin Strafing around the trap area and Arcane Shot
    • By strafing you will maintain a safe distance from the shaman while still doing damage
    • Many shamans will Frost Shock as soon as they are within range, limiting your movement speed
    • Use your PvP trinket to remove the snare and regain a safe distance from the shaman
  • multiStop briefly, Multi Shot, begin strafing again
    • Increased critical strike chance, high damage attack
  • viperViper Sting
    • Shamans can cleanse this sting, but many will not do it fast enough, and your sting will eat away at their mana
  • Enhancement Shamans should be dead or very near dead
  • If the shaman is not dead, continue strafing around the trap area while using Multi/Arcane Shot/Viper Sting and Interrupting healing spells with Silencing/Scatter Shot until he or she dies
    • If the shaman is specced Restoration, this battle can continue for quite some time.
    • The shaman will be able to heal a few times and it may feel like you are killing him three times over, but continue strafing and maintain range from him and you will eventually wear him down.

*Shamans will always try to heal when brought to low health.
Save Silencing Shot and Scatter Shot for when the enemy attempts to heal. You may not be able to interrupt every heal, but you can often interrupt a big heal that would have saved the shaman and prolonged the battle.

*Shaman totems can be fairly disruptive
While strafing away from the shaman, tell your pet to attack the totems. It will not slow you down at all and will waste the shaman's mana and time


View Step Details Hunter vs Warlock

gnomeThe Warlock

Strategy

  • markDeploy Pet and Use Hunter's Mark
    • Stay far away while your pet runs in, the warlock may attempt to fear your pet instead of you
    • Hunter's mark will allow you to do more damge to the warlock
  • silencingSilencing Shot
    • Instant, low-moderate damage shot
    • Silences the warlock for 3 seconds, preventing fear from landing on you and allowing you to damage him or her freely
  • multiMulti Shot
    • Increased critical strike chance, high damage attack
  • arcaneArcane Shot
    • Instant, moderate damage attack
  • serpentSerpent Sting - only if you have managed to maintain a long range from the warlock
    • Instant, low-moderate damage over time
    • When the silencing shot effect wears off, the warlock can use Death Coil and then Fear to crowd control you while s/he does damage
    • If you allow yourself to be feared, the warlock has a very good chance of being able to kill you
    • Death Coil has a shorter range than all of your shots, you can counter this by laying a Frost Trap and running away from the warlock while using your instant cast shots
    • If you are unable to maintain range, use Scatter Shot immediately after the Silencing Shot silence fades and move out of death coil range
    • Concussive Shot as the Scatter Shot effect fades, and continue the execution of your strategy
  • multiMulti Shot
    • Increased critical strike chance, high damage attack
  • arcaneArcane Shot
    • Instant, moderate damage attack
  • silencingSilencing Shot
    • Instant, low-moderate damage shot
    • Silences the warlock for 3 seconds, preventing fear from landing on you and allowing you to damage him or her freely
  • The warlcok should be approaching death
  • If the warlock is still alive, repeat the Silencing/Multi/Arcane combo until dead

*The warlock is one of the most challenging classes for a hunter to kill. You have no way to break fear, and s/he will often be able to kill you if you become feared.

*Warlocks using a succubus will often try to seduce you in order to close within range of Fear/Death Coil.
If you see a Succubus, deploy your pet to attack it instantly. Your pet's attacks will break Seduce and allow you to move freely


View Step Details Hunter vs Warrior

warriorThe Warrior

Strategy

  • trapDrop a Freezing Trap at your feet
    • The warrior needs to come into melee range to damage you, when s/he enters melee range, the trap will pop and give you time to reposition
  • concussiveConcussive Shot the warrior while he is out of his charge range (25 yards)
    • Your shot range is much larger than the warrior's charge
    • You will put the warrior into combat, making it impossible to charge
    • Snares the warrior, giving you more time to shoot before s/he reaches you
    • The warrior PvP trinket removes stuns/roots/snares. Using this will enable the warrior to run to your position quickly without using intercept.
    • Do not change your strategy, he or she will still be frozen upon reaching your position
  • arcaneStand still on your trap and Arcane Shot
    • Instant cast for moderate damage
  • multiContinue Standing on your trap and Multi Shot
    • Increased critical strike chance, high damage attack
  • By now the warrior will be in melee range and your trap will pop
  • frostRun to max range and drop a Frost Trap
  • multiMulti Shot
    • Increased critical strike chance, high damage attack
  • arcaneArcane Shot
    • Instant cast for moderate damage
  • Begin strafing around your frost trap
    • Strafing provides the same movement speed as running, while enabling you to continue facing your target and fire instant cast shots
    • The warrior will often Intercept you at this point, which stuns you for three seconds and allows him to close to melee range. He will then Hamstring you which limits your movement speed.
    • When this happens, Scatter Shot
      • Disorients the warrior for 4 seconds. The warrior will be unable to perform any action while under the effect of Scatter Shot
    • Use your PvP trinket to remove the snare and regain range
  • serpentSerpent Sting
    • Instant cast for decent damage over time
    • If the warrior manages to come within 8 yards of your position, he or she can use Intimidating Shout to fear you for up to 8 seconds. During this time he or she will re-apply hamstring and attempt to maintain melee range.
    • Use Deterrance
      • It will be difficult for the warrior to land attacks on you while this ability is in effect
    • Hit Wing Clip while at the same time hitting Raptor Strike
      • Raptor Strike is an "on next swing" attack, meaning you can use it at the same time as another ability.
      • Doing both of these at the same time will do extra damage to the warrior, while at the same time allowing you to place a snare on him or her.
    • Attempt to regain range and continue execution of your strategy
  • arcaneArcane Shot
    • Instant cast for moderate damage
  • silencingSilencing Shot
    • instant cast attack, lower damage than others but still worthwhile
  • multiStop Briefly, Multi Shot, being strafing again
    • Increased critical strike chance, high damage attack
  • arcaneArcane Shot
    • Instant cast for moderate damage
  • multiStop Briefly, Multi Shot, begin strafing again
    • Increased critical strike chance, high damage attack
  • The warrior should be dead at this point, even if he or she was using a shield

*It is possible at any time for a Warrior to kill you within 2 or 3 seconds. DO NOT, under any circumstances, allow a warrior to stay within melee range of you for more than a second or two.


Mage Strategies

View Step Details General Mage Information

Overview

The mage is a highly damage oriented class that relies on its extensive burst damage capabilities to kill opponents quickly.


Mage Strengths

Extreme burst damage potential. Short cooldowns spells allow for even larger than normal damage output. The ability to remove any and all debuffs with the Ice Block ability. Can crowd control opponents, leaving the mage free to set up and execute any strategy he or she may see fit without interruption.


Mage Weaknesses

Cloth armor provides very little physical damage mitigation. Mages typically have small amounts of health, making them easier to kill than many other classes.


The Best all around PvP Talent Build

Arcane/Frost

This guide assumes that you use Ice Armor, and Arcane Intellect at all times. It is also assumed that you will use Cold Snap immediately after you use Ice Block in any situation.


How to read the strategy section

  • Ability to Use
    • Details about the ability and why you are using it
    • How enemies can counter
    • What to do if they counter

View Step Details Mage vs Druid

druidThe Druid

Strategy

  • fboltFrost Bolt
    • 2.5 second cast, 36 yard range
    • Very high damage attack that limits the target's run speed to 60% of normal for 9 seconds
  • fboltFrost Bolt
    • 2.5 second cast, 36 yard range
    • Very high damage attack that limits the target's run speed to 60% of normal for 9 seconds
  • fbFire Blast
    • Instant cast, 20 yard range, moderate-high damage attack
  • fboltFrost Bolt until the druid attempts to heal
  • spellstealSpellsteal any health over time spells the druid tries to use
    • The health over time spells will heal you instead of the druid!
    • Feral druids may attempt to Bash; stunning you for 4 seconds and providing them time to heal
    • Blink immediately after you are stunned and continue as planned
  • csWhen the druid attempts to cast Healing Touch, Counterspell
    • Interrupts the druid's spellcast and prevents him or her from casting another nature spell for 10 seconds
    • Provides you with an opporutnity to unload on the druid without interruption
  • arcane powerArcane Power
    • Increases all damage you do by 30%, but causes spells to cost an additional 30% mana
    • Lasts 15 seconds
  • fboltFrost Bolt
    • 2.5 second cast, 36 yard range
    • Very high damage attack that limits the target's run speed to 60% of normal for 9 seconds
  • pom + fboltPresence of Mind, Frost Bolt
    • Instant cast (because of Presence of Mind), 36 yard range
    • Very high damage attack that limits the target's run speed to 60% of normal for 9 seconds
  • novaFrost Nova
    • Instant cast, area of effect, low damage attack
    • Freezes enemies in place for up to 8 seconds
    • Increases your critical strike chance by 50% for the duration your target is frozen (because of the Shatter Talent)
  • lanceIce Lance
    • Instant cast, 30 yard range, low damage attack
    • Causes triple damage to Frozen target
  • cocCone of Cold
    • Instant cast, moderate-high damage attack that affects targets in a cone in front of the caste
  • fbFire Blast
    • Instant cast, 20 yard range, moderate-high damage attack
  • The druid will die

*Druids really have no way to effectively interrupt your casting and are easy to damage. The problem with some druids lies in their healing ability. Use spellsteal as mana permits to remove health over time spells, and Counterspell any Healing Touch Casts. If you can effectively interrupt a druid's heals, you will find s/he is easy prey!


View Step Details Mage vs Hunter

hunterThe Hunter

Strategy

  • mana shieldMana Shield
    • Absorbs damage, draining mana instead
  • polyPolymorph
    • 1.5 second cast, 30 yard range
    • Causes the target to wander aimlessly for up to 12 seconds, preventing him her or her from using any abilities
    • Hunters will often use Silencing Shot to interrupt your casting
    • Run toward the hunter, when the three second silence ends, Polymorph and continue as planned
    • Beast Mastry Hunters can use The Beast Within to become immune to all crowd control, snare, and stun effects for 18 seconds. If this is active, you will be unable to Polymorph.
    • Ice Block for the full 10 second duration. When it expires, wait on The Beast Within effect to fade and Polymorph
  • Move to near melee range with the hunter
    • Prevents the hunter from using ranged attacks, and considerably reduces his or her damage output
    • Hunters will often stand on a Freezing Trap. This trap will pop if stepped on and render you unable to act for up to 12 seconds while the hunter moves away from you
    • Do not move directly on top of the hunter. Move to within Frost Nova range but no further and you will be safe from traps.
  • arcane powerArcane Power
    • Increases all damage you do by 30%, but causes spells to cost an additional 30% mana
    • Lasts 15 seconds
  • fboltFrost Bolt
    • 2.5 second cast, 36 yard range
    • Very high damage attack that limits the target's run speed to 60% of normal for 9 seconds
  • pom + fboltPresence of Mind, Frost Bolt
    • Instant cast (because of Presence of Mind), 36 yard range
    • Very high damage attack that limits the target's run speed to 60% of normal for 9 seconds
    • Hunters will often attempt to Scatter Shot immediately after Polymorph breaks. This will render you unable to act for up to 4 seconds
    • If you Frost Nova immediately after this Frost Bolt, the hunter will be frozen for the duration of Scatter Shot and will not be able to move away from you
  • novaFrost Nova
    • Instant cast, area of effect, low damage attack
    • Freezes enemies in place for up to 8 seconds
    • Increases your critical strike chance by 50% for the duration your target is frozen (because of the Shatter Talent)
    • The hunter PvP trinket removes all movement impairing effects. He or she can use it here to break out of your Frost Nova and move to a ranged position
    • Do not change your strategy, this tactic is largely ineffective against you and should not make a difference in the outcome of the battle
  • lanceIce Lance Immediately
    • Instant cast, 30 yard range, low damage attack
    • Causes triple damage to Frozen targets
  • cocCone of Cold
    • Instant cast, moderate-high damage attack that affects targets in a cone in front of the caster
  • fbFire Blast, move toward the hunter if he or she runs away
    • Instant cast, 20 yard range, moderate-high damage attack
  • lanceIce Lance, continue to move toward the hunter
    • Instant cast, 30 yard range, low damage attack
    • Causes triple damage to Frozen targets
  • cocCone of Cold
    • Instant cast, moderate-high damage attack that affects targets in a cone in front of the caster
  • fbFire Blast
    • Instant cast, 20 yard range, moderate-high damage attack
  • The hunter will die

*The most effective way to kill hunters is to do as much damage as possible within a few seconds. The hunter will often win long battles due to the ability to Viper Sting and drain your mana.

*Stick to instant cast spells as much as possible. It is very hard to cast spells that are not instant cast against hunters because of the pet and hunter attacking you very often, which pushes back the spell casting time.


View Step Details Mage vs Mage

mageThe Mage

Strategy

  • fire ward or frost wardFire Ward or Frost Ward, depending on the type of mage you are fighting. Continue to refresh this every time the cooldown ends
    • Absorbs 1220 fire damage of frost damage, depending on the spell you cast
  • polyPolymorph
    • 1.5 second cast, 30 yard range
    • Causes the target to wander aimlessly for up to 12 seconds, preventing him her or her from using any abilities
    • The mage PvP trinket removes Polymorph effects.
    • Polymorph again immediately, and continue execution of your strategy
  • arcane powerArcane Power
    • Increases all damage you do by 30%, but causes spells to cost an additional 30% mana
    • Lasts 15 seconds
  • fbolt Frost Bolt
    • 2.5 second cast, 36 yard range
    • Very high damage attack that limits the target's run speed to 60% of normal for 9 seconds
  • pom + fboltPresence of Mind, Frost Bolt
    • Instant cast (because of Presence of Mind), 36 yard range
    • Very high damage attack that limits the target's run speed to 60% of normal for 9 seconds
    • The enemy mage will often attempt to Counterspell you when Polymorph breaks, preventing you from casting
    • If you use Counterspell immediately after this Frost Bolt cast, you will actually be able to land counterspell before the opposing mage is unable to act. This ensures that you can finish execution of your strategy without interruption
  • csCounterspell
    • Interrupts any spell the enemy mage is casting, and prevents him or her from casting any spell in that school for 10 seconds
    • Silences the mage for 4 seconds, preventing him or her from casting any spell
  • novaFrost Nova
    • Instant cast, area of effect, low damage attack
    • Freezes enemies in place for up to 8 seconds
    • Increases your critical strike chance by 50% for the duration your target is frozen (because of the Shatter Talent)
  • lanceIce Lance
    • Instant cast, 30 yard range, low damage attack
    • Causes triple damage to Frozen target
  • cocCone of Cold
    • Instant cast, moderate-high damage attack that affects targets in a cone in front of the caste
  • fbFire Blast
    • Instant cast, 20 yard range, moderate-high damage attack
  • fboltFrost Bolt if needed
    • 2.5 second cast, 36 yard range
    • Very high damage attack that limits the target's run speed to 60% of normal for 9 seconds
    • The enemy mage may attempt to Counterspell you and use Polymorph to prevent you from acting
    • Use your PvP trinket to remove the Polymorph effect and finish the enemy mage off
  • The mage will die

*Enemy frost mages may attempt to use Ice Block to prevent incoming damage and interrupt the flow of your strategy.
If your opponent does this, bandage to regain health while you wait on Ice Block to fade. Be patient and stick to your plan. The enemy mage's death awaits as soon as the Ice Block fades

*The most effective way to kill an opposing mage is to unleash as much damage as possible within a very short time period. Interrupt his or her spellcasting with Counterspell, and finish the fight promptly


View Step Details Mage vs Paladin

pallyThe Paladin

Strategy

  • fboltFrost Bolt
    • 2.5 second cast, 36 yard range
    • Very high damage attack that limits the target's run speed to 60% of normal for 9 seconds
    • Paladins will often use Hammer of Justice to interrupt your cast and stun you for 6 seconds
    • Blink to remove the stun, and continue execution of your strategy
  • fboltContinue to Frost Bolt until the paladin attempts to heal or use Divine Shield
  • fboltIf the paladin uses Divine Shield, bandage while s/he heals. Resume Frost Bolting until the paladin attempts to heal
  • csWhen the paladin starts healing, Counterspell
    • Interrupts the paladin's spellcast and prevents him or her from casting another spell for 10 seconds (more than enough time to successfully kill the paladin)
    • Provides you with an opporutnity to unload on the paladin without interruption
  • arcane powerArcane Power
    • Increases all damage you do by 30%, but causes spells to cost an additional 30% mana
    • Lasts 15 seconds
  • fboltFrost Bolt
    • 2.5 second cast, 36 yard range
    • Very high damage attack that limits the target's run speed to 60% of normal for 9 seconds
  • pom + fboltPresence of Mind, Frost Bolt
    • Instant cast (because of Presence of Mind), 36 yard range
    • Very high damage attack that limits the target's run speed to 60% of normal for 9 seconds
  • novaFrost Nova
    • Instant cast, area of effect, low damage attack
    • Freezes enemies in place for up to 8 seconds
    • Increases your critical strike chance by 50% for the duration your target is frozen (because of the Shatter Talent)
    • Blessing of Freedom makes the paladin immune to all movement impairing effects
    • If you see the paladin use this spell, Spellsteal and continue as planned
  • lanceIce Lance
    • Instant cast, 30 yard range, low damage attack
    • Causes triple damage to Frozen target
  • cocCone of Cold
    • Instant cast, moderate-high damage attack that affects targets in a cone in front of the caste
  • fbFire Blast
    • Instant cast, 20 yard range, moderate-high damage attack
  • The paladin will die

*The trick to this fight is making the paladin heal. Conserve mana and cooldowns until after you have successfully landed a Counterspell. If you interrupt a heal, the fight is over

*If you notice the paladin using Avenging Wrath at any point in the battle (it looks like golden wings on the paladin's back) use spellsteal. You will steal the buff and all your spells will do 30% additional damage for the duration!


View Step Details Mage vs Priest

priestThe Priest

Strategy

  • spellstealSpellsteal
    • Priests have many magical buffs, such as Power Word:Shield and Renew. Steal these spells any time you see them cast
  • polyPolymorph
    • 1.5 second cast, 30 yard range
    • Causes the target to wander aimlessly for up to 12 seconds, preventing him her or her from using any abilities
    • The priest PvP trinket removes Polymorph effects
    • Cast Polymorph again and continue the execution of your strategy
  • arcane powerArcane Power
    • Increases all damage you do by 30%, but causes spells to cost an additional 30% mana
    • Lasts 15 seconds
  • fboltFrost Bolt
    • 2.5 second cast, 36 yard range
    • Very high damage attack that limits the target's run speed to 60% of normal for 9 seconds
  • pom + fboltPresence of Mind, Frost Bolt
    • Instant cast (because of Presence of Mind), 36 yard range
    • Very high damage attack that limits the target's run speed to 60% of normal for 9 seconds
    • Shadow Priests may attempt to use Silence to prevent you from casting for 5 seconds
    • If you Counterspell immediately after casting this Frost Bolt, it will land before the priest is able to act, and pevent him from silencing you for 4 seconds
  • csCounterspell
    • Interrupts the priest's spellcast and prevents him or her from casting another spell in that school for 10 seconds
    • Silences the priest for 4 seconds, preventing him or her from casting any spell
  • novaFrost Nova
    • Instant cast, area of effect, low damage attack
    • Freezes enemies in place for up to 8 seconds
    • Increases your critical strike chance by 50% for the duration your target is frozen (because of the Shatter Talent)
    • When you enter Frost Nova range, the priest will often attempt to use Psychic Scream; fearing you for up to 8 seconds
    • Use your PvP trinket to remove the fear effect and continue as planned
  • lanceIce Lance
    • Instant cast, 30 yard range, low damage attack
    • Causes triple damage to Frozen target
  • cocCone of Cold
    • Instant cast, moderate-high damage attack that affects targets in a cone in front of the caste
  • fbFire Blast
    • Instant cast, 20 yard range, moderate-high damage attack
  • fboltFrost Bolt if needed
  • The priest will die

*Ice Block is a very powerful tool when used against Shadow Priests. After the priest casts his or her various damage over time spells, and if s/he attempts to Silence you, Ice Block and then immediately cancel the buff and continue killiing the priest. This is very disruptive to the priest and can swing the battle to your favor

*Against non-shadow priests, make sure you use Counterspell during a heal cast. If you manage to successfully interrupt a heal, and unload with arcane power, victory is almost certain


View Step Details Mage vs Rogue

rogueThe Rogue

Strategy

  • mana shieldMana Shield
    • Absorbs damage, draining mana instead
    • Extremely useful against rogues
  • aeChain Cast Arcane Explosion (Rank 1)
    • Instant cast, low damage, area of effect spell
    • If you hit the rogue while s/he tries to get the opening move, stealth will fade and you will be able to attack freely
    • It is possible for rogues to use Sprint and open on you in between spell casts
    • When you are able to act, you will be snared. Use your PvP trinket immediately as you Frost Nova the rogue and continue as planned
  • novaFrost Nova as soon as the rogue becomes visible
    • Instant cast, area of effect, low damage attack
    • Freezes enemies in place for up to 8 seconds
    • Increases your critical strike chance by 50% for the duration your target is frozen (because of the Shatter Talent)
    • The rogue can use Vanish to remove the root effect and re-open on you
    • As soon as the rogue Vanishes, chain cast Arcane Explosion (Rank 1) until his or her stealth is removed. Continue as planned
  • cocCone of Cold and begin strafing away from the rogue
    • Instant cast, moderate-high damage attack that affects targets in a cone in front of the caster
    • The rogue can use Cloak of Shadows to remove any snare effects
    • Rogues can use Cloak of Shadows to remove all debuffs and resist virtually every spell for 5 seconds. During this time they will move back into melee range with you
    • Do not attempt to attack the rogue before the Cloak of Shadows buff fades, it is a waste of mana. Run away from the rogue, and use Blink to establish a safe distance if needed
    • Some rogues will use Blind to bandage and restealth, allowing them to get another opener
    • Use Ice Block to remove Blind immediately, Frost Nova, and continue execution of your strategy
  • lanceIce Lance as you continue to strafe away from the rogue
    • Instant cast, 30 yard range, low damage attack
    • Causes triple damage to Frozen targets
  • fbFire Blast while continuing to strafe
    • Instant cast, 20 yard range, moderate-high damage attack
  • blinkWhen the rogue regains melee range, Blink
    • Teleports you 20 yards forward
    • Removes stun and root effects
  • pom + fboltPresence of Mind, Frost Bolt
    • Instant cast (because of Presence of Mind), 36 yard range
    • Very high damage attack that limits the target's run speed to 60% of normal for 9 seconds
  • lanceStrafe away from the rogue while casting Ice Lance
    • Instant cast, 30 yard range, low damage attack
    • Causes triple damage to Frozen targets
  • fbFire Blast , continue strafing
    • Instant cast, 20 yard range, moderate-high damage attack
  • lanceIce Lance
    • Instant cast, 30 yard range, low damage attack
    • Causes triple damage to Frozen targets
  • novaWhen the cooldown on Frost Nova finishes, use it
    • Instant cast, area of effect, low damage attack
    • Freezes enemies in place for up to 8 seconds
    • Increases your critical strike chance by 50% for the duration your target is frozen (because of the Shatter Talent)
  • arcane powerArcane Power, Frost Bolt
    • 2.5 second cast, 36 yard range
    • Very high damage attack that limits the target's run speed to 60% of normal for 9 seconds
    • Rogues with Preparation may use it to Blind you a second time when they see you cast Arcane Power
    • Ice Block again Immediately, Frost Nova, and continue execution of your strategy
  • lanceIce Lance
    • Instant cast, 30 yard range, low damage attack
    • Causes triple damage to Frozen targets
  • fbFire Blast
    • Instant cast, 20 yard range, moderate-high damage attack
  • cocCone of Cold
    • Instant cast, moderate-high damage attack that affects targets in a cone in front of the caster
  • The rogue should be dead, even in top gear

*Rogues can be either a very fast or very long fight for you. Use cooldowns wisely, and use a new Mana Shield whenever the rogue uses Vanish or restealths.

*Be prepared for Cloak of Shadows. Do not attempt to attack the rogue while this buff is active; he or she will simply resist it and waste your mana.


View Step Details Mage vs Shaman

shamanThe Shaman

Strategy

  • fire wardFire Ward
    • Absorbs 1220 fire damage, lasts 30 seconds
    • Shamans can use Purge to remove this, as well as your other buffs
    • Continue as planned. Fire Ward helps against shamans but it is not detrimental to your strategy if it gets Purged
  • lance Ice Lance
    • Instant cast, 30 yard range, low damage attack
    • Causes triple damage to Frozen target
    • If the shaman has placed a Grounding Totem, the Ice Lance will kill it
  • polyPolymorph
    • 1.5 second cast, 30 yard range
    • Causes the target to wander aimlessly for up to 12 seconds, preventing him her or her from using any abilities
    • Shamans can use Earth Shock to interrupt this spell if they are fast enough
    • Wait 2 seconds for the Earth Shock effect to end, and cast Polymorph again
  • arcane powerArcane Power
    • Increases all damage you do by 30%, but causes spells to cost an additional 30% mana
    • Lasts 15 seconds
  • fboltFrost Bolt
    • 2.5 second cast, 36 yard range
    • Very high damage attack that limits the target's run speed to 60% of normal for 9 seconds
  • pom + fboltPresence of Mind, Frost Bolt
    • Instant cast (because of Presence of Mind), 36 yard range
    • Very high damage attack that limits the target's run speed to 60% of normal for 9 seconds
  • novaFrost Nova
    • Instant cast, area of effect, low damage attack
    • Freezes enemies in place for up to 8 seconds
    • Increases your critical strike chance by 50% for the duration your target is frozen (because of the Shatter Talent)
    • The shaman PvP trinket removes movement impairing effects
    • Do not change your strategy. Your Ice Lance will hit for less damage, but the outcome of the fight should remain unchanged
  • lanceIce Lance
    • Instant cast, 30 yard range, low damage attack
    • Causes triple damage to Frozen target
  • cocCone of Cold
    • Instant cast, moderate-high damage attack that affects targets in a cone in front of the caste
  • fbFire Blast
    • Instant cast, 20 yard range, moderate-high damage attack
  • csCounterspell
    • Interrupts any spell the enemy mage is casting, and prevents him or her from casting any spell in that school for 10 seconds
    • Silences the mage for 4 seconds, preventing him or her from casting any spell
    • Prevents the shaman from healing
  • fboltFrost Bolt
    • 2.5 second cast, 36 yard range
    • Very high damage attack that limits the target's run speed to 60% of normal for 9 seconds
  • cocCone of Cold
    • Instant cast, moderate-high damage attack that affects targets in a cone in front of the caste
  • The shaman will die

*Shamans will Earth Shock frequently in an attempt to interrupt your casting. Stick to instant cast spells as much as possible and you will see great success

*If the shaman uses Earth Shield, use Spellsteal to take the buff and use it for yourself!

*Any time you see the shaman drop a Grounding Totem, use Ice Lance to kill it immediately and continue execution of your strategy


View Step Details Mage vs Warlock

lockThe Warlock

Strategy

  • fire wardFire Ward
    • Absorbs 1220 fire damage, lasts 30 seconds
  • polyPolymorph
    • 1.5 second cast, 30 yard range
    • Causes the target to wander aimlessly for up to 12 seconds, preventing him her or her from using any abilities
    • The warlock PvP trinket removes Polymorph effects
    • Cast Polymorph again and continue execution of your strategy
  • spellstealSpellsteal
    • Most warlocks use Fel Armor. You can steal it and gain 100 extra spell damage for the duration of the fight
  • arcane powerArcane Power
    • Increases all damage you do by 30%, but causes spells to cost an additional 30% mana
    • Lasts 15 seconds
  • fboltFrost Bolt
    • 2.5 second cast, 36 yard range
    • Very high damage attack that limits the target's run speed to 60% of normal for 9 seconds
  • pom + fboltPresence of Mind, Frost Bolt
    • Instant cast (because of Presence of Mind), 36 yard range
    • Very high damage attack that limits the target's run speed to 60% of normal for 9 seconds
  • fbFire Blast
    • Instant cast, 20 yard range, moderate-high damage attack
    • When sheep is broken, most warlocks will immediately use Death Coil, and then Fear you
    • Use your PvP trinket to remove the fear and continue as planned
  • lanceIce Lance
    • Instant cast, 30 yard range, low damage attack
    • Causes triple damage to Frozen targets
  • novaFrost Nova
    • Instant cast, area of effect, low damage attack
    • Freezes enemies in place for up to 8 seconds
    • Increases your critical strike chance by 50% for the duration your target is frozen (because of the Shatter Talent)
    • Many warlocks will attempt to fear you again after you break the first
    • Counterspell to interrupt the fear cast and prevent the warlock from casting any shadow spells for 10 seconds
    • If the Fear lands before you cast Counterspell, use Ice Block immediately
      • Much of a warlock's damage comes from DoT spells so it is helpful all around to use Ice Block now
  • lanceIce Lance
    • Instant cast, 30 yard range, low damage attack
    • Causes triple damage to Frozen target
  • cocCone of Cold
    • Instant cast, moderate-high damage attack that affects targets in a cone in front of the caste
  • fbFire Blast
    • Instant cast, 20 yard range, moderate-high damage attack
  • fboltFrost Bolt if needed
    • 2.5 second cast, 36 yard range
    • Very high damage attack that limits the target's run speed to 60% of normal for 9 seconds
  • The warlock will die

*If the warlock is using a Felhunter pet, stick to instant cast spells as much as possible. The Felhunter has an ability much like your Counterspell, and can be devastating if it lands while you are casting a spell

*Use Remove Lesser Curse throughout the fight to remove spells such as Curse of Agony and Curse of Tongues that the warlock will place on you

*If fighting an affliction warlock, use Ice Block after s/he casts all damage over time spells on you. It will remove all of the debuffs and nullify their damage


View Step Details Mage vs Warrior

orcThe Warrior

Strategy

  • lanceIce Lance
    • Instant cast, 30 yard range, low damage attack
    • Causes triple damage to Frozen targets
    • Prevents the warrior from using Charge to enter melee range
  • polyPolymorph
    • 1.5 second cast, 30 yard range
    • Causes the target to wander aimlessly for up to 12 seconds, preventing him her or her from using any abilities
  • Move to maximim range
    • The further from the warrior you can get, the more time you will have to cast before s/he can use Intercept to move back into melee range
  • mana shieldMana Shield
    • Absorbs damage, draining mana instead
    • Extremely useful against warriors
  • arcane powerArcane Power
    • Increases all damage you do by 30%, but causes spells to cost an additional 30% mana
    • Lasts 15 seconds
  • fbolt Frost Bolt
    • 2.5 second cast, 36 yard range
    • Very high damage attack that limits the target's run speed to 60% of normal for 9 seconds
  • pom + fboltPresence of Mind, Frost Bolt
    • Instant cast (because of Presence of Mind), 36 yard range
    • Very high damage attack that limits the target's run speed to 60% of normal for 9 seconds
    • Warriors wearing a shield can use spell reflect to make you unintentionally damage yourself
    • If you see the warrior use Spell Reflect, use a Fire Blast (Rank 1), which will deal almost no damage to you and allow you to continue the execution of your strategy
  • fboltFrost Bolt
    • 2.5 second cast, 36 yard range
    • Very high damage attack that limits the target's run speed to 60% of normal for 9 seconds
    • The warrior will Intercept to stun you and move to melee range
    • Blink
      • Teleports you 20 yards forward
      • Removes stun and root effects
  • fboltFrost Bolt
    • 2.5 second cast, 36 yard range
    • Very high damage attack that limits the target's run speed to 60% of normal for 9 seconds
    • If the warrior gets close enough, he or she can use Intimidating Shout to interrupt your spellcasting and re-enter melee range
    • If you are undead, use Will of the Forsaken to remove the fear effect and continue as planned
    • If you are not undead, wait for the fear to break and immediately use Frost Nova
  • novaWhen the warrior comes within range, Frost Nova
    • Instant cast, area of effect, low damage attack
    • Freezes enemies in place for up to 8 seconds
    • Increases your critical strike chance by 50% for the duration your target is frozen (because of the Shatter Talent)
    • The warrior PvP trinket removes movement impairing effects. He or she can use it here in an attempt to re-enter melee range
    • Continue as planned. The warrior will be low on health and you should be able to end the fight very quickly
  • lanceIce Lance
    • Instant cast, 30 yard range, low damage attack
    • Causes triple damage to Frozen targets
  • cocCone of Cold
    • Instant cast, moderate-high damage attack that affects targets in a cone in front of the caster
  • fbFire Blast
    • Instant cast, 20 yard range, moderate-high damage attack
  • The warrior will die

*Warriors are generally extremely easy for a mage to kill. Stick to the plan, and do not let the warrior stay in melee range for more than a second or two under any circumstances, and you will prevail

*While it is generally not needed against warriors, you can use Ice Block to remove any snare effects and then cancel the buff immediately to resume attacking. This is very helpful if you find yourself Hamstrung while your Blink and Frost Nova spells are on cooldown


Paladin Strategies

View Step Details General Paladin Information

Overview

The paladin is a very stout defensive force. Given the right conditions it can output some damage, but its strength lies in its ability to survive. For many battles you will play to outlast your opponents rather than try to nuke them before they can nuke you. It is a very complex class that is difficult to play well, but extremely rewarding when you learn the many its many intricacies.


Paladin Strengths

Ability to live through many situations where other classes would be slaughtered. Offensive capability with the right gear. Extremely versatile.


Paladin Weaknesses

Lack of ranged abilities. Lower damage output than other classes. No way to snare opponents.


The Best all around PvP Talent Build

Retribution Hybrid

It is implied within this guide that you use a new seal every time you Judge your current one.


How to read the strategy section

  • Ability to Use
    • Details about the ability and why you are using it
    • How enemies can counter
    • What to do if they counter

View Step Details Paladin vs Druid

druidThe Druid

Strategy

  • sanc+ bowUse Sanctity Aura and Blessing of Wisdom
    • Sanctity Aura increases your damage done to the druid
    • Blessing of Wisdom enables you to more effectively outlast the druid's mana pool
  • sowJudge Seal of Wisdom
    • All of your attacks and spells against the druid have a high chance to restore 74 mana
  • csCrusader Strike
    • Instant, high damage attack
  • socJudge Seal of Command
    • Instant cast, high damage attack
    • Increased critical strike chance
  • cs + socContinue to use the Crusader Strike, Judgement combo until the druid shifts to Caster Form
    • Druids have much less armor in Caster Form than they do in Dire Bear or Moonkin Form
    • The druid will shift to heal upon reaching low health
    • Before Feral Druids shift to heal, they often use Bash to stun you, preventing you from interrupting the healing process
    • Use your PvP trinket to remove the stun effect, and continue execution of your strategy
  • hojHammer of Justice
    • 6 second stun
    • The druid PvP trinket removes stun effects
    • As long as you Judge Seal of Command directly after you use Hammer of Justice it will still do extra damage
    • Blood Elf Paladins can use Arcane Torrent to silence the druid for 2 seconds, and delay healing
  • socJudge Seal of Command
    • Instant cast, high damage attack
    • Increased critical strike chance
    • Deals extra damage because your target is stunned
  • csCrusader Strike
    • Instant, high damage attack
  • repentRepentance
    • Incapacitates your target for up to 6 seconds, preventing him or her from taking any action
  • socJudge Seal of Command
    • Instant cast, high damage attack
    • Increased critical strike chance
    • Deals extra damage because your target is stunned
    • Some druids will use Cyclone to render you unable to act while they heal to full
    • You can use Divine Shield before the Cyclone is cast to prevent this from happening and finish the druid off
    • NOTE: if you attempt to use Divine Shield while under the effects of Cyclone, it will not work
  • howHammer of Wrath
    • 1 second cast, ranged attack that is usable on enemies with less than 20% health

*As with all healing classes, this fight can take a very long time. You have no true way to interrupt the druids heals and must rely on outlasting his or her mana pool. Thankfully this is easy to do against a druid because they have no real way to interrupt your healing either, and you can use mana efficient spells, coupled with Judgement of Wisdom and Seal of Wisdom to make sure they run out of mana before you do.

*It is possible to burst the druid down before he or she is able to heal. This is why you use Hammer of Justice and Repentance while the druid is in caster form. If you have a little bit of luck, and execute properly, you can make the fight much shorter by preventing his or her heals in this manner.

*If the druid attempts to use Entangling Roots on you at any time, simply Cleanse it and continue fighting.


View Step Details Paladin vs Hunter

hunterThe Hunter

Strategy

  • sancUse Sanctity Aura
    • Increases damage done to the hunter
  • sojJudge Seal of Justice
    • Prevents the hunter from using movement increasing effects, such as Aspect of the Cheetah, to get out of your melee range
    • Some hunters will stand on Freezing Traps while shooting, when you approach you will be frozen for up to 12 seconds
  • bofBlessing of Freedom
    • Grants immunity to any snare or root effects
    • You will be able to maintain melee range with the hunter while this is active
  • csCrusader Strike
    • Instant, high damage attack
    • Hunters will often Scatter Shot to disorient you while the move out of your melee range
    • You can use Repentance early in order to move back into melee range with the hunter
  • socJudge Seal of Command
    • Instant cast, high damage attack
    • Increased critical strike chance
  • hojWhen Blessing of Freedom fades, Hammer of Justice
    • 6 second stun
    • The hunter PvP trinket removes stun effects
    • Do not change your strategy, this may prolong the fight slightly but should not have any effect on the outcome
  • socJudge Seal of Command
    • Instant cast, high damage attack
    • Increased critical strike chance
    • Will deal extra damage since the hunter is stunned
  • csCrusader Strike
    • Instant, high damage attack
  • bofBlessing of Freedom
    • Grants immunity to any snare or root effects
    • You will be able to maintain melee range with the hunter while this is active
  • repentWhen Blessing of Freedom fades, Repentance
    • Incapacitates the target for 6 seconds
    • Breaks on damage
  • socWait a few seconds, Judge Seal of Command
    • Instant cast, high damage attack
    • Increased critical strike chance
    • Will deal extra damage since the hunter is stunned
  • csCrusader Strike
    • Instant, high damage attack
  • The Hunter should be approaching death
  • howHammer of Wrath
    • 1 second cast, ranged attack that is usable on enemies with less than 20% health
  • The Hunter will die

*Fighting hunters can be frustrating because they have a number of abilities that enable them to move out of your melee range. Be patient and stick to your strategy, if you execute well, you will come out on top the majority of the time

*Use Cleanse liberally. Hunters will often try to use Viper Sting to drain your mana, or Serpent Sting to do additional damage to you. These spells cost the hunter more mana than Cleanse costs you, and he or she will be simply wasting mana

*This is a battle of attrition. Outlast the hunter by conserving mana, healing when needed, and sticking to your plan


View Step Details Paladin vs Mage

trollThe Mage

Strategy

  • frost or fireUse Frost or Fire Resistance Aura (depending on the mage' talent build)
    • Increases either your frost or fire resistance by 70
    • reduces the amount of damage you take from the majority of the mage's spells
  • sojAgainst fire mages, Judge Seal of Justice
    • Prevents a Blazing Speed proc from ruining your chances of beating the mage
  • socAgainst frost mages, Judge Seal of the Crusader
    • Increases your damage done to the mage
  • socSeal of Command
    • The best damage dealing seal for Retribution Paladins
    • Many mages will lead off the battle by using Polymorph and moving to maximum range before attacking
    • Use your PvP trinket to remove Polymorph and continue to move toward the mage.
    • Some mages will attempt to Polymorph you a second time
    • This Polymorph will last a maximum of 6 seconds. Wait for it to break and continue as planned
  • bofBlessing of Freedom, and continue to use it every time the cooldown finishes
    • Grants immunity to any snare or root effects
    • You will be able to better maintain melee range with the mage while this is active
    • Some mages will use Spellsteal to take Blessing of Freedom from you, rendering it useless
    • Use Cleanse to remove the Mage's movement impairing effects and continue to move into melee range
  • csCrusader Strike
    • Instant, high damage attack
  • hojHammer of Justice
    • 6 second stun
    • The mage will almost always use Blink to remove your stun and teleport out of your melee range
    • Judge Seal of Command as soon as possible after you Hammer of Justice. You will be able to cast it while the mage is stunned (and deal extra damage) the majority of the time
  • socImmediately Judge Seal of Command
    • Instant cast, high damage attack
    • Increased critical strike chance
  • csCrusader Strike
    • Instant, high damage attack
  • repentRepentance
    • Incapacitates the target for up to 6 seconds
  • socJudge Seal of Command
    • Instant cast, high damage attack
    • Increased critical strike chance
  • The mage should be approaching death
  • howHammer of Wrath
    • 1 second cast, ranged attack that is usable on enemies with less than 20% health
  • The mage will die

*Mages will usually try to Counterspell you while you heal and then do as much damage as possible while you are unable to cast. Prevent this from happening by healing very often and using only Flash of Light. Its fast casting speed makes it very difficult to interrupt, and the mage will often Counterspell at the wrong time, leaving you free to cast.

*Save Divine Shield for use when the mage is at low health. He or she will often attempt to crowd control you in some way and heal; the offensive use of Divine Shield prevents this from happening.

*If the mage attempts to Ice Block at any point during the battle, begin to bandage. Bandaging lets you regain health while letting your mana regenerate, and will often let you get the upper hand on your opponent.


View Step Details Paladin vs Paladin

pallyThe Paladin

Strategy

  • sanc+ bowUse Sanctity Aura and Blessing of Wisdom
    • Sanctity Aura increases your damage done to the opposing paladin
    • Blessing of Wisdom enables you to more effectively outlast his or her mana pool
  • csCrusader Strike
    • Instant, high damage attack
    • Many paladins will use Hammer of Justice immediately as the fight begins, preventing you from attacking for 6 seconds
    • Do not use your PvP trinket to break the stun, save it for later in the fight when you are trying to finish off the enemy paladin
  • hojHammer of Justice
    • 6 second stun
    • The paladin PvP trinket removes stun effects, he or she can use it here and re-engage you
    • Judge Seal of Command immediately after the Hammer of Justice and it will still do extra damage. Continue execution of your strategy.
  • socJudge Seal of Command
    • Instant cast, high damage attack
    • Increased critical strike chance
    • Deals extra damage because your target is stunned
  • csCrusader Strike
    • Instant, high damage attack
  • repentRepentance
    • Incapacitates your target for up to 6 seconds, preventing him or her from taking any action
    • The enemy paladin can use Divine Shield to remove the Repentance effect, and heal to full
    • This is beneficial to you, move away from the paladin, begin bandaging, and continue as planned
  • socJudge Seal of Command
    • Instant cast, high damage attack
    • Increased critical strike chance
    • Deals extra damage because your target is stunned
  • Auto Attack with Seal of Command active until the opposing paladin either runs out of mana or uses Divine Shield
    • You will still deal considerable damage, and will be able to regenerate mana since you are not casting anything
  • If the opposing paladin uses Divine Shield and begins healing, move away from him or her and begin to bandage
    • This allows you to regenerate mana while you heal. Your opponent will likely be using healing spells and further draining his or her mana pool. You will win the fight by outlasting your opponent, so this works in your favor
  • csOnce your opponent runs out of mana, Crusader Strike
    • Instant, high damage attack
  • hojHammer of Justice
    • 6 second stun
  • socJudge Seal of Command
    • Instant cast, high damage attack
    • Increased critical strike chance
    • Deals extra damage because your target is stunned
    • The enemy paladin may use his or her own Hammer of Justice to prevent you from attacking while s/he either bandages or attempts to heal
    • Use your PvP trinket to remove the stun effect, and immediately resume attacking the paladin
  • csCrusader Strike
    • Instant, high damage attack
  • repentRepentance
    • Incapacitates your target for up to 6 seconds, preventing him or her from taking any action
  • socJudge Seal of Command
    • Instant cast, high damage attack
    • Increased critical strike chance
    • Deals extra damage because your target is stunned
  • howHammer of Wrath
    • 1 second cast, ranged attack that is usable on enemies with less than 20% health
  • The opposing paladin will die

*As with all healing classes, paladins can take you a very long amount of time to kill. The goal is to force your opposition to use more mana than you and then finish him or her off when s/he runs out of mana and is unable to heal.

*Do not attempt to use any Judgements that place a debuff on the paladin (e.g. Judgement of Wisdom, Judgement of the Crusader, and Judgement of Justice), s/he will simply Cleanse it; rendering it useless.


View Step Details Paladin vs Priest

priestThe Priest

Strategy

  • sancUse Sanctity Aura
    • Increases your damage done to the priest
  • socUse Seal of Command (Rank 1)
    • The actual effect of the seal is the same, regardless of rank
    • Rank 1 Seal of Command has a very low mana cost
    • Most priests will use Dispel Magic liberally throughout the fight
    • Rank 1 Seal of Command is very mana inexpensive and you should re-cast as needed
  • csCrusader Strike
    • Instant, high damage attack
    • Priests will often use Psychic Scream when you enter melee range to fear you for up to 8 seconds
    • Use your PvP trinket to remove the fear effect and continue attacking the priest
  • hojHammer of Justice
    • 6 second stun
    • The priest PvP trinket removes stun effects
    • The purpose of this stun is really to increase the damage of your Judgement of Command. Judge as soon as possible after you use Hammer of Justice, and it should land before the priest is able to use his or her PvP trinket
  • socUse Seal of Command (Rank 6), and Judge it Immediately
    • High damage attack, deals extra damage because your target is stunned
  • socUse Seal of Command (Rank 1)
    • The actual effect of the seal is the same, regardless of rank
    • Rank 1 Seal of Command has a very low mana cost
  • csCrusader Strike
    • Instant, high damage attack
  • soc + csContinue using Seal of Command (Rank 1) and using Crusader Strike until the priest is out of mana
  • repentRepentance
    • Incapacitates the target for up to 6 seconds, preventing any action from being taken
  • socUse Seal of Command (Rank 6), and Judge it Immediately
    • High damage attack, deals extra damage because your target is stunned
  • howHammer of Wrath
    • 1 second cast, ranged attack that is usable on enemies with less than 20% health
  • The Priest Will Die

*Do not attempt to use any Judgement that places a debuff on the priest (e.g. Judgement of the Crusader, Judgement of Wisdom, etc.) he or she will simply dispel it.

*Unfortunately, some priests will use Mana Burn to drain all your mana and finish you off. This is very difficult to overcome, and you should try to interrupt the priest's casting if at all possible

*Use Cleanse often throughout the fight. Priests have several magical debuffs that they will attempt to place on you; all can be easily dispelled


View Step Details Paladin vs Rogue

rogueThe Rogue

Strategy

  • bom + sancUse Blessing of Might and Sanctity Aura
    • Rogues cannot heal your damage, the goal is to kill them before they can kill you
    • These abilities maximize your damage output
  • sojJudge Seal of Justice
    • Prevents the rogue from using movement increasing effects, such as Sprint, to get out of your melee range
    • The rogue can use cloak of shadows to remove this debuff
    • Simply reapply it when your Judgement cooldown finishes
  • socUse Seal of Command
    • The best damage dealing seal for Retribution Paladins
  • csCrusader Strike
    • Instant, high damage attack
    • The rogue can use Evasion to avoid the majority of your melee/Crusader Strike/ and Seal of Command attacks for 15 seconds
    • Hammer of Justice
      • 6 second stun
      • The rogue cannot dodge while stunned
    • The rogue PvP trinket removes stun effects, he or she can use it to continue attacking you
    • Divine Shield, heal to full, and wait for Evasion to fade
  • consecrateConsecration (Rank 1), continue using this every time the cooldown is up
    • Uses almost no mana
    • Increases damage output a fair amount
    • Some rogues will run out of your Consecration, rendering it useless
    • Rank 1 Consecrate is extremely efficient, and the rogue must enter melee range with you at some point. Simply continue to use it every cooldown.
  • socJudge Seal of Command
    • Instant cast, high damage attack
    • Increased critical strike chance
  • csCrusader Strike
    • Instant, high damage attack
  • soc + csRepeat the Judgement/Crusader Strike combo until you need to heal, Hammer of Justice
    • 6 second stun
  • socJudge Seal of Command
    • Instant cast, high damage attack
    • Increased critical strike chance
  • holy lightHoly Light
    • Large heal
    • Your opponent will still be stunned, leaving you free to cast without interruption
  • csCrusader Strike
    • Instant, high damage attack
  • repentRepentance
    • Incapacitates the target for 6 seconds
    • Breaks on damage
  • socJudge Seal of Command
    • Instant cast, high damage attack
    • Increased critical strike chance
  • howThe rogue will be dead or near death, Hammer of Wrath
    • High damage, ranged attack that is usable on enemies below 20% health
  • The rogue will die

*Rogues can use Cloak of Shadows and Vanish at any time during the fight to avoid damage and get a second opener on you. Be prepared to heal multiple times, and use Divine Shield as needed

*Some rogues will attmept to run out of melee range and restealth during the fight. Treat this situation just like the rogue who uses Cloak of Shadows and Vanish. As long as you conserve mana you will be fine.


View Step Details Paladin vs Shaman

shamanThe Shaman

Strategy

  • sancUse Sanctity Aura
    • Increases your damage done to the shaman
  • sowJudge Seal of Wisdom
    • All of your attacks and spells against the shaman have a high chance to restore 74 mana
  • socUse Seal of Command (Rank 1)
    • The actual effect of the seal is the same, regardless of rank
    • Rank 1 Seal of Command has a very low mana cost. Using it will allow you to outlast the shaman in most cases
    • Most shamans will use purge liberally throughout the fight
    • Rank 1 Seal of Command is very mana inexpensive and you should re-cast as needed
  • bofBlessing of Freedom
    • Grants immunity to snare effects
    • You will be able to maintain melee range with the shaman for its duration
    • Shamans can purge this from you
    • You can still maintain melee range with the shaman by using Cleanse to remove movement impairing effects
  • csCrusader Strike
    • Instant, high damage attack
  • hojHammer of Justice
    • 6 second stun
    • The shaman PvP trinket removes stun effects
    • The purpose of this stun is really to increase the damage of your Judgement of Command. Judge as soon as possible after you use Hammer of Justice, and it should land before the shaman is able to use his or her PvP trinket
  • socUse Seal of Command (Rank 6), and Judge it Immediately
    • High damage attack, deals extra damage because your target is stunned
  • socUse Seal of Command (Rank 1)
    • The actual effect of the seal is the same, regardless of rank
    • Rank 1 Seal of Command has a very low mana cost. Using it will allow you to outlast the shaman in most cases
  • csCrusader Strike
    • Instant, high damage attack
  • soc + csContinue using Seal of Command (Rank 1) and using Crusader Strike until the shaman runs out of mana
  • repentRepentance
    • Incapacitates the target for up to 6 seconds, preventing any action from being taken
  • socUse Seal of Command (Rank 6), and Judge it Immediately
    • High damage attack, deals extra damage because your target is stunned
  • howHammer of Wrath
    • 1 second cast, ranged attack that is usable on enemies with less than 20% health
  • The shaman will die

*Shamans will attempt to use Earth Shock to interrupt your heals in virtually every fight. Heal early and often, and use primarily Flash of Light to keep yourself topped off. This will usually be a long battle, and you need to use your mana efficiently.

*Make sure you keep Judgement of Wisdom on the shaman at all times. This can regenerate a very large amount of mana over the course of the fight, and can turn the battle from a loss into a win.


View Step Details Paladin vs Warlock

gnomeThe Warlock

Strategy

  • shadow auraUse Shadow Resistance Aura
    • Increases your Shadow Resistance by 70
    • reduces the amount of damage you take from the majority of warlock spells
  • socJudge Seal of the Crusader
    • Increases your critical strike chance by 3%
    • Increases your holy damage done to the target
    • Many warlocks will use Fear often throughout the fight to prevent you from acting while they deal damage
    • Use your PvP trinket to break the first fear. Subsequent fears will last for a much shorter duration and you should proceed as planned in between them.
  • socSeal of Command
    • The best damage dealing seal for Retribution Paladins
  • csCrusader Strike
    • Instant, high damage attack
  • hojHammer of Justice
    • 6 second stun
  • socJudge Seal of Command
    • Instant cast, high damage attack
    • Increased critical strike chance
    • The warlock can use Death Coil to cause you to flee in terror for 2 seconds; giving the warlock time to move out of your melee range
    • Use Repentance to incapacitate the target for up to 6 seconds; enabling you to regain melee range
  • csCrusader Strike
    • Instant, high damage attack
  • socJudge Seal of Command
    • Instant cast, high damage attack
    • Increased critical strike chance
  • Heal if needed
    • Warlocks using a Felhunter can use its Spell Lock ability to interrupt your casting and prevent you from casting any other spells for 8 seconds
    • If you need to heal during a fight with a warlock using a felhunter pet, use Divine Shield first to prevent interruption
  • cs + socRepeat the Crusader Strike/Judgement combo until the warlock is nearing death
  • howHammer of Wrath
    • 1 second cast, ranged attack that is usable on enemies with less than 20% health
  • The warlock will die

*Use Cleanse liberally for the duration of the fight. A large portion of warlock damage comes from DoT spells which are magical in nature. These spells are easy to remove, and you should at every opportunity.

*DO NOT attempt to cleanse if a warlock uses Unstable Affliction. If you attempt to dispel Unstable Affliction, you will be silenced and take additional damage. In this situation it is best to heal throughout the fight instead of cleansing.

*Fights against warlocks can take a very long time. Conserve mana, heal when needed, and Cleanse often, and you will find yourself prevailiing in most situations


View Step Details Paladin vs Warrior

orcThe Warrior

Strategy

  • bom + sancUse Blessing of Might and Sanctity Aura
    • Warriors cannot heal your damage, the goal is to kill them before they can kill you
    • These abilities maximize your damage output
  • socJudge Seal of the Crusader
    • Increases your critical strike chance by 3%
    • Increases your holy damage done to the target
  • socUse Seal of Command
    • The best damage dealing seal for Retribution Paladins
  • csCrusader Strike
    • Instant, high damage attack
  • consecrateConsecration (Rank 1), continue using this every time the cooldown is up
    • Uses almost no mana
    • Increases damage output a fair amount
    • Some warriors will run out of your Consecration, rendering it useless
    • Rank 1 Consecrate is extremely efficient, and the warrior must enter melee range with you at some point. Simply continue to use it every cooldown.
  • socJudge Seal of Command
    • Instant cast, high damage attack
    • Increased critical strike chance
  • csCrusader Strike
    • Instant, high damage attack
  • hojWait for Judgement to finish cooldown, Hammer of Justice
    • 6 second stun
    • The warrior PvP trinket removes stun effects. Often warriors will use it here to continue attacking you
    • Be prepared to use Divine Shield if you need to heal. If you do not need to heal, continue execution of the strategy without any change
  • socJudge Seal of Command
    • Instant cast, high damage attack
    • Increased critical strike chance
    • Hits for extra damage because your opponent is stunned
  • holy lightHoly Light
    • Large heal
    • Your opponent will still be stunned, leaving you free to cast without interruption
    • If the warrior is not stunned, he or she can use Pummel to interrupt your heal
    • Do not heal while the warrior is in melee range and attacking you. If you absolutely must heal, use Divine Shield before casting
    • Some warriors will attempt to bandage while you heal
    • Interrupt the bandage with a melee attack and resume healing
  • csCrusader Strike
    • Instant, high damage attack
  • socJudge Seal of Command
    • Instant cast, high damage attack
    • Increased critical strike chance
  • howIf the warrior is not dead he or she should be reaching low health. Hammer of Wrath
    • High damage attack usable on targets with less than 20% health
    • Longer range than your other attacks
  • csCrusader Strike
    • Instant, high damage attack
  • The warrior will die

*Warriors are capale of very high damage output with almost no notice. Be prepared to heal any time you reach low health, and do not ever let yourself drop below 20%.

*If you find it hard to engage the warrior because of Hamstring, use Blessing of Freedom as needed


Priest Strategies

View Step Details General Priest Information

Overview

Priests are capable of doing immense amounts of damage, or healing, depending on what the situation calls for. It is a versatile class that is sought after in most situations, and extremely rewarding to play.


Priest Strengths

The high damage output that priests are capable of, accompanied by their ability to heal effectively makes them a force to be reckoned with. Priests have the strongest dispel magic ability in the game, the ability to do damage from range, instant cast AoE fear, and more physical damage mitigation than any other cloth wearing class.


Priest Weaknesses

While in Shadowform, priests are unable to heal. While not in Shadowform, the priest's physical damage mitigation drops considerably.


The Best all around PvP Talent Build

Shadow

It is assumed within this guide that you begin each fight in Shadowform with Power Word:Shield active, and that you refresh Power Word:Shield each time the Weakened Soul debuff fades


How to read the strategy section

  • Ability to Use
    • Details about the ability and why you are using it
    • How enemies can counter
    • What to do if they counter

View Step Details Priest vs Druid

druidThe Druid

Strategy

  • painShadow Word: Pain
    • Instant cast, 36 yard range
    • Extremely high damage over time
  • veVampiric Embrace
    • Instant cast, 30 yard range
    • Causes you and your party to be healed for 30% of the shadow damage you deal
  • vtVampiric Touch
    • 1.5 second cast, 36 yard range
    • High damage over time
    • Causes you and your party to gain mana equal to 5% of the shadow damage you deal
  • psPsychic Scream
    • Instant Cast, area of effect, effecting up to 5 enemies
    • Causes enemies to run in fear for up to 8 seconds
    • The druid PvP trinket removes fear effects. He or she can use it if in Caster Form, and re-engage you quickly
    • This does not present a problem, continue execution of your strategy
  • mbMind Blast
    • 1.5 second cast, 36 yard range
    • Heavy, direct damage
  • mfMind Flay
    • 3 second channeled spell, 24 yard range, limits enemy movement speed to 50% of normal
    • High damage over 3 seconds
  • mfMind Flay
    • 3 second channeled spell, 24 yard range, limits enemy movement speed to 50% of normal
    • High damage over 3 seconds
    • Feral Druids will use Feral Charge to quickly return to melee range and interrupt the spell you are casting
    • This does not really hurt you, continue as planned
  • mbMind Blast
    • 1.5 second cast, 36 yard range
    • Heavy, direct damage
  • Refresh Shadow Word: Pain and Vampiric Touch as needed
  • The druid will be reaching low health
  • silenceIf s/he attempts to use Healing Touch, Silence
    • Instant cast, 20 yard range
    • Silences your target for 5 seconds, preventing them from casting any spells
    • Feral Druids can use either Maim or Bash to prevent you from acting while they shift to caster form and heal
    • Your PvP trinket will remove the Bash stun allowing you to Silence during the heal
    • If the druid uses Maim, the fight will take slightly longer, but the outcome will not change as long as you have mana. Continue as planned
  • mbMind Blast
    • 1.5 second cast, 36 yard range
    • Heavy, direct damage
  • swdShadow Word: Death
    • Instant cast, 36 yard range
    • Heavy, direct damage, if your target does not die from this spell, it will deal damage to you as well
  • The druid will die

*Use dispel liberally throughout the fight. The majority of a druid's heals are HoT spells. If you dispel the HoT's as they are cast, the druid will accomplish nothing but the wasting of his or her mana


View Step Details Priest vs Hunter

hunterThe Hunter

Strategy

  • painShadow Word: Pain while running toward the hunter
    • Instant cast, 36 yard range
    • Extremely high damage over time
  • veVampiric Embrace while continuing to run toward the hunter
    • Instant cast, 30 yard range
    • Causes you and your party to be healed for 30% of the shadow damage you deal
  • psPsychic Scream, and continue to do so every time its cooldown finishes
    • Instant Cast, area of effect, effecting up to 5 enemies
    • Causes enemies to run in fear for up to 8 seconds
    • Hunters will often stand on top of a Freezing Trap, which will render you unable to act for up to 12 seconds if you move over top of it
    • Use Psychic Scream the second you are nearing melee range. Even if you are trapped, the hunter will be feared as well and your Shadow Word: Pain will be doing damage the entire time
  • vtVampiric Touch
    • 1.5 second cast, 36 yard range
    • High damage over time
    • Causes you and your party to gain mana equal to 5% of the shadow damage you deal
  • mbMind Blast
    • 1.5 second cast, 36 yard range
    • Heavy, direct damage
  • mfMind Flay
    • 3 second channeled spell, 24 yard range, limits enemy movement speed to 50% of normal
    • High damage over 3 seconds
    • Hunters will often use Scatter Shot while you are casting to interrupt
    • Ignore this and continue as planned
  • mfMind Flay
    • 3 second channeled spell, 24 yard range, limits enemy movement speed to 50% of normal
    • High damage over 3 seconds
    • Sometimes, hunters will Feign Death, causing you to drop your target
    • Retarget the hunter and continue as planned
  • mbMind Blast
    • 1.5 second cast, 36 yard range
    • Heavy, direct damage
  • The Hunter should be nearing death
  • swdShadow Word: Death
    • Instant cast, 36 yard range
    • Heavy, direct damage, if your target does not die from this spell, it will deal damage to you as well
  • If the Hunter is not dead, Refresh Shadow Word: Pain and Vampiric Touch as needed
  • Continue to Ming Blast/Mind Flay until the hunter dies

*Many hunters will use Viper Sting in an effort to drain you of your mana.
The only way you have to counter this is to kill them before you run out of mana! This is not a problem in most cases, because hunters typically have only a moderate amount of health, and you will be doing very high amounts of damage.

*Hunter pets can be very troublesome when you are trying to cast Mind Flay.
Even if you are not in melee range with the hunter, Psychic Scream is good to use to get rid of his or her pet for 8 seconds.


View Step Details Priest vs Mage

trollThe Mage

Strategy

  • painShadow Word: Pain as you begin to move toward the mage
    • Instant cast, 36 yard range
    • Extremely high damage over time
  • veVampiric Embrace while continuing to run toward the mage
    • Instant cast, 30 yard range
    • Causes you and your party to be healed for 30% of the shadow damage you deal
  • vtVampiric Touch
    • 1.5 second cast, 36 yard range
    • High damage over time
    • Causes you and your party to gain mana equal to 5% of the shadow damage you deal
    • Some mages will start out by using Polymorph and then unloading as much damage as possible before you have time to react, in an attempt to kill you very quickly
    • Use your PvP trinket to remove the Polymorph effect and continue execution of your strategy
    • If the mage Polymorphs you a second time, it will only last a few seconds, and the mage will not have time to properly execute the burst damage strategy in most cases
  • silenceSilence
    • Instant cast, 20 yard range
    • Silences your target for 5 seconds, preventing them from casting any spells
    • Frost mages will often use Ice Block at this point in time to remove all debuffs you have placed upon them
    • Wait for Ice Block to fade, re-apply Shadow Word: Pain, Vampiric Embrace, and Vampiric Touch, and continue as planned
    • Some mages will use Ice Block a second time to remove all debuffs once more
    • Handle this just as you did the first Ice Block. Also, if the mage holds the Ice Block for more than a few seconds, drop out of Shadowform, heal to full, and wait to re-engage the mage
  • mbMind Blast
    • 1.5 second cast, 36 yard range
    • Heavy, direct damage
  • mfMind Flay
    • 3 second channeled spell, 24 yard range, limits enemy movement speed to 50% of normal
    • High damage over 3 seconds
    • Mages can use Counterspell to interrupt you, and prevent you from casting any shadow based spells for 10 seconds
    • If this happens, you will still be able to cast holy spells. Drop out of Shadowform and heal to full while you wait on Counterspell to end
  • psPsychic Scream (the mage should be in or near melee range)
    • Instant Cast, area of effect, effecting up to 5 enemies
    • Causes enemies to run in fear for up to 8 seconds
    • The mage PvP trinket removes fear effects. He or she can use it here to re-engage you quickly
    • Proceed as planned, with no change in strategy
  • mfMind Flay
    • 3 second channeled spell, 24 yard range, limits enemy movement speed to 50% of normal
    • High damage over 3 seconds
  • mbMind Blast
    • 1.5 second cast, 36 yard range
    • Heavy, direct damage
  • Most mages will be very near dead
  • swdShadow Word: Death
    • Instant cast, 36 yard range
    • Heavy, direct damage, if your target does not die from this spell, it will deal damage to you as well
  • If the mage is still alive, reapply Shadow Word: Pain and Vampiric Touch as needed
  • Continue to use the Mind Blast/Mind Flay combo until the mage dies

*Be prepared for the mage to ice block at any time. Do not waste mana by trying to attack the mage for the duration of the Ice Block. Either wait for it to fade, or shift out of Shadowform, heal to full, and then shift back

*Use dispel to remove any freeze effects, such as Frost Nova, or Frostbite very quickly. Frost mages do much more damage against frozen targets, and you must avoid this if at all possible.


View Step Details Priest vs Paladin

pallyThe Paladin

Strategy

  • mbMind Blast
    • 1.5 second cast, 36 yard range
    • Heavy, direct damage
  • psPsychic Scream, continue to use this whenever the cooldown finishes
    • Instant Cast, area of effect, effecting up to 5 enemies
    • Causes enemies to run in fear for up to 8 seconds
    • The paladin PvP trinket breaks fear
    • The paladin really can't do anything even if your fear is broken. Continue as planned
  • mana burnMana Burn
    • 3 second cast, 30 yard range
    • Drains roughly 1000 mana from the target and does about 500 damage
    • The paladin can use Hammer of Justice to stun you for six seconds and prevent you from casting
    • Use your PvP trinket to remove the stun effect and continue to drain the paladin's mana
  • mana burnMana Burn
    • 3 second cast, 30 yard range
    • Drains roughly 1000 mana from the target and does about 500 damage
    • Blood Elf Paladins can use Arcane Torrent to silence you for 2 seconds, interrupting your cast
    • Ignore this completely, resume mana burning as soon as the silence wears off and you will win
  • mbMind Blast
    • 3 second channeled spell, 24 yard range, limits enemy movement speed to 50% of normal
    • High damage over 3 seconds
  • Repeat this until the paladin runs out of mana, it may take 6 or 7 Mana Burn casts
  • silenceIf the paladin attempts to heal while you are mana burning, use Silence
    • Instant cast, 20 yard range
    • Silences your target for 5 seconds, preventing them from casting any spells
  • painShadow Word: Pain
    • Instant cast, 36 yard range
    • Extremely high damage over time
  • veVampiric Embrace
    • Instant cast, 30 yard range
    • Causes you and your party to be healed for 30% of the shadow damage you deal
  • vtVampiric Touch
    • 1.5 second cast, 36 yard range
    • High damage over time
    • Causes you and your party to gain mana equal to 5% of the shadow damage you deal
  • mbMind Blast
    • 1.5 second cast, 36 yard range
    • Heavy, direct damage
  • mfMind Flay
    • 3 second channeled spell, 24 yard range, limits enemy movement speed to 50% of normal
    • High damage over 3 seconds
  • mana burnMana Burn
    • 3 second cast, 30 yard range
    • Drains roughly 1000 mana from the target and does about 500 damage
  • mbMind Blast
    • 1.5 second cast, 36 yard range
    • Heavy, direct damage
  • swdShadow Word: Death
    • Instant cast, 36 yard range
    • Heavy, direct damage, if your target does not die from this spell, it will deal damage to you as well
  • The paladin will die

*Paladins are very easily killed by priests. They have no true counter to your mana burn spell, and are extremely ineffective when they run out of mana.

*Whenever the paladin uses Divine Shield, cast Mass Dispel over the area he or she stands. You will dispel the shield and can continue with the killing!

*Dispel liberally. The majority of paladin damage comes from the use of Seals which can be very easily dispelled, rendering them useless

*Avoid using damage over time spells while the paladin has mana, he or she will simply dispel them


View Step Details Priest vs Priest

priestThe Priest

Strategy

  • mbMind Blast
    • 1.5 second cast, 36 yard range
    • Heavy, direct damage
    • Many priests lead off with Psychic Scream, causing you to run in fear for 8 seconds
    • Use your PvP trinket to remove the fear and continue as planned
  • psPsychic Scream, continue to use this whenever the cooldown finishes
    • Instant Cast, area of effect, effecting up to 5 enemies
    • Causes enemies to run in fear for up to 8 seconds
    • The Priest PvP trinket removes fear effects, enabling the enemy priest to re-engage quickly
    • Do not change your strategy
  • mana burnMana Burn
    • 3 second cast, 30 yard range
    • Drains roughly 1000 mana from the target and does about 500 damage
    • Shadow Priests can use Silence to prevent you from casting for 5 seconds
    • Wait for the silence effect to fade and continue execution of your strategy
  • mana burnMana Burn
    • 3 second cast, 30 yard range
    • Drains roughly 1000 mana from the target and does about 500 damage
  • mbMind Blast
    • 1.5 second cast, 36 yard range
    • Heavy, direct damage
  • Repeat this until the priest runs out of mana, it may take 6 or 7 Mana Burn casts
  • silenceIf the enemy priest attempts to heal, or to Mana Burn you, use Silence
    • Instant cast, 20 yard range
    • Silences your target for 5 seconds, preventing them from casting any spells
  • painShadow Word: Pain
    • Instant cast, 36 yard range
    • Extremely high damage over time
  • veVampiric Embrace
    • Instant cast, 30 yard range
    • Causes you and your party to be healed for 30% of the shadow damage you deal
  • vtVampiric Touch
    • Instant Cast, area of effect, effecting up to 5 enemies
    • Causes enemies to run in fear for up to 8 seconds
  • mbMind Blast
    • 1.5 second cast, 36 yard range
    • Heavy, direct damage
  • mfMind Flay
    • 3 second channeled spell, 24 yard range, limits enemy movement speed ot 50% of normal
    • High damage over 3 seconds
  • swdShadow Word: Death
    • Instant cast, 36 yard range
    • Heavy, direct damage, if your target does not die from this spell, it will deal damage to you as well
  • The enemy priest will die

*Use dispel liberally, many priests will attempt to use damage over time spells, as well as Power Word: Shield and Renew throughout the fight. Dispel renders all of these abilities completely useless and can ensure your victory.

*Do not attempt to use damage over time spells while the enemy priest still has mana. He or she will simply dispel, rendering them useless.

*Against an enemy priest who is also using the mana burn strategy, fights can take a LONG time to finish. Make sure you continue to use mana burn throughout the length of the fight to counter his or her mana regeneration.


View Step Details Priest vs Rogue

rogueThe Rogue

Strategy

  • Rogues will generally open against you with Cheap Shot, a 4 second stun
    • If you are able to open on the rogue, simply move to the Shadow Word: Pain step
  • Use your PvP trinket to remove this stun effect
    • Enables you to act immediately and catch the rogue offguard
    • Prevents the rogue from chaining stuns together until you die
  • psPsychic Scream, and continue to do so every time its cooldown finishes
    • Instant Cast, area of effect, effecting up to 5 enemies
    • Causes enemies to run in fear for up to 8 seconds
    • The rogue PvP trinket removes fear effects, s/he can use it here to re-engage you very quickly
    • Do not change your strategy. The fear will last long enough to disrupt the rogue, and allow you to cast at lease one spell uninterrupted
  • painShadow Word: Pain
    • Instant cast, 36 yard range
    • Extremely high damage over time
    • Prevents the rogue from restealthing
  • veVampiric Embrace
    • Instant cast, 30 yard range
    • Causes you and your party to be healed for 30% of the shadow damage you deal
  • vtVampiric Touch
    • 1.5 second cast, 36 yard range
    • High damage over time
    • Causes you and your party to gain mana equalling 5% of the shadow damage you deal
  • mbMind Blast
    • 1.5 second cast, 36 yard range
    • Heavy, direct damage
  • mfMind Flay
    • 3 second channeled spell, 24 yard range, limits enemy movement speed ot 50% of normal
    • High damage over 3 seconds
    • Rogues can use Kick to interrupt your spellcast
    • Ignore this and continue execution of your strategy
  • mfMind Flay
    • 3 second channeled spell, 24 yard range, limits enemy movement speed ot 50% of normal
    • High damage over 3 seconds
    • Rogues can use Gouge to interrupt your spellcast
    • Any damage the rogue does will break this effect, ignore this and continue execution of your strategy
  • mbMind Blast
    • 1.5 second cast, 36 yard range
    • Heavy, direct damage
  • Most rogues will be nearing death
  • swdShadow Word: Death
    • Instant cast, 36 yard range
    • Heavy, direct damage, if your target does not die from this spell, it will deal damage to you as well
  • If the rogue is not dead, Refresh Shadow Word: Pain and Vampiric Touch as needed
  • Continue to Mind Blast/Mind Flay until the rogue dies

*Rogues can use Cloak of Shadows and Vanish at any time to remove all debuffs and re-open on you. If this happens, begin to bandage immediately.
When the rogue uses the second opener, simply continue as planned.

*Blind has virtually the same effect as the Cloak/Vanish Combo if the rogue is not afflicted by any of your DoT spells.
Prevent this from happening by recasting Shadow Word:Pain every 15 seconds or so, be aware though a good rogue can still blind, restealth and reopen on you before a tick of Shadow Word: Pain.


View Step Details Priest vs Shaman

shamanThe Shaman

Strategy

  • swdIf the shaman has dropped a Grounding Totem, target the totem and use Shadow Word: Death
    • Instant cast, 36 yard range
    • Heavy, direct damage, if your target does not die from this spell, it will deal damage to you as well
    • You will not take damage since you killed the totem, and it will be unable to absorb your other spells
  • painWhen no Grounding Totem is present, Shadow Word: Pain
    • Instant cast, 36 yard range
    • Extremely high damage over time
  • veVampiric Embrace
    • Instant cast, 30 yard range
    • Causes you and your party to be healed for 30% of the shadow damage you deal
  • vtVampiric Touch
    • 1.5 second cast, 36 yard range
    • High damage over time
    • Causes you and your party to gain mana equalling 5% of the shadow damage you deal
  • silenceSilence
    • Instant cast, 20 yard range
    • Silences your target for 5 seconds, preventing them from casting any spells
  • mbMind Blast
    • 1.5 second cast, 36 yard range
    • Heavy, direct damage
  • mfMind Flay
    • 3 second channeled spell, 24 yard range, limits enemy movement speed to 50% of normal
    • High damage over 3 seconds
    • Shamans will almost always use Earth Shock to interrupt your casting
    • Proceed as planned, Earth Shocks happen often and are annoying, but they are usually not enough to enable the shaman to win against you
  • psPsychic Scream
    • Instant Cast, area of effect, effecting up to 5 enemies
    • Causes enemies to run in fear for up to 8 seconds
    • Some shamans use Tremor Totem to attempt to break fears
    • Ignore this totem, it breaks fears infrequently and usually won't even do anything
  • mfMind Flay
    • 3 second channeled spell, 24 yard range, limits enemy movement speed to 50% of normal
    • High damage over 3 seconds
  • mbMind Blast
    • 1.5 second cast, 36 yard range
    • Heavy, direct damage
  • mfMind Flay
    • 3 second channeled spell, 24 yard range, limits enemy movement speed to 50% of normal
    • High damage over 3 seconds
  • The shaman will be low on health
  • swdShadow Word: Death
    • Instant cast, 36 yard range
    • Heavy, direct damage, if your target does not die from this spell, it will deal damage to you as well
  • mana burnIf the Shaman begins healing, Mana Burn
    • 3 second cast, 30 yard range
    • Drains roughly 1000 mana from the target and does about 500 damage
    • Prevents the shaman from healing for prolonged periods of time
    • Rarely, a shaman will cancel the heal and earth shock your Mana Burn
    • Just cast another Mana Burn, the shaman will attempt to heal right after casting Earth Shock and you can run him dry
  • mana burnContinue to Mana Burn until the shaman stops healing and begins to attack you again
  • Re-apply Shadow Word: Pain and Vampiric Touch as needed
  • Mind Blast and Mind Flay until the shaman dies

View Step Details Priest vs Warlock

gnomeThe Warlock

Strategy

  • painShadow Word: Pain
    • Instant cast, 36 yard range
    • Extremely high damage over time
    • Warlocks will often use Shadow Ward to mitigate about 920 of your damage every 30 seconds
    • Shadow ward is a magic effect and can be easily dispelled if you use Dispel Magic on the warlock
  • veVampiric Embrace
    • Instant cast, 30 yard range
    • Causes you and your party to be healed for 30% of the shadow damage you deal
  • silenceSilence
    • Instant cast, 20 yard range
    • Silences your target for 5 seconds, preventing them from casting any spells
  • vtVampiric Touch
    • 1.5 second cast, 36 yard range
    • High damage over time
    • Causes you and your party to gain mana equalling 5% of the shadow damage you deal
  • mbMind Blast
    • 1.5 second cast, 36 yard range
    • Heavy, direct damage
  • psPsychic Scream
    • Instant Cast, area of effect, effecting up to 5 enemies
    • Causes enemies to run in fear for up to 8 seconds
    • The warlock PvP trinket removes fear effects. He or she can use it here in order to quickly re-engage you
    • Proceed as planned, with no change to your strategy
  • mfMind Flay
    • 3 second channeled spell, 24 yard range, limits enemy movement speed to 50% of normal
    • High damage over 3 seconds
    • Warlocks using a Felhunter pet can use its Spell Lock ability to interrupt you and prevent you from casting for 8 seconds
    • If you are interrupted, you will still be able to cast holy spells. It is often a good idea to drop out of Shadowform and heal back to full, renew, shield, and switch back to shadowform.
  • mfMind Flay
    • 3 second channeled spell, 24 yard range, limits enemy movement speed to 50% of normal
    • High damage over 3 seconds
  • mbMind Blast
    • 1.5 second cast, 36 yard range
    • Heavy, direct damage
  • Refresh Shadow Word: Pain and Vampiric Touch as needed
  • Continue using Mind Flay and Mind Blast until the warlock reaches low health
  • swdShadow Word: Death
    • Instant cast, 36 yard range
    • Heavy, direct damage, if your target does not die from this spell, it will deal damage to you as well
  • The Warlock should be dead

*Warlocks will often use Fear to keep you crowd controlled while they do damage.
Use your PvP trinket to break the first fear, and use Will of the Forsaken / Fear Ward to prevent a second from landing (if you are one of the races that has either ability), any fear after the second that the warlock tries to apply will last only a few seconds.

*The majority of warlock DoT spells are magic.
Use dispel liberally throughout the fight to prevent yourself from taking unneeded damage, unless the warlock uses Unstable Affliction on you. You should never attempt to dispel yourself if you have the Unstable Affliction debuff on; it will silence you and deal a large amount of damage. The Unstable Affliction debuff looks like this: ua


View Step Details Priest vs Warrior

orcThe Warrior

Strategy

  • painShadow Word: Pain as soon as you are in range, begin to run away from the warrior
    • Instant cast, 36 yard range
    • Extremely high damage over time
    • Puts the warrior into combat, making it impossible to use Charge
  • veVampiric Embrace while continuing to run from the warrior
    • Instant cast, 30 yard range
    • Causes you and your party to be healed for 30% of the shadow damage you deal
  • vtStop and Vampiric Touch
    • 1.5 second cast, 36 yard range
    • High damage over time
    • Causes you and your party to gain mana equalling 5% of the shadow damage you deal
    • Warriors will often use Intercept to stun you and enter melee range extermely quickly
    • Your PvP trinket breaks stuns. Use it and continue execution of your strategy
  • mbMind Blast
    • 1.5 second cast, 36 yard range
    • Heavy, direct damage
    • Warriors can interrupt your spellcasting for a short time with Pummel
    • Ignore this and continue execution of your strategy
  • mfMind Flay
    • 3 second channeled spell, 24 yard range, limits enemy movement speed ot 50% of normal
    • High damage over 3 seconds
  • mfMind Flay
    • 3 second channeled spell, 24 yard range, limits enemy movement speed ot 50% of normal
    • High damage over 3 seconds
  • mbMind Blast
    • 1.5 second cast, 36 yard range
    • Heavy, direct damage
  • The Warrior should be reaching low health
  • swdShadow Word: Death
    • Instant cast, 36 yard range
    • Heavy, direct damage, if your target does not die from this spell, it will deal damage to you as well
  • If the warrior is not dead, Refresh Vampiric Touch and Shadow Word: Pain as needed while continuing to Mind Blast/Mind Flay
  • The warrior will die

*Do not use Psychic Scream against a warrior unless you notice them switch to Battle Stance (It will look like an X appears over the warrior's head). Warriors primarily fight in Berserker Stance, which allows them to break fears and continue attacking you. The fear breaking ability is not available to the warrior in Battle Stance, making that the ideal time to cast.

*Inner Fire is a good tool to use against warriors. It will increase your physical damage mitigation by a fair margin, and can turn a loss in to a win.


Rogue Strategies

View Step Details General Rogue Information


Overview

The Rogue is one of the most exciting, challenging, and rewarding classes to play in a player versus player situation. You will win some battles, and you will lose some battles. There will be fun times, and times of despair. If you stick with it, and make an effort to truly learn the intricacies of the class, you will find it is quite rewarding and very enjoyable.


Rogue Strengths

With the latest talent changes, Rogues have truly become a PvP powerhouse. Rogues have a counter for virtually every situation they may find themselves in. A rogue's strongest area, however, is its ability to utterly destroy low armor classes.


Rogue Weaknesses

If an enemy player is able to successfully get out of your melee range and stay away from you while doing damage, the rogue's melee prowess is stripped away and it becomes difficult to win battles.


The Best all around PvP Talent Build

Assassination/Subtlety

Poison Choice

Poison Choice
Main hand: Wound Poison
Off hand: Crippling Poison


How to read the strategy section

  • Ability to Use
    • Why it is good
    • How enemies can counter
    • What to do if they counter

View Step Details Rogue vs Druid

The Druid

Strategy

  • premedUse Premeditation to gain 2 combo points.
  • garroteGarrote
    • Silences the Druid for 2 seconds
    • Ignores armor
    • Generates 1 or 2 combo points (75% chance to award two with initiative)
  • shivShiv
    • Snares the druid (they can shapeshift out of the snare, but if they attempt to you can catch them with a kidney shot in caster form and inflict heavy damage
    • Generates 1 combo point, 2 on a crit because of Seal Fate
  • ruptureRupture
    • Ignores armor
    • You will have accumulated either 4 or 5 combo points, meaning it will deal substantial damage to the druid
  • backstabBackstab
    • Heavy damage
    • Generates 1 combo point, 2 on a crit because of seal fate
  • backstabBackstab
    • Heavy damage
    • Generates 1 combo point, 2 on a crit because of seal fate
  • backstabBackstab
    • Heavy damage
    • Generates 1 combo point, 2 on a crit because of seal fate
  • exposeExpose Armor
    • This will not affect the druid greatly in bear form, but upon shifting to caster form in an attempt to break snares or heal, he or she will have 0 armor
  • shivShiv to build combo points
    • Small amounts of extra damage
    • Ensures that crippling poison remains on the target
    • Generates either one or two combo points for small amounts of energy
  • Let energy regen to full, he should attempt to bash you and heal soon
  • evasionWhen the druid's health is low, use Evasion
    • This prevents the bash from landing, leaving you free to kidney shot while the druid is in caster form
    • Tauren Druids can use War Stomp to stun you while they heal.
    • Your wound poison will half the amount healed
      • Do not alter your strategy, the battle will simply take slightly longer
  • kidney shotWhen the druid shifts to caster form, Kidney Shot
    • You will have accumulated 5 combo points, making this a long duration stun
    • With a full energy bar, you should be able to kill the druid within the stun duration
  • backstabBackstab
    • Heavy damage
    • Generates 1 combo point, 2 on a crit because of seal fate
  • cold blood+ eviscCold Blood Eviscerate
    • Guaranteed crit with full combo points
    • Should provide the finishing power needed to kill the druid
  • The druid should be dead, even in top gear
  • If the druid is somehow not dead, let energy regen and vanish
  • Re-open with cheap shot and repeat the entire process from step two on

*As with any healing class, it is implied that you use gouge/kick/deadly throw in order to interrupt the druid's heals. If you do not interrupt heals, you can still win, but the battle will potentially take much longer.

*Druids have the ability to shapeshift out of any snare or root. Be prepared to use Shiv as soon as this happens so you can keep the druid in melee range.


View Step Details Rogue vs Hunter

hunterThe Hunter

Strategy

  • premedUse Premeditation to gain 2 combo points
  • cosIf the Hunter is standing on a freezing trap, use Cloak of Shadows
    • It is a common tactic for hunters to place a trap under their feet as they shoot away at the opposition
    • You will be able to see the trap because of the rogue passive Detect Traps
    • You will resist the trap 95% of the time or more and be able to get the opening move on the hunter
  • cheap shotCheap Shot
    • 4 second stun
    • Generates 2 or 3combo points (75% chance to award three with initiative)
    • The Hunter PvP trinket removes root/snare/stun effects
      • Hunters will often use the trinket now and run away from you, attempting to get out of your melee range
      • Be ready to use Shiv immediately after the hunter uses the trinket, s/he will be unable to remove any more snares for the duration of the fight
      • Some hunters will use Scatter Shot right after they use their trinket, allowing them to safely move out of your melee range
      • Deadly Throw
        • This will reduce the hunter's movement speed to 50%, allowing you to effectively return to melee range
      • Sprint
        • Will enable you to get into melee range with the hunter considerably faster
  • shivShiv
    • Guaranteed snare on the hunter
    • Generates 1 combo point, 2 on a crit because of Seal Fate
  • kidney shotAs Cheap Shot is about to wear off, Kidney Shot
    • Do this before cheap shot actually wears off because players cannot parry or dodge while stunned
    • You will have accumulated 4 or 5 combo points, making this a long duration stun
    • The Hunter PvP trinket removes root/snare/stun effects
      • Hunters will often use the trinket now and run away from you, attempting to get out of your melee range
      • Be ready to use Shiv immediately after the hunter uses the trinket, s/he will be unable to remove any more snares for the duration of the fight
      • Some hunters will use Scatter Shot right after they use their trinket, allowing them to safely move out of your melee range
      • Deadly Throw
        • This will reduce the hunter's movement speed to 50%, allowing you to effectively return to melee range
      • Sprint
        • Will enable you to get into melee range with the hunter considerably faster
  • backstabBackstab
    • Heavy damage
    • Generates 1 combo point, 2 on a crit because of seal fate
  • backstabBackstab
    • Heavy damage
    • Generates 1 combo point, 2 on a crit because of seal fate
  • cold blood+ eviscCold Blood Eviscerate
    • You will have accumulated 4 or 5 combo points, and cold blood guarantees a critical strike, the eviscerate will hit for a very large amount of damage
  • Hunters in average gear should be dead, or near dead
  • evasionIf the hunter is not dead, Use Evasion
    • This prevents the hunter from landing any raptor strikes or wing clips on you
    • Mitigates any melee damage from the hunter and his/her pet
  • backstabContinue "tanking" the hunter by strafing around and backstabbing until you have 5 combo points
  • eviscEviscerate
    • Will hit for considerable damage
  • The vast majority of hunters should be dead at this point

*Hunters will always try to move out of your melee range, if you find the hunter near death and have combo points, a deadly throw is an excellent move. It snares them as well as doing considerable damage.

*Some Hunters will have an ability called Deterrance. This makes it very difficult to land attacks on the hunter. If you see the hunter use this ability, build combo points with Shiv (which cannot be dodged or parried) and land a heavy-hitting Eviscerate when Deterrance fades.

*Hunters have multiple snare abilities, if you have still not managed to regain melee range with the Hunter after s/he has used the PvP trinket, you can break snares by using either Cloak of Shadows or Vanish


View Step Details Rogue vs Mage

mageThe Mage

Strategy

  • premedUse Premeditation to generate 2 combo points
  • garroteGarrote
    • Silences the Mage for 2 seconds
    • Deals respectable damage
    • Generates 1 or 2 combo points (75% chance to award two with initiative)
  • shivShiv
    • Guaranteed snare on the Mage
    • Generates 1 combo point, 2 on a crit because of Seal Fate
  • cold blood+ eviscCold Blood Eviscerate
    • You will have accumulated 4 or 5 combo points, and the attack is guaranteed to crit, meaning it will do very high damage
  • backstabBackstab
    • Heavy damage
    • Generates 1 combo point, 2 on a crit because of seal fate
    • Frost specced mages will most likely use Ice Block
      • The mage will be immune to any of your attacks for the duration of Ice Block
    • Wait for the Ice Block to end and immediately use Blind
      • This allows you to bandage back to full health and restealth
      • Re-open on the mage with Garrote and continue executing your strategy
  • The Mage will either Frost Nova or Blink
  • vanishIf s/he Novas, Vanish, Sprint, and Gouge when you catch up
    • Gives you time to regen energy
    • Generates 1 combo point, 2 on a crit because of Seal Fate
  • cosIf s/he Blinks, Cloak of Shadows, Sprint, and chase him or her. Gouge when you catch up
    • Gives you time to regen energy
    • Generates 1 combo point, 2 on a crit because of Seal Fate
  • shivShiv
    • Guaranteed snare on the Mage
    • Generates 1 combo point, 2 on a crit because of Seal Fate
  • backstabBackstab
    • Heavy damage
    • Generates 1 combo point, 2 on a crit because of seal fate
  • eviscEviscerate
    • You will have accumulated 4 or 5 combo points, meaning it will deal considerable damage
  • Any mage without ice block should be dead
  • vanishIf the mage is not dead, Vanish (If you used vanish, preparation then vanish)
    • Allows you to re-open on the mage
    • If vanish is on cooldown because you used it to break a frost nova, do not hesitate to use Preparation to reset its cooldown.
  • ambushRe-Open with Ambush
    • Heavy damage
    • Generates 1-3 combo points, depending on if it crits and if initiative works
  • eviscEviscerate
    • You will have anywhere from 1-4 combo points
    • The damage off of even a low combo point eviscerate should be enough to finish off the mage
  • Even high-health mages should be dead at this point

*Mages with Ice Block can use it at any time during the battle, up to 2 times. You must be prepared to counter the ice block with a blind as soon as they come out of it. By blinding and bandaging, you will be able to swing the battle right back in your favor.


View Step Details Rogue vs Paladin

pallyThe Paladin

Strategy

  • premedUse Premeditation to gain 2 combo points.
  • garroteGarrote
    • Silences the Paladin for 2 seconds, making him unable to use judgements or Hammer of Justice
    • Ignores armor
    • Generates 1 or 2 combo points (75% chance to award two with initiative)
  • backstabBackstab
    • Heavy damage
    • Generates 1 combo point, 2 on a crit because of seal fate
  • cosCloak of Shadows
    • Paladins generally try to use Hammer of Justice right away, you will resist it
    • You will resist most of the Paladin's damage abilities for the duration of the cloak
  • ruptureRupture
    • Ignores armor
    • You will have accumulated either 4 or 5 combo points, meaning it will deal substantial damage to the paladin
  • vanishVanish
    • Enables you to get a second opener on the paladin
  • cheap shotCheap Shot
    • 4 second stun
    • Generates 2 or 3combo points (75% chance to award three with initiative)
  • backstabBackstab
    • Heavy damage
    • Generates 1 combo point, 2 on a crit because of seal fate
  • kidney shotKidney Shot
    • You will have accumulated 4 or 5 combo points by now, making this a 4 or 5 second stun
    • The damage you have done so far will force the paladin to use Divine Shield
    • Paladins can use Divine Shield here to prevent you from killing them, remove your whole stack of wound poison, and heal back to full
    • Expect the Divine Shield. As long as you are not caught off guard it will not alter the outcome of the battle. If the Paladin does indeed use Divine Shield:
      • Sprint
        • Run as far away from the Paladin as possible and attempt to drop combat
        • If you manage to drop combat while the paladin heals, restealth
      • Open again with Cheap Shot
        • Another 4 second stun
        • Generates 2 or 3combo points (75% chance to award three with initiative)
  • backstabBackstab
    • Heavy damage
    • Generates 1 combo point, 2 on a crit because of seal fate
  • ruptureRupture
    • Ignores armor
    • You will have accumulated either 4 or 5 combo points, meaning it will deal substantial damage to the paladin
  • backstabBackstab
    • Heavy damage
    • Generates 1 combo point, 2 on a crit because of seal fate
  • backstabBackstab
    • Heavy damage
    • Generates 1 combo point, 2 on a crit because of seal fate
  • eviscEviscerate
    • This should be enough to kill the paladin provided you've interrupted at least some heals
  • If the paladin is not dead simply repeat the backstab/eviscerate combo until s/he is.

*Paladins are unique in that they can divine shield at any point in the battle and heal back to full. It is possible to guess when they will divine shield, but you can never be 100 percent sure. You must be able to adapt and counter whenever they decide to "blow the bubble"

*As with any healing class, it is implied that you use gouge/kick/deadly throw in order to interrupt the paladin's heals. If you do not interrupt heals, you can still win, but the battle will potentially take much longer.


View Step Details Rogue vs Priest

priestThe Priest

Strategy

  • premedUse Premeditation to gain 2 combo points.
  • garroteGarrote
    • Silences the Druid for 2 seconds
    • Ignores armor
    • Generates 1 or 2 combo points (75% chance to award two with initiative)
  • The Priest will fear when Garrote silence ends, use PvP trinket
    • You should at least purchase the level 60 PvP trinket as soon as possible, it is available for ~4000 honor from the PvP vendor in Orgrimmar or Stormwind
  • shivShiv
    • Snares the priest, guaranteed
    • Generates 1 combo point, 2 on a crit because of Seal Fate
  • kidney shotWait for energy to regen, use Kidney Shot
    • Should have approximately 2-4 combo points
    • Moderate stun length
    • Full energy
  • backstabBackstab
    • Heavy damage
    • Generates 1 combo point, 2 on a crit because of seal fate
  • backstabBackstab
    • Heavy damage
    • Generates 1 combo point, 2 on a crit because of seal fate
  • cold blood+ eviscCold Blood Eviscerate
    • You will have accumulated 4 or 5 combo points, and cold blood guarantees a critical strike, the Eviscerate will hit for a very large amount of damage
  • In less than top gear, the priest will be dead
  • blindIf the priest is still alive, use Blind
  • cosCloak of Shadows, Restealth and open with Cheap Shot
    • Remove DoT effects
    • 4 second stun
    • Generates 2 or 3 combo points (75% chance to award three with initiative)
  • backstabBackstab
    • Heavy damage
    • Generates 1 combo point, 2 on a crit because of seal fate
  • eviscEviscerate
    • You will have accumulated 4 or 5 combo points, the eviscerate will hit for a considerable amount of damage
  • Even top geared priests should be dead.

*As with any healing class, it is implied that you use gouge/kick/deadly throw in order to interrupt the priest's heals. If you do not interrupt heals, you can still win, but the battle will potentially take much longer.


View Step Details Rogue vs Rogue

rogueThe Rogue

Strategy

  • premedUse Premeditation to generate 2 combo points
  • cheap shotCheap Shot
    • 4 second stun
    • Generates 2 or 3combo points (75% chance to award three with initiative)
  • shivShiv
    • Guaranteed snare on the hunter
    • Generates 1 combo point, 2 on a crit because of Seal Fate
  • kidney shotAs the Cheap Shot stun is about to fade, use Kidney Shot
    • You will have 5 combo points, making this a 6 second stun
  • backstabBackstab
    • Heavy damage
    • Generates 1 combo point, 2 on a crit because of seal fate
  • shivShiv
    • Guaranteed snare on the rogue
    • Generates 1 combo point, 2 on a crit because of Seal Fate
  • gougeAs the Cheap Shot stun is about to fade, Gouge
    • it is important to do this before Cheap Shot fades, so the rogue cannot dodge or parry
  • ruptureWait for energy to regen, Rupture
    • You will have accumulated 4 or 5 combo points, making the rupture do respectable damage
    • Prevents the rogue from Vanishing
  • vanishImmediately after the Rupture, Vanish
    • Do not allow the opposing rogue to land a gouge on you
  • cheap shotRe-open with Cheap Shot
    • 4 second stun
    • Generates 2 or 3combo points (75% chance to award three with initiative)
  • backstabBackstab
    • Heavy damage
    • Generates 1 combo point, 2 on a crit because of seal fate
  • cold blood+ eviscCold Blood Eviscerate
    • You will have accumulated 4 or 5 combo points, and the attack is guaranteed to crit, meaning it will do very high damage
  • Even in high end gear, the rogue should be dead

*Enemy Rogues will somtimes try to move out of your melee range in order to drop from combat and restealth. If you find the Rogue near death and have combo points, a deadly throw is an excellent move. It snares them as well as doing considerable damage.

*If an enemy rogue is free from a stun for a second, they will often either Vanish or Gouge and attempt to keep you locked down with a series of stuns. Make sure you do not allow the enemy rogue even a fraction of a second to move freely without first using Rupture


View Step Details Rogue vs Shaman

shamanThe Shaman

Strategy

  • sapSap
    • Only sap if the shaman knows you are coming and drops his field of totems
    • If the shaman does not have totems placed, or is already engaged in combat, skip this step
  • Kill Totems
    • If the shaman has seen you coming he or she will have likely dropped a rank one fire nova totem, an earthbind totem, and a poison cleanse totem
    • The totems are actually fairly disruptive, and it is a good idea to kill them before engaging the shaman.
  • premedUse Premeditation to gain 2 combo points
  • cheap shotCheap Shot
    • 4 second stun
    • Generates 2 or 3combo points (75% chance to award three with initiative)
    • The Shaman PvP trinket breaks roots/snares/stuns, shaman will often use it and frost shock immediately after in an attempt to stay out of your melee range.
    • Be prepared to use Shiv immediately after the shaman trinkets. The shaman will not be able to remove the snare again and you will be free to continue the execution of your strategy unhindered.
  • shivShiv
    • Cheap energy cost, instant offhand attack
    • Applies offhand poison, the shaman will be snared, guaranteed
    • Generates 1 combo point, 2 on a crit because of seal fate
  • kidney shotKidney Shot
    • You will have accumulated 4 or 5 combo points by now, making this a 4 or 5 second stun
    • The Shaman PvP trinket breaks roots/snares/stuns, shaman will often use it and frost shock immediately after in an attempt to stay out of your melee range.
    • Be prepared to use Shiv immediately after the shaman trinkets. The shaman will not be able to remove the snare again and you will be free to continue the execution of your strategy unhindered.
  • backstabBackstab
    • Heavy damage
    • Generates 1 combo point, 2 on a crit because of seal fate
  • gougeGouge
    • Gives you time to regenerate energy, as well as prevents the shaman from healing
    • Generates 1 combo point, 2 on a crit because of seal fate
  • backstabWait for energy, Backstab
    • Heavy damage
    • Generates 1 combo point, 2 on a crit because of seal fate
  • cold blood+ eviscCold Blood Eviscerate
    • You will have accumulated 4 or 5 combo points, and cold blood guarantees a critical strike, the eviscerate will hit for a very large amount of damage
    • Restoration Shamans will often use Nature's Swiftness in order to instantly cast their largest heal on themselves.
    • You will have a full stack of Wound Poison up at this point, so the heal will only hit for half its full amount
    • Do not alter your strategy. The outcome of the battle will remain the same, it will just take slightly longer.
  • Shamans not using a shield, and even many shamans with shields will be dead by this point
  • blindIf the shaman is not dead, blind, bandage to full, and restealth
    • You will be able to restart with near full health, while the shaman will still be missing health and mana
    • The shaman may have successfully dropped a new Poison Cleansing Totem, which is able to remove blind.
    • As long as you put talent points into Vile Poisons, do not worry
      • You will have a full stack of wound poison on the shaman, as well as crippling poison
      • The chances of the totem removing your blind are very slim
  • cheap shotRe-open with cheap shot
    • 4 second stun
    • Generates 2 or 3 combo points (75% chance to award three with initiative)
  • backstabBackstab
    • Heavy damage
    • Generates 1 combo point, 2 on a crit because of seal fate
  • eviscEviscerate
    • You will have accumulated 4 or 5 combo points, the eviscerate will hit for considerable damage
  • Even restoration shamans with top gear should be dead

*As with any healing class, it is implied that you use gouge/kick/deadly throw in order to interrupt the shaman's heals. If you do not interrupt heals, you can still win, but the battle will potentially take much longer.


View Step Details Rogue vs Warlock

gnomeThe Warlock

Strategy

  • premedUse Premeditation to generate 2 combo points
  • cheap shotCheap Shot
    • 4 second stun
    • Generates 2 or 3combo points (75% chance to award three with initiative)
  • shivShiv
    • Guaranteed snare on the Warlock
    • Generates 1 combo point, 2 on a crit because of Seal Fate
  • kidney shotAs the Cheap Shot is about to wear off, Kidney Shot
    • You will have 5 combo points, making this a 6 second stun
  • backstabBackstab
    • Heavy damage
    • Generates 1 combo point, 2 on a crit because of seal fate
  • backstabBackstab
    • Heavy damage
    • Generates 1 combo point, 2 on a crit because of seal fate
  • cosCloak of Shadows
    • The Warlock will be low on health
    • Most Warlocks will be mashing the Death Coil button as soon as they break free of the stun
    • You will resist the Death Coil 95% or more of the time
    • If the Warlock sees that you have used Cloak of Shadows, he or she may wait until it fades to use Death Coil
      • During the duration of Death Coil, the Warlock will cast Fear on you
    • Counter this by immediately using your PvP trinket
      • You will still suffer from the Death Coil, but the Fear will be broken instantly
    • Deadly Throw
      • This will interrupt any non instant cast spell the warlock attempts to cast while you move to regain melee range
      • Snares the warlock, enabling you to regain melee range with ease
  • cold blood+ eviscCold Blood Eviscerate
    • You will have accumulated 3-5 combo points
    • The critical Eviscerate should be sufficient in finishing off the Warlock provided they are not fully outfitted with high-stamina PvP epic gear
  • Warlocks with low to moderate health will be dead
  • vanishIf the Warlock is not dead, Vanish
    • If you have executed properly, the Warlock should not have had any opportunity to get a damage over time spell to land on you, leaving you free to vanish at will
    • If the Warlock managed to land Death Coil earlier, you will probably have at least one damage over time spell on you making it hard to restealth
    • Wait for the DoT to tick, and vanish immediately after
      • You will have roughly 3 seconds to perform the next step without your stealth breaking
  • cheap shotRe-Open with Cheap Shot
    • 4 second stun
    • Generates 2 or 3combo points (75% chance to award three with initiative)
  • backstabBackstab
    • Heavy damage
    • Generates 1 combo point, 2 on a crit because of seal fate
  • eviscEviscerate
    • You will have generated enough combo points that even high-stamina warlocks should die when hit with this eviscerate
  • Even Warlocks with excellent gear should be dead by this point

*Warlocks have the ability to Death Coil at any point. You must be ready for it any time the Warlock is not stunned and you do not have Cloak of Shadows up. As long as crippling poison is up on the target and you are wearing your PvP trinket, it should not significantly alter the outcome of the battle.


View Step Details Rogue vs Warrior

orcThe Warrior:

Strategy

  • premedUse Premeditation to gain 2 Combo points
  • garroteGarrote
    • Ignores armor
    • Generates 1 or 2 combo points (75% chance to award two with initiative)
  • shivShiv
    • Cheap energy cost, instant offhand attack
    • Applies offhand poison, the warrior will be snared, guaranteed
    • Generates 1 combo point, 2 on a crit because of seal fate
  • ruptureRupture
    • Ignores armor
    • You will have accumulated either 4 or 5 combo points, meaning it will deal substantial damage to the warrior
    • Dwarf Warriors can Stoneform, removing your Garrote and Rupture, as well as any poison you had on.
    • Wait for Stoneform to fade, use Blind, Restealth, and start over.
      • The warrior's stoneform will be on cooldown, and s/he will not be able to counter your Garrote/Rupture a second time.
  • vanishVanish
    • Allows you to re-open
    • If he has not managed to get deep wounds/ rend on you, you should wait for energy to regen to full before re-engaging
  • cheap shotRe-open with Cheap shot
    • 4 second stun
    • Generates 2 or 3combo points (75% chance to award three with initiative)
  • backstabBackstab
    • Heavy damage
    • Generates 1 combo point, 2 on a crit because of seal fate
  • cold blood+ eviscCold Blood Eviscerate
    • The use of cold blood guarantees critical strike
    • You will have accumulated at least 4 combo points most of the time, often you will have 5.
    • The eviscerate will hit for heavy damage.
  • evasionUse Evasion and strafe around the warrior, backstabbing as energy permits.
    • You will dodge almost every attack the warrior attempts to hit you with
    • Warriors can fear you during evasion
      • Unless you are undead or have your PvP trinket equipped, the warrior can simply bandage and wait on your evasion timer to run out while you are feared.
      • You cannot dodge or parry while feared, so the warrior can fear and then immediately Mortal Strike to ensure it lands, even though you used evasion.
    • You should have your PvP trinket equipped
      • If the warrior fears and attempts to bandage, simply use the trinket and continue with the next step
      • If the warrior fears and tries to immediately Mortal Strike, you must use your pvp trinket within 1.5 seconds of the fear. The warrior's global cooldown will prevent him or her from attacking during this time. If you are quick enough and break the fear before he Mortal Strikes, you will simply dodge it.
  • At this point, warriors in average gear should be dead.
  • blindIf the warrior is not dead, use blind.
    • This allows you to bandage while regenerating all of your energy
    • After five seconds you will drop from combat, allowing you to restealth
    • Dwarf warriors can Stoneform (if they did not already) to remove your blind and continue attacking.
    • You can use Preparation and then Vanish to achieve the same effect as the blind.
  • cheap shotRe-Open with Cheap shot
    • 4 second stun
    • Generates 2 or 3combo points (75% chance to award three with initiative)
  • backstabBackstab
    • Heavy damage
    • Generates 1 combo point, 2 on a crit because of seal fate
  • Even in the best gear, all warriors should be very near dead by now.
  • eviscIf the warrior is not dead but very low, Eviscerate
    • You will have accumulated at least 4 combo points most of the time, often you will have 5.  The Eviscerate will hit for heavy damage.
  • ruptureIf the warrior is somehow not even close to dead, Rupture
    • You will have accumulated enough combo points that the rupture will hit for considerable damage
    • The DoT will keep the warrior from bandaging while you perform the next steps
  • cosCloak of Shadows to remove dots, use preparation, and vanish again
    • You can let your energy regenerate to full
    • The warrior can begin to eat/drink or bandage
    • If the warrior does this, attack immediately instead of waiting for full energy
      • you will still have the upper hand, and s/he will not have had time to regain a significant amount of health.
  • From here, repeat the process from step one until the warrior is dead.

General things to look for when fighting warriors

  • If a good warrior knows s/he’s about to be ambushed by a rogue, s/he will often equip a shield and go to defensive stance.
    • Even though Garrote and Rupture ignore armor, they will deal 20 percent less damage to the warrior than they would had he or she stayed in berserker stance.
    • All of your attacks besides garrote and rupture will deal significantly less damage.
    • This does not significantly change your strategy. It will take longer to kill the warrior, but the fight will play out the same.
  • When the warrior lands a hamstring or piercing howl, he or she will often use the pvp trinket to remove crippling poison, run away, and intercept you.
    • You cannot dodge or parry while stunned
    • You are not dealing any damage to the warrior while stunned.
    • Luck plays into this somewhat. You should not alter your strategy, but it is possible that the warrior will double or triple crit while you are stunned and kill you outright. When this happens there is really no counter but, hey, you cant win 'em all.


Shaman Strategies

View Step Details General Shaman Information

Overview

Shaman can be very successful in PvP with any talent build. Some builds, however, are much more durable than others. The Elemental talent tree has a great deal of survivability, the ability to heal well, and downright insane burst damage. All of these things put together make the Elemental Shaman a PvP powerhouse.


Shaman Strengths

Totems add a very unique dimension to the class. They provide very strong buffs to the shaman, and can easily turn the tide of a battle. Mail armor, accompanied with the ability to wear a shield, and heal make the shaman a very hard class to kill. Shamans can use Purge to remove a large number of buffs that enemies place on themselves and their teammates. Shamans also have the capability of doing incredible amounts of damage within a very short time period, making them a force to be reckoned with on the battlefield.


Shaman Weaknesses

The shaman class does not have any true form of crowd control. Once an enemy engages you, they will be able to stay engaged until one of you dies. Several of the shaman's attacks are very short range; enemy casters with long range attacks can deal heavy amounts of damage before the shaman is able to retaliate.


The Best all around PvP Talent Build

Elemental Hybrid

This guide assumes that you use Frostbrand Weapon unless specified otherwise, and that you start every fight with lightning shield active, refreshing it whenever it fades


How to read the strategy section

  • Ability to Use
    • Details about the ability and why you are using it
    • How enemies can counter
    • Whatt to do if they counter

View Step Details Shaman vs Druid

druidThe Druid

Strategy

  • Start the fight with a Grounding Totem, Earthbind Totem, and Mana Spring Totem active
    • Grounding Totem will absorb one harmful spell every 10 seconds (if it absorbs a direct damage spell such as Moonfire, it will die and you must drop a new one)
    • Earthbind Totem will snare the opposing druid if he or she comes close to your melee range
  • chainChain Lightning
    • 1.5 second cast, 36 yard range
    • Heavy damage effecting up to three targets
    • Some druids will use Cyclone as a way to interrupt your spell casting
    • This really accomplishes nothing because you are immune to all damage while under the effects of Cyclone. The druid is attempting to annoy you and make you deviate from your strategy. Be patient and stick to the plan; you will come out on top more often than not
  • earthEarth Shock
    • Instant cast, 20 yard range
    • High damage attack that interrupts enemy spellcasts and prevents them from casting any further spells of that type for 2 seconds
  • lightning boltLightning Bolt
    • 2 second cast, 36 yard range, high damage attack
  • fire novaIf the druid attempts to move into melee range, drop a Fire Nova Totem
    • Totem that inflicts moderate-high damage to all targets within a 10 yard radius
    • Does not do damage until 4 seconds after the totem is dropped
  • chainChain Lightning
    • 1.5 second cast, 36 yard range
    • Heavy damage effecting up to three targets
    • Feral Druids can use Feral Charge to interrupt your spell casting
    • Wait for the feral charge effect to fade and resume casting
  • earthEarth Shock
    • Instant cast, 20 yard range
    • High damage attack that interrupts enemy spellcasts and prevents them from casting any further spells of that type for 2 seconds
  • groundingRe-drop Grounding Totem as soon as the cooldown finishes
    • Grounding Totem will absorb one harmful spell every 10 seconds (if it absorbs a direct damage spell such as Moonfire, it will die and you must drop a new one)
  • mastery + chainElemental Mastry, Chain Lightning
    • Elemental Mastry grants the Chain Lightning 100% critical strike chance
    • 1.5 second cast, 36 yard range
    • Heavy damage effecting up to three targets
    • Feral Druids can use Bash to stun you while they shift to Caster Form and Heal; preventing you from finishing them off with the Chain Lightning/Lightning Bolt combo
    • Your PvP trinket removes stun effects. Use it when Bashed and Earth Shock the druid to interrupt any casted heal.
    • Use Purge to remove any health over time spells the druid has casted
  • swiftness + lightning boltNature's Swiftness, Lightning Bolt
    • Instant Cast (because of Nature's Swiftness), 36 yard range, high damage attack
    • Do not use Nature's Swiftness to heal against a druid. They have very limited spell interrupts, so you can simply cast any heal you need and save the Nature's Swiftness for dealing damage
  • earthEarth Shock
    • Instant cast, 20 yard range
    • High damage attack that interrupts enemy spellcasts and prevents them from casting any further spells of that type for 2 seconds
  • The Druid should be dead
  • If the druid is not dead, continue to Earth Shock any heal casts, Chain Lightning, and Lightning Bolt
  • The druid will die

*Druids are fairly easy for an elemental shaman to kill. They have no real way to interrupt your spell casts, and the armor bonus granted by druid forms does nothing to mitigate your damage.

*Druids will often attempt to beat you by outhealing your damage and then damaging you when you run out of mana.
This is easily countered by using Purge and Earth Shock. Druids only have 1 large direct heal, and it takes 3-3.5 seconds to cast, making it very easy to interrupt. The rest of the druid's heals are health over time spells; purge renders them completely useless.


View Step Details Shaman vs Hunter

hunterThe Hunter

Strategy

  • Begin the fight with no totems active
    • The hunter will attempt to run away from you while fighting. You must wait until you attain melee range to drop totems.
  • mastery + chainElemental Mastry, Chain Lightning
    • Elemental Mastry grants the Chain Lightning 100% critical strike chance
    • 1.5 second cast, 36 yard range
    • Heavy damage effecting up to three targets
    • Some hunters will use Feign Death to cause you to lose your target and interrupt your spell cast
    • Simply retarget the hunter and continue the execution of your strategy
  • frostFrost Shock as you run toward the hunter
    • Instant Cast, 20 yard range
    • High damage attack that slows your target's run speed to 50% for 8 seconds
  • frostContinue to run toward the hunter Frost Shock again
    • Instant Cast, 20 yard range
    • High damage attack that slows your target's run speed to 50% for 8 seconds
  • groundingAs you enter melee range with the hunter drop a Grounding Totem
    • Hunters will often stand on a Freezing Trap in an attempt to incapacitate you for up to 12 seconds, rendering you unable to act should you enter melee range
    • Grounding Totem will absorb the trap effect, allowing you to attack the hunter freely
  • Turn on Auto Attack
    • Auto attacks add extra damage when the enemy is in melee range
    • Frostbrand Weapon effect is a very strong snare that will slow the hunter, making him or her unable to obtain range. This renders most of the hunter's attacks useless.
  • fire novaWhen you are in melee range, Fire Nova Totem
    • Totem that inflicts moderate-high damage to all targets within a 10 yard radius
    • Does not do damage until 4 seconds after the totem is dropped
    • Hunters will usually use Scatter Shot to disorient you for 4 seconds and then use their PvP trinket to remove your snare effects and move out of your melee range
    • After the Scatter Shot effect Fades, drop a Windwall Totem to reduce the ranged damage you take and use your ranged attacks to finish the hunter off
  • chainChain Lightning
    • 1.5 second cast, 36 yard range
    • Heavy damage effecting up to three targets
  • frostFrost Shock
    • Instant Cast, 20 yard range
    • High damage attack that slows your target's run speed to 50% for 8 seconds
  • swiftness + lightning boltNature's Swiftness (if you have not already used it in the fight to heal), Lightning Bolt
    • Instant Cast (because of Nature's Swiftness), 36 yard range, high damage attack
  • The Hunter should be dead.
  • If the hunter is not dead, shoot Lightning Bolts at him or her until death occurs (it should be very shortly)

*Hunters will often use Silencing Shot to prevent you from healing. Keep yourself above 40% health at all times to prevent the hunter from getting lucky and killing you while you are silenced

*Many hunters will attempt to drain your mana with Viper Sting. This is easily dispelled by either your Poison Cleansing Totem, or the Cure Poison Spell itsself. Remove it as quickly as possible.


View Step Details Shaman vs Mage

trollThe Mage

Strategy

  • Begin the fight with a Grounding Totem, Earthbind Totem, and Mana Spring Totem active
    • Grounding Totem will absorb one harmful spell every 10 seconds (if it absorbs a direct damage spell such as Ice Lance, it will die and you must drop a new one)
    • Earthbind Totem will snare the mage if he or she comes close to your melee range
  • mastery + chainElemental Mastry, Chain Lightning
    • Elemental Mastry grants the Chain Lightning 100% critical strike chance
    • 1.5 second cast, 36 yard range
    • Heavy damage effecting up to three targets
  • earthEarth Shock while the mage is casting a spell
    • Instant cast, 20 yard range
    • High damage attack that interrupts enemy spellcasts and prevents them from casting any further spells of that type for 2 seconds
  • lightning boltLightning Bolt
    • 2 second cast, 36 yard range, high damage attack
    • Mages can use Counterspell to interrupt your spell cast and prevent you from casting any spell within that school for 10 seconds
    • If you get Counterspelled, try to use the terrain to your advantage. Mages need line of sight to deal damage, and if you can hide behind a rock, building, or some other object, you will be able to avoid taking damage whille you wait on Counterspell to end
    • If there is no terrain to use, simply melee the mage until the effect wears off and then use Nature's Swiftness and Healing Wave to heal back to full
  • chainChain Lightning
    • 1.5 second cast, 36 yard range
    • Heavy damage effecting up to three targets
  • earthEarth Shock while the mage is casting a spell
    • Instant cast, 20 yard range
    • High damage attack that interrupts enemy spellcasts and prevents them from casting any further spells of that type for 2 seconds
    • When mages are in trouble, they usually use Polymorph to render you unable to act, and then eat/drink to full health before the Polymorph breaks
    • Use Earth Shock any time it is possible to stop the mage from casting Polymorph.
    • If the cooldown on Grounding Totem is up, you can drop it as the spell casts and it will absorb the Polymorph
  • groundingDrop a new Grounding Totem as soon as the cooldown is over
    • Grounding Totem will absorb one harmful spell every 10 seconds (if it absorbs a direct damage spell such as Ice Lance, it will die and you must drop a new one)
  • chainChain Lightning
    • 1.5 second cast, 36 yard range
    • Heavy damage effecting up to three targets
  • swiftness + lightning boltNature's Swiftness (if you have not already used it during the fight to heal), Lightning Bolt
    • Instant Cast (because of Nature's Swiftness), 36 yard range, high damage attack
  • The mage should be dead
  • Some frost mages will still be alive, Continue to Earth Shock them as they attempt to cast spells, Chain Lightning, and Drop fresh Grounding Totems until the mage is dead

*Mages can Ice Block at any time during the fight in order to remove any debuffs and wait on short cooldowns to finish.
If the mage uses Ice Block, just heal yourself back to full and continue fighting when the Ice Block fades. Ice Block is largely ineffective against shamans and you will still be able to easily win the fight

*Purge is very effective against mages. You can purge every buff, as well as Arcane Power, Mana Shield, and Ice Barrier. Any time you see the mage use any of these abilities, purge immediately.

*This is usually a fairly easy fight for you, and you will come out on top the majority of the time as long as you keep yourself healed sufficiently.


View Step Details Shaman vs Paladin

pallyThe Paladin

Strategy

  • Start the fight with a Grounding Totem, Earthbind Totem, and Mana Spring Totem active
    • Grounding Totem will absorb one harmful spell every 10 seconds (if it absorbs a direct damage spell such as Holy Shock, it will die and you must drop a new one)
    • Earthbind Totem will snare the opposing shaman if he or she comes close to your melee range
  • lightning boltLightning Bolt
    • 2 second cast, 36 yard range, high damage attack
    • Paladins can use Hammer of Justice to interrupt your spell casting and stun you for 6 seconds
    • Use your PvP trinket and resume casting
  • lightning boltLightning Bolt
    • 2 second cast, 36 yard range, high damage attack
    • Blood Elf Paladins can use Arcane Torrent to silence you for 2 seconds
    • Ignore this and proceed as planned
  • Turn on Auto Attack
    • Auto attacks add extra damage when the enemy is in melee range
    • Frostbrand Weapon effect is a very strong snare that will enable you to move out of range of the paladin
  • fire novaAs the paladin enters melee range, drop a Fire Nova Totem
    • Totem that inflicts moderate-high damage to all targets within a 10 yard radius
    • Does not do damage until 4 seconds after the totem is dropped
  • earthEarth Shock only when the paladin attempts to heal
    • Instant cast, 20 yard range
    • High damage attack that interrupts enemy spellcasts and prevents them from casting any further spells of that type for 2 seconds
  • lightning boltLightning Bolt
    • 2 second cast, 36 yard range, high damage attack
    • Blood Elf Paladins can use Arcane Torrent to Silence you for 2 seconds
    • Ignore this and proceed as planned
  • lightning boltLightning Bolt
    • 2 second cast, 36 yard range, high damage attack
  • Continue this, while interrupting heals with Earth Shock, until the paladin uses Divine Shield
  • While the paladin heals to full, bandage
    • Regain 3400 health while regenerating mana
  • mastery + chainElemental Mastery, Chain Lightning
    • Elemental Mastry grants the Chain Lightning 100% critical strike chance
    • 1.5 second cast, 36 yard range
    • Heavy damage effecting up to three targets
  • swiftness + lightning boltNature's Swiftness, Lightning Bolt
    • Instant Cast (because of Nature's Swiftness), 36 yard range, high damage attack
  • earthEarth Shock any time the paladin attempts to heal
    • Instant cast, 20 yard range
    • High damage attack that interrupts enemy spellcasts and prevents them from casting any further spells of that type for 2 seconds
  • Continue using Lightning Bolt/Earth Shock until the paladin dies

*Paladins generally don't have any counters to your spellcasting. They will attempt to beat you by healing and outlasting your mana pool. Stick to mana efficient spells, and keep a Mana Spring Totem active for the duration of the fight

*Purge is more effective against paladins than any other class in the game. A very large portion of paladin damage comes from his or her Seal spells which cost a fair amount of mana to cast and can be easily Purged. Purge any time you see the paladin cast any buff spell, and you should be able to outlast.


View Step Details Shaman vs Priest

priestThe Priest

Strategy

  • Begin the fight with a Grounding Totem, Tremor Totem, and Mana Spring totem active
    • Tremor Totem emits a pulse every few seconds that removes fear effects. This can be very disruptive to the priest when it works
    • Grounding Totem will absorb one harmful spell every 10 seconds (if it absorbs a direct damage spell such as Mind Blast, it will die and you must drop a new one)
    • Grounding totem will not absorb the priest's Psychic Scream Spell
    • Make sure you always have a Tremor Totem active. Stand as close to it as possible for the duration of the fight, and it should remove the majority of fears
  • purgePurge
    • Instant Cast, 30 yard range
    • Removes 2 magical effects from your target
  • purgePurge
    • Instant Cast, 30 yard range
    • Removes 2 magical effects from your target
  • lightning boltLightning Bolt
    • 2 second cast, 36 yard range, high damage attack
  • earthEarth Shock while the priest is casting a spell
    • Instant cast, 20 yard range
    • High damage attack that interrupts enemy spellcasts and prevents them from casting any further spells of that type for 2 seconds
    • Many priests will attempt to use Pain Supression, Renew, and Power Word: Shield instead of directly casted spells
    • Use Purge any time you see the priest use any of these spells to negate them completely
  • lightning boltLightning Bolt
    • 2 second cast, 36 yard range, high damage attack
  • Queue Auto Attack
    • Auto attacks add extra damage when the enemy is in melee range
    • Frostbrand Weapon effect is a very strong snare
  • fire novaIf the priest enters melee range (most do because they try to fear you), drop a Fire Nova Totem
    • Totem that inflicts moderate-high damage to all targets within a 10 yard radius
    • Does not do damage until 4 seconds after the totem is dropped
  • groundingAfter the priest uses fear, drop a Grounding Totem
    • Grounding Totem will absorb one harmful spell every 10 seconds (if it absorbs a direct damage spell such as Moonfire, it will die and you must drop a new one)
    • Earthbind Totem will snare the opposition if he or she comes close to your melee range
  • mastery + chainElemental Mastry, Chain Lightning
    • Elemental Mastry grants the Chain Lightning 100% critical strike chance
    • 1.5 second cast, 36 yard range
    • Heavy damage effecting up to three targets
    • Shadow Priests can Silence you for 5 seconds. They will often try to use it late in the fight and use burst damage to kill you before you are able to heal
    • Heal yourself throughout the fight as needed, and never let yourself drop below 40% health if at all possible
  • swiftness + lightning boltNature's Swiftness, Lightning Bolt
    • Instant Cast (because of Nature's Swiftness), 36 yard range, high damage attack
  • earthEarth Shock
    • Instant cast, 20 yard range
    • High damage attack that interrupts enemy spellcasts and prevents them from casting any further spells of that type for 2 seconds
  • The priest should be dead
  • If the priest is still alive, continue to Lightning Bolt/ Earthshock until the priest dies

*Occasionally, priests will attempt to use Mana Burn to drain all of your mana and end the battle early.
Mana Burn has a long casting time, and is very easy to Earth Shock. If Earth Shock is on cooldown, drop a Grounding Totem to absorb the spell.

*Shadow Priests are capable of very heavy damage output within a short period of time. Do not let yourself fall below 40% health or you may find yourself taking the express train to the graveyard!


View Step Details Shaman vs Rogue

rogueThe Rogue

Strategy

  • Start out the fight with an Earthbind Totem, Magma Totem (rank 1), Wrath of Air Totem, and Poison Cleansing Totem active
    • Earthbind Totem assists you in keeping the rogue snared for the duration of the fight
    • Wrath of Air Totem increases your damage output substantially
    • Poison Cleansing Totem removes one poison effect from you every few seconds. This is can be very disruptive to the rogue and turn the battle in your favor.
    • Some rogues will Sap you at the start of the fight and kill your totems
    • When the Sap fades, re-drop totems and continue as planned
    • If the rogue manages to restealth during Sap and re-opens with Cheap Shot, use your PvP trinket to remove the stun effect and quickly re-engage
  • frostFrost Shock as soon as the rogue leaves stealth and you are able to act
    • Instant Cast, 20 yard range
    • High damage attack that slows your target's run speed to 50% for 8 seconds
  • Turn on your auto attack as you begin to strafe away from the rogue
    • Auto attacks add extra damage when the rogue is in melee range
    • Frostbrand Weapon effect is a very strong snare that will enable you to move out of range of the rogue even if he or she has applied Crippling Poison to you
  • fire novaFire Nova Totem
    • Totem that inflicts moderate-high damage to all targets within a 10 yard radius
    • Does not do damage until 4 seconds after the totem is dropped
    • Rogues can use Cloak of Shadows here to remove all debuffs and resist the Fire Nova Totem
    • This will prolong the fight slightly, but continue as planned and you will do well
  • chainStop briefly, Chain Lightning
    • 1.5 second cast, 36 yard range
    • Heavy damage effecting up to three targets
    • Rogues can use Kick in order to interrupt
    • Move away from the rogue until the kick effect fades, then resume casting
  • flameFlame Shock as you resume strafing
    • Instant cast, 20 yard range
    • Moderate direct damage with a moderate damage over time component as well
  • mastery + chainElemental Mastry, Chain Lightning
    • Elemental Mastry grants the Chain Lightning 100% critical strike chance
    • 1.5 second cast, 36 yard range
    • Heavy damage effecting up to three targets
    • The Rogue can use Blind in order to drop out of combat and get another opener on you
    • Make sure that you always have a Poison Cleansing Totem active and it will dispel the Blind from you almost immediately; leaving you free to re-engage
  • frostFrost Shock
    • Instant Cast, 20 yard range
    • High damage attack that slows your target's run speed to 50% for 8 seconds
  • Rogues in less than top gear should be dead
  • If the rogue is not dead, continue to strafe away from him or her while using Fire Nova Totem and Frost shock until s/he is

*Rogues can use Cloak of Shadows and Vanish at any point in the fight to get another opener on you. Stay within range of your Earthbind and Magma Totems for the duration of the fight and this will be much less of a problem

*Poison Cleanse Totem, accompanied by using Dispel Poison is very disruptive to a rogue. Use both of these liberally throughout the fight.

*Some rogues are able to do considerable damage to you before you are able to act. Save Nature's Swiftness for an instant cast Healing Wave on demand, and you will see tremendous results


View Step Details Shaman vs Shaman

shamanThe Shaman

Strategy

  • Start the fight with a Grounding Totem, Earthbind Totem, and Mana Spring Totem active
    • Grounding Totem will absorb one harmful spell every 10 seconds (if it absorbs a direct damage spell such as Earth Shock, it will die and you must drop a new one)
    • Earthbind Totem will snare the opposing shaman if he or she comes close to your melee range
  • earthIf the opposing shaman has dropped a Grounding Totem, kill it with an Earth Shock (rank 1)
    • Extremely low damage, but almost no mana cost
    • Kills the Grounding Totem
  • chainChain Lightning
    • 1.5 second cast, 36 yard range
    • Heavy damage effecting up to three targets
  • lightning boltLightning Bolt
    • 2 second cast, 36 yard range, high damage attack
    • Shaman will use Earth Shock as often as possible to interrupt spells you cast.
    • The Earth Shock interrupt is very short. Resume casting when the earth shock effect fades, and continue as planned
  • groundingRe-Drop Grounding Totem as soon as its cooldown finishes
    • Grounding Totem will absorb one harmful spell every 10 seconds (if it absorbs a direct damage spell such as Earth Shock, it will die and you must drop a new one)
  • Queue Auto Attack
    • Auto attacks add extra damage when the enemy is in melee range
    • Frostbrand Weapon effect is a very strong snare that will enable you to move out of range of the shaman
  • fire novaFire Nova Totem as soon as the enemy shaman is within range
    • Totem that inflicts moderate-high damage to all targets within a 10 yard radius
    • Does not do damage until 4 seconds after the totem is dropped
  • mastery + chainElemental Mastery, Chain Lightning
    • Elemental Mastry grants the Chain Lightning 100% critical strike chance
    • 1.5 second cast, 36 yard range
    • Heavy damage effecting up to three targets
  • swiftness + lightning boltNature's Swiftness (if you have not already used it during the fight to heal), Lightning Bolt
    • Instant Cast (because of Nature's Swiftness), 36 yard range, high damage attack
  • earthEarth Shock as the enemy shaman attempts to heal
    • Instant cast, 20 yard range
    • High damage attack that interrupts enemy spellcasts and prevents them from casting any further spells of that type for 2 seconds
  • lightning boltLightning Bolt
    • 2 second cast, 36 yard range, high damage attack
  • If you have managed to Earth Shock the shaman's heals, he or she should be dead
  • If the opposing shaman is not dead, continue to Chain Lightning/Lightning Bolt while you use Earth Shock to interrupt heals
  • The enemy shaman will die

*Shaman versus shaman battles can end very quickly or go on seemingly forever.
This all depends on the talent build of your opponent and how well you interrupt any heals he or she may cast. If you manage to get the other shaman below 50% health, unload with the Elemental Mastry, Chain Lightning and Nature's Swiftness Lightning Bolt combo. If needed you can follow up with an Earth Shock, and you should be able to burst the other shaman down before s/he gets a chance to heal.

*If you notice that your opponent is an Enhancement Shaman, using Earthbind, Frostbrand Weapon, and Frost Shock to stay out of his or her melee range while you do damage is a very effective way to avoid taking any heavy damage for the duration of the fight. Shamans in enhancement gear are also very poor healers, and you should win easily.


View Step Details Shaman vs Warlock

lockThe Warlock

Strategy

  • Begin the fight with a Grounding Totem, Tremor Totem, and Mana Spring totem active
    • Grounding Totem will absorb one harmful spell every 10 seconds (if it absoarbs a direct damage spell such as Shadow Bolt, it will die and you must drop a new one)
    • Tremor Totem emits periodic pulses which remove Fear effects from you; this is extremely disruptive to warlocks
  • mastery + chainElemental Mastry, Chain Lightning
    • Elemental Mastry grants the Chain Lightning 100% critical strike chance
    • 1.5 second cast, 36 yard range
    • Heavy damage effecting up to three targets
    • Warlocks will often use Death Coil and then Fear to start off the fight
    • Make sure you have a Grounding Totem down at the start of the fight, and always stand as close to your Tremor Totem as possible. If you do these two things, Fear should not be much of an issue
  • earthEarth Shock
    • Instant cast, 20 yard range
    • High damage attack that interrupts enemy spellcasts and prevents them from casting any further spells of that type for 2 seconds
  • lightning boltLightning Bolt
    • 2 second cast, 36 yard range, high damage attack
    • Some warlocks will use Curse of Tongues to slow your casting speed considerably
    • Unfortunatley there is no true counter to this. Continue as planned and be patient, you can still win the fight if you execute properly
  • lightning boltLightning Bolt
    • 2 second cast, 36 yard range, high damage attack
    • The warlock Felhunter Pet has an ability called Spell Lock, which can interrupt your spell cast, and prevent you from casting another spell for 8 seconds
    • If you notice that the warlock is using a Felhunter pet, heal yourself early and often. If you keep your health high, the warlock will not be able to kill you within the duration of the Spell Lock effect
  • earthEarth Shock
    • Instant cast, 20 yard range
    • High damage attack that interrupts enemy spellcasts and prevents them from casting any further spells of that type for 2 seconds
  • chainChain Lightning
    • 1.5 second cast, 36 yard range
    • Heavy damage effecting up to three targets
  • groundingRe-Drop Grounding Totem as soon as the cooldown finishes
    • Grounding Totem will absorb one harmful spell every 10 seconds (if it absorbs a direct damage spell such as Shadow Bolt, it will die and you must drop a new one)
  • lightning boltLightning Bolt
    • 2 second cast, 36 yard range, high damage attack
  • swiftness + chainNature's Swiftness (if you have not already used it in the fight to heal), Chain Lightning
    • Instant cast (because of Nature's Swiftness), 36 yard range
    • Heavy damage effecting up to three targets
  • The Warlock should be dead, or very close
  • If the warlock is not dead, Continue to drop Grounding Totem every cooldown and use your Earth Shock/Lightning Bolt to finish the job

*If a warlock is able to succesfully fear you, he or she can often kill you before the fear effect fades.
Make sure you always have a Tremor Totem in place and you are standing near it. In addition to this, use Earth Shock whenever the warlock casts fear to interrupt.

*Warlock DoT spells will be absorbed by your Grounding Totem but will not destroy it. Because of this, your Grounding Totem is EXTREMELY useful. You drop a grounding totem as often as possible every time you encounter a warlock.


View Step Details Shaman vs Warrior

orcThe Warrior

Strategy

  • Start the fight with a Grounding Totem, Earthbind Totem, and Mana Spring Totem active.
    • If the warrior uses Charge or Intercept while the Grounding Totem is active, s/he will run toward it instead of you. You will avoid the stun as well as the warrior entering melee range
    • Earthbind Totem keeps the warrior snared for the duration of the battle
  • chainChain Lightning as you turn on your Auto Attack
    • 1.5 second cast, 36 yard range
    • Heavy damage effecting up to three targets
    • Warriors will try to intercept during your spellcast to interrupt
    • The Grounding Totem you placed at the beginning of the fight will absorb the warrior's intercept, and you will be free to act
  • frostBegin to strafe away from the warrior while staying in your Earthbind Totem's range, Frost Shock
    • Instant Cast, 20 yard range
    • High damage attack that slows your target's run speed to 50% for 8 seconds
    • If the warrior manages to close to within 8 yards of you, he or she can use Intimidating Shout; which will cause you to stand in place for up to 8 seconds as s/he attacks
      • Intimidating Shout usually breaks on the first attack you recieve. The warrior will use Hamstring to attempt to keep you in melee range
    • After Hamstring is applied, you can use your PvP trinket to remove the snare effect and move to a safe distance from the warrior
  • fire novaContinue strafing, drop a Fire Nova Totem
    • Totem that inflicts moderate-high damage to all targets within a 10 yard radius
    • Does not do damage until 4 seconds after the totem is dropped
    • The warrior can switch targets and kill the totem
      • Note: Area of Effect attacks do not hit totems, so the warrior must actually target and attack the totem to kill it
    • Do not change your strategy, it may take slightly longer to kill the warrior, but the outcome of the battle should not change
  • frostFrost Shock, while continuing to strafe
    • Instant Cast, 20 yard range
    • High damage attack that slows your target's run speed to 50% for 8 seconds
    • The warrior PvP trinket removes Fear effects, he or she can use it here in an attempt to regain melee range with you
    • As long as you stay within range of your Earthbind Totem, the warrior will be snared again almost immediately
  • chainChain Lightning
    • 1.5 second cast, 36 yard range
    • Heavy damage effecting up to three targets
  • lightning boltLightning Bolt
    • 2 second cast, 36 yard range, high damage attack
    • During this spellcast the warrior will likely be able to attack you. He or she could use Pummel to interrupt you
    • Ignore this and continue as planned
  • frostFrost Shock
    • Instant Cast, 20 yard range
    • High damage attack that slows your target's run speed to 50% for 8 seconds
  • mastery + chainElemental Mastry, Chain Lightning
    • Elemental Mastry grants the Chain Lightning 100% critical strike chance
    • 1.5 second cast, 36 yard range
    • Heavy damage effecting up to three targets
  • fire novaFire Nova Totem
    • Totem that inflicts moderate-high damage to all targets within a 10 yard radius
    • Does not do damage until 4 seconds after the totem is dropped
  • swiftness + lightning boltNature's Swiftness Lightning Bolt (assuming you have not already used Nature's Swiftness to heal)
    • Instant Cast (because of Nature's Swiftness), 36 yard range, high damage attack
  • frostFrost Shock
    • Instant Cast, 20 yard range
    • High damage attack that slows your target's run speed to 50% for 8 seconds
  • The warrior should be dead
  • If the warrior is not dead, continue to Frost Shock, Chain Lightning and Lightning Bolt until he or she is

*After the warrior uses Intimidating Shout and the PvP trinket, there is no way for him or her to catch up to you. You can simply run away while using instant cast spells and the warrior will never be able to attack

*Heal early against warriors. If you reach 20% health they will be able to kill you very quickly. Try to keep yourself above at least 40% health at all times.


Warrior Strategies

View Step Details General Warrior Information

Overview

The warrior is a challenging class to play. At the same time, it is extremely rewarding and fun when played correctly. You will rely on your high pool of stamina along with your burst damage capability to outlast your opponent's damage and claim the battlefield as your own.


Warrior Strengths

High Stamina Pool
Huge Burst Damage Capability
Ability to crowd control up to 5 opponents for short periods of time
Area of effect damage lets you kill more than one enemy at a time


Warrior Weaknesses

Limited ability to remove movement impairing effects. If enemies are particularly adept at 'kiting', you may find yourself dead without even being able to touch them
No ranged damage capability


The Best all around PvP Talent Build

Mortal Strike Hybrid

This guide assumes that you:
Use Commanding Shout for every battle
Switch to Battle Stance, Overpower, and switch back to your previous stance any time an enemy dodges


How to read the strategy section

  • Ability to Use
    • Details about the ability and why you are using it
    • How enemies can counter
    • What to do if they counter

View Step Details Warrior vs Druid

druidThe Druid

Strategy

  • chargeCharge
    • Moves you into melee range with your enemy
    • Generates 15 rage
    • Some druids will try to prevent you from using Charge by using an instant cast spell (such as Moonfire) from a long range
    • Switch to Berserker Stance, Intercept, and continue as planned
  • hamstringHamstring, refresh this as needed throughout the battle
    • Low damage attack that slows your target's run speed to 50% of normal
    • Druids can shapeshift to remove all snare effects
    • Re-apply Hamstring immediately after the druid shapeshifts at all times during the fight
  • demoralDemoralizing Shout, refresh this as needed throughout the fight (unless the druid is in Moonkin Form)
    • Lowers your enemy's attack power by 420
    • Reduces the amount of physical damage you take considerably
  • beserkerSwitch to Berserker Stance
  • berserkrageBerserker Rage
    • Grants immunity to fear and incapacitate effects
    • Greatly increases the rage generated from damage you take
  • dwDeath Wish
    • Increases your damage dealt by 20%
    • Breaks all fear effects, and makes you immune to them
    • Increases damage taken by 5%
    • Lasts 30 seconds
  • msMortal Strike
    • Very high damage attack that lowers your target's healing taken by 50% for 10 seconds
    • Some druids will use Entangling Roots to hold you in place while they deal damage
    • Use your PvP trinket to remove the first root and continue attacking
    • If the druid attempts to root you again, use Intimidating Shout and wait for the root effect to fade
    • Any additional root spells the druid casts will last only a very short amount of time and should not disrupt your strategy
  • wwWhirlwind
    • High damage attack
    • Hits up to 4 enemies
    • When Feral Druids find themselves at low health, they will often use Bash to stun you and enable them to heal without interruption
    • Use your PvP trinket to remove the stun effect and Pummel the druid as s/he attempts to heal
    • Balance Druids may attempt to Cyclone you for the same effect as Bash
    • Use Pummel to interrupt the Cyclone cast, and kill the druid
  • ms + wwContinue to Mortal Strike and Whirlwind until the druid reaches low health
  • executeExecute until the druid dies
    • Very high damage attack
    • Usable on targets with less than 20% health
  • The Druid will die

*Most druids will try to beat you by healing often, and wearing you down slowly. Be sure to keep the Mortal Strike debuff on the druid at all times. With this debuff on, it is much harder for the druid to heal, and you will improve your chances of winning greatly.

*Try to stun the druid any time he or she shifts into Caster Form by using Intercept. Druids have much less armor in this form than others, and your attacks will hit a great deal harder.


View Step Details Warrior vs Hunter

hunterThe Hunter

Strategy

  • chargeCharge
    • Moves you into melee range with your enemy
    • Generates 15 rage
    • Hunters will sometimes try to shoot you before you enter Charge range. This puts you into combat and makes you unable to Charge
    • If this happens, equip your shield and a one-handed weapon and run towards the hunter
  • piercing_howlPiercing Howl
    • Reduces the movement speed of all enemies within 10 yards of the warrior to 50% of normal
    • Cannot be dodged, blocked, or parried
    • Hunters will often stand on a Freezing Trap. When you enter melee range, the trap will pop; leaving you unable to act for up to 12 seconds
    • When the Freezing Trap is broken, switch to Berserker Stance and Intercept
    • Re-apply Piercing Howl and continue as planned
  • demoralDemoralizing Shout, refresh this as needed throughout the fight
    • Lowers your enemy's attack power by 420
    • Reduces the amount of physical damage you take considerably
  • dwDeath Wish
    • Increases your damage dealt by 20%
    • Breaks all fear effects, and makes you immune to them
    • Increases damage taken by 5%
    • Lasts 30 seconds
  • msMortal Strike
    • Very high damage attack that lowers your target's healing taken by 50% for 10 seconds
    • When you enter melee range a second time, most hunters will use Scatter Shot in an attempt to move out of your melee range again
    • When the Scatter Shot effect fades, run towards the hunter and use Intimidating Shout to fear him or her for up to 8 seconds and allow you to re-engage
  • hamstringHamstring
    • Low damage attack that slows your target's run speed to 50% of normal
    • At this point, many hunters will use Wing Clip to limit your movement speed, and then use their PvP trinket to run out of your melee range
    • Use your own PvP trinket to remove the snare, and immediately use Piercing Howl
  • beserkerSwitch to Berserker Stance
  • berserkrageBerserker Rage
    • Grants immunity to fear and incapaciate effects
    • Greatly increases the rage generated from damage you take
  • wwWhirlwind
    • High damage attack
    • Hits up to 4 enemies
  • msMortal Strike
    • Very high damage attack that lowers your target's healing taken by 50% for 10 seconds
    • Some hunters will use Feign Death to make you drop your target and interrupt your attacks
    • Re-target the hunter and continue as planned
  • ww + msContinue to Whirlwind and Mortal Strike until the hunter reaches low health
  • executeExecute
    • Very high damage attack
    • Usable on targets with less than 20% health
  • The hunter will die

View Step Details Warrior vs Mage

trollThe Mage

Strategy

  • chargeCharge
    • Moves you into melee range with your enemy
    • Generates 15 rage
  • hamstringHamstring
    • Low damage attack that slows your target's run speed to 50% of normal
    • As soon as you enter melee range, most mages will Frost Nova, move out of your melee range, and cast Polymorph
    • Use your PvP trinket to remove the root effect, and Pummel as the mage casts Polymorph
      • You will interupt the Polymorph cast and prevent the mage from casting any arcane spells (Blink for example) for 4 seconds
  • beserkerSwitch to Berserker Stance
  • berserkrageBerserker Rage
    • Grants immunity to fear and incapacitate effects
    • Greatly increases the rage generated from damage you take
  • dwDeath Wish
    • Increases your damage dealt by 20%
    • Breaks all fear effects, and makes you immune to them
    • Increases damage taken by 5%
    • Lasts 30 seconds
  • msMortal Strike
    • Very high damage attack that lowers your target's healing taken by 50% for 10 seconds
    • The Pummel effect will wear off and the mage will Blink after you Mortal Strike
    • Intercept to regain melee range and stun the mage for 3 seconds
  • wwWhirlwind
    • High damage attack
    • Hits up to 4 enemies
  • msMortal Strike
    • Very high damage attack that lowers your target's healing taken by 50% for 10 seconds
    • The mage will be able to Frost Nova again, and will attempt to move out of your melee range
    • Use Intimidating Shout to fear the mage for the duration of the Frost Nova
    • The mage PvP trinket removes fear effects. If used here, the mage will be able to Polymorph you and bandage to regain health
    • You must wait for Polymorph to end and attempt to re-engage the mage
  • wwWhirlwind
    • High damage attack
    • Hits up to 4 enemies
  • The mage will be approaching death
  • executeExecute
    • Very high damage attack
    • Usable on targets with less than 20% health
  • The mage will die

*Mage is a very difficult matchup for you. The class has several ways to get away from you, and can deal large amounts of damage without you being able to enter melee range. Frost mages are especially tricky due to the addition of talents like Frostbite and Ice Block. Be patient and stick to the strategy, and you will increase your chances of winning dramatically.

*If the mage Ice Blocks at any time, immediately begin to bandage. The health you regain could very well turn a loss into a win.

*You will only be able to melee the mage for very short periods of time. Make the best of this time and unload as much damage as possible before the mage is able to move away from you.


View Step Details Warrior vs Paladin

pallyThe Paladin

Strategy

  • chargeCharge
    • Moves you into melee range with your enemy
    • Generates 15 rage
  • hamstringHamstring, refresh this as needed throughout the battle
    • Low damage attack that slows your target's run speed to 50% of normal
    • Many paladins will lead with Hammer of Justice, stunning you for 6 seconds
    • Use your PvP trinket to remove the stun and continue execution of your strategy
    • Paladins can use Blessing of Freedom to remove movement impairing effects, and become immune to any further snares for a period of time
    • Continue as planned, the paladin will not try to run away from you and you will still be able to attack
  • demoralDemoralizing Shout, refresh this as needed for the duration of the fight
    • Lowers your enemy's attack power by 420
    • Reduces the amount of physical damage you take considerably
  • beserkerSwitch to Berserker Stance
  • berserkrageBerserker Rage
    • Grants immunity to fear and incapacitate effects
    • Greatly increases the rage generated from damage you take
  • dwDeath Wish
    • Increases your damage dealt by 20%
    • Breaks all fear effects, and makes you immune to them
    • Increases damage taken by 5%
    • Lasts 30 seconds
  • msMortal Strike
    • Very high damage attack that lowers your target's healing taken by 50% for 10 seconds
  • wwWhirlwind
    • High damage attack
    • Hits up to 4 enemies
  • Run away from the paladin until you are in range of Intercept
  • interceptIntercept
    • Moves you into melee range with your opponent
    • Stuns the target for 3 seconds
    • The paladin PvP trinket removes stun effects
    • Ignore this and continue as planned
  • msMortal Strike
    • Very high damage attack that lowers your target's healing taken by 50% for 10 seconds
  • wwWhirlwind
    • High damage attack
    • Hits up to 4 enemies
  • The Paladin will Divine Shield (unless it is on cooldown)
  • Move away from the paladin and begin to bandage
    • Enables you to regenerate health while the paladin heals
    • Doing this can greatly increase your chances of victory
  • ms + wwContinue to Mortal Strike and Whirlwind until the paladin is near death
  • executeExecute
    • Very high damage attack
    • Usable on targets with less than 20% health
  • The paladin will die

*Paladins will rely on their healing capabilities to stay alive while they slowly wear you down. Use Pummel as often as possible to interrupt heal casts and make sure that the Mortal Strike debuff is always on the paladin. If you do both of these things, you will emerge from the battle victorious the majority of the time.

*If the paladin uses Repentance and attempts to heal, use Berserker Rage to remove the incapacitate effect and re-engage.


View Step Details Warrior vs Priest

priestThe Priest

Strategy

  • chargeCharge
    • Moves you into melee range with your enemy
    • Generates 15 rage
    • Many priests will attempt to use an instant cast spell on you before you are in range; putting you into combat and preventing you from charging
    • Switch to Berserker Stance and Intercept; continue as planned
  • dwDeath Wish
    • Increases your damage dealt by 20%
    • Breaks all fear effects, and makes you immune to them
    • Increases damage taken by 5%
    • Lasts 30 seconds
  • hamstringHamstring
    • Low damage attack that slows your target's run speed to 50% of normal
  • beserkerSwitch to Berserker Stance
  • msMortal Strike
    • Very high damage attack that lowers your target's healing taken by 50% for 10 seconds
  • wwWhirlwind
    • High damage attack
    • Hits up to 4 enemies
  • Run away from the priest until you are in range to Intercept
  • interceptIntercept
    • Moves you into melee range with your opponent
    • Stuns the target for 3 seconds
    • The preist PvP trinket removes stun effects
    • Ignore this and continue execution of your strategy
  • ms Strike
    • Very high damage attack that lowers your target's healing taken by 50% for 10 seconds
  • wwWhirlwind
    • High damage attack
    • Hits up to 4 enemies
  • executeExecute
    • Very high damage attack
    • Usable on targets with less than 20% health
  • The priest will die

*The priest's only real defense is Psychic Scream. This is nullified by Death Wish and Berserker Rage, leaving you free and clear to demolish the priest.

* Many priests will attempt to heal throughout the fight. Pummel as often as possible, and make sure the Mortal Strike debuff is on the priest for the duration of the battle. You will find yourself winning the vast majority of battles against priests if you do these two things and stick to the proper execution of this strategy


View Step Details Warrior vs Rogue

rogueThe Rogue

Strategy

  • defensiveBegin the battle in Defensive Stance, with a one-handed weapon and shield equipped
    • The rogue will try to do as much damage as possible within his or her opening series of attacks. By using a shield in defensive stance, you greatly reduce the damage you take, and increase your chances of winning.
  • demoralWhen the rogue is visable and you are able to act, Demoralizing Shout
    • Lowers your enemy's attack power by 420
    • Reduces the amount of physical damage you take considerably
  • piercing_howlPiercing Howl
    • Reduces the movement speed of all enemies within 10 yards of the warrior to 50% of normal
    • Cannot be dodged, blocked, or parried
  • beserkerSwitch to Berserker Stance while equipping your two-handed weapon
  • dwDeath Wish
    • Increases your damage dealt by 20%
    • Breaks all fear effects, and makes you immune to them
    • Increases damage taken by 5%
    • Lasts 30 seconds
  • msMortal Strike
    • Very high damage attack that lowers your target's healing taken by 50% for 10 seconds
    • The rogue can use Evasion to dodge most of your attacks for 15 seconds
    • Use your PvP trinket to remove Crippling Poison and strafe away from the rogue. Cast Piercing Howl every few seconds while doing this to prevent the rogue from dropping out of combat and restealthing
  • hamstringHamstring
    • Low damage attack that slow's your target's run speed to 50% of normal
    • The rogue can Vanish to remove hamstring and get another opener on you
    • As soon as the rogue uses Vanish, begin to chain cast Piercing Howl. If the rogue is within 10 yards of you, you will remove his stealth and snare him at the same time.
  • wwWhirlwind
    • High damage attack
    • Hits up to 4 enemies
    • When you begin to attack the rogue, s/he will often use Gouge to incapacitate you and try to run away and restealth
    • Use Berserker Rage to remove the Gouge effect, and Intercept the rogue
  • msMortal Strike
    • Very high damage attack that lowers your target's healing taken by 50% for 10 seconds
  • wwWhirlwind
    • High damage attack
    • Hits up to 4 enemies
  • executeExecute
    • Very high damage attack
    • Usable on targets with less than 20% health
    • When the rogue reaches low health, he or she may use Blind to render you unable to act for 10 seconds while s/he bandages, restealths and gets another opener
    • When you are able to act, use Intimidating Shout to fear the rogue for up to 8 seconds and begin to bandage yourself
    • The rogue can use his or her PvP trinket to break the fear and re-engage you
    • Even if the rogue does this, you will still be able to regain about 1200 health from the badage at a minimum. Begin to Mortal Strike and Whirlwind the rogue again until you are again able to Execute
  • The rogue will die

*At any point in the battle, the rogue can use Cloak of Shadows and Vanish to get a second opener on you. Be prepared for this by being ready to bandage. When you see the rogue use Cloak of Shadows, you will have a few seconds with which you can bandage to regain health; and increase your chances of winning the fight.

*You must be able to outlast the rogue's damage in order to win. Do not rely on crits to try to 2 shot the rogue, it just wont work in some cases. Use Commanding Shout, Bandage when needed, and start out with a Shield equipped every single time.

*Rogues dodge more than any other class. Make absolutely sure that you use Overpower as often as possible to remove large chunks of the rogues health and secure the win.


View Step Details Warrior vs Shaman

shamanThe Shaman

Strategy

  • chargeCharge
    • Moves you into melee range with your enemy
    • Generates 15 rage
    • Very rarely, shamans will use Grounding Totem to prevent you from charging into melee range
    • Charge anyway to generate rage, and then run toward the shaman
  • piercing_howlPiercing Howl
    • Reduces the movement speed of all enemies within 10 yards of the warrior to 50% of normal
    • Cannot be dodged, blocked, or parried
  • demoralDemoralizing Shout, refresh this as needed throughout the fight
    • Lowers your enemy's attack power by 420
    • Reduces the amount of physical damage you take considerably
  • beserkerSwitch to Berserker Stance
  • hamstringHamstring, refresh this as needed throughout the battle
    • Low damage attack that slows your target's run speed to 50% of normal
    • The shaman PvP trinket removes movement impairing effects. He or she can use it here and attempt to run out of your melee range
    • Piercing Howl has a longer range than Hamstring. If you use it immediately, you will be able to snare the shaman again and resume attacking
  • berserkrageBerserker Rage
    • Grants immunity to fear and incapacitate effects
    • Greatly increases the rage generated from damage you take
  • dwDeath Wish
    • Increases your damage dealt by 20%
    • Breaks all fear effects, and makes you immune to them
    • Increases damage taken by 5%
    • Lasts 30 seconds
  • msMortal Strike
    • Very high damage attack that lowers your target's healing taken by 50% for 10 seconds
  • wwWhirlwind
    • High damage attack
    • Hits up to 4 enemies
  • Run away from the shaman until you are in range of Intercept
  • interceptIntercept
    • Moves you into melee range with your opponent
    • Stuns the target for 3 seconds
    • The shaman will be low on health at this point, and may use Nature's Swiftness to cast a large heal
    • Make sure the Mortal Strike debuff is always on the shaman. This will cut all healing effects in half, and make it much easier to dispatch your foe
  • msMortal Strike
    • Very high damage attack that lowers your target's healing taken by 50% for 10 seconds
  • wwWhirlwind
    • High damage attack
    • Hits up to 4 enemies
  • The shaman will be approaching low health
  • executeExecute
    • Very high damage attack
    • Usable on targets with less than 20% health
  • The shaman will die

*Shamans will often attempt to heal multiple times throughout the fight. Use Pummel to interrupt as many heals as possible, keep Mortal Strike up at all times, and use Intimidating Shout to interrupt the shaman's spellcasting if Pummel is on cooldown. If you execute all of these things properly, you will absolutely destroy the great majority of shaman you come in contact with.


View Step Details Warrior vs Warlock

gnomeThe Warlock

Strategy

  • chargeCharge
    • Moves you into melee range with your enemy
    • Generates 15 rage
    • Warlock spells have a slightly longer range than your charge. They can somtimes use an instant cast spell to put you in combat and prevent you from charging
    • Switch to Berserker Stance and Intercept if this happens. Once in melee range, continue as planned.
  • dwDeath Wish
    • Increases your damage dealt by 20%
    • Breaks all fear effects, and makes you immune to them
    • Increases damage taken by 5%
    • Lasts 30 seconds
  • hamstringHamstring, re-apply this as needed throughout the fight
    • Low damage attack that slows your target's run speed to 50% of normal
    • When you enter melee range, most warlocks will use Death Coil. This causes you to flee in terror for 2 seconds (even if you have Death Wish active) and enables the warlock to get out of your melee range
    • If you have not already used Intercept, use it now and re-engage the warlock
    • If you were forced to use Intercept already, run toward the warlock and cast Intimidating Shout when in range. You will be able to re-establish melee range and resume attacking.
  • ssSweeping Strikes
    • Causes your next 5 attacks to hit an additional target
    • Will increase your damage output against the warlock AND his or her pet
  • msMortal Strike
    • Very high damage attack that lowers your target's healing taken by 50% for 10 seconds
  • beserkerSwitch to Berserker Stance
  • wwWhirlwind
    • High damage attack
    • Hits up to 4 enemies
  • msMortal Strike
    • Very high damage attack that lowers your target's healing taken by 50% for 10 seconds
  • wwWhirlwind
    • High damage attack
    • Hits up to 4 enemies
  • msMortal Strike
    • Very high damage attack that lowers your target's healing taken by 50% for 10 seconds
    • When Death Wish fades, the warlock can potentially use Fear to crowd control you while s/he does damage
    • Use Berserker Rage to break the fear as soon as possible and re-engage the warlock
  • executeExecute
    • Very high damage attack
    • Usable on targets with less than 20% health
  • The warlock will die

*Once the warlock has used Death Coil, s/he is defensesless against you. Unload as much damage as possible as soon as you re-enter melee range, and you will find you are extremely successful against warlocks in most situations.


View Step Details Warrior vs Warrior

orcThe Warrior

Strategy

  • chargeCharge as soon as you are in range
    • Moves you into melee range with your enemy
    • Generates 15 rage
    • The opposing warrior can potentially charge before you are able; preventing you from doing so
    • Turn on auto attack and continue as planned. You will have less rage at the start but should not change your strategy
  • dwDeath Wish
    • Increases your damage dealt by 20%
    • Breaks all fear effects, and makes you immune to them
    • Increases damage taken by 5%
    • Lasts 30 seconds
  • demoralDemoralizing Shout
    • Lowers your enemy's attack power by 420
    • Reduces the amount of physical damage you take considerably
  • hamstringHamstring, re-apply as needed throughout the battle
    • Low damage attack that slow's your target's run speed to 50% of normal
    • The enemy warrior can his his or her PvP trinket to remove the snare, and Intercept; stunning you for 3 seconds
    • Use Piercing Howl immediately to re-snare the warrior and move back into melee range
  • beserkerSwitch to Berserker Stance
  • berserkrageBerserker Rage
    • Grants immunity to fear and incapacitate effects
    • Greatly increases the rage generated from damage you take
  • msMortal Strike
    • Very high damage attack that lowers your target's healing taken by 50% for 10 seconds
  • wwWhirlwind
    • High damage attack
    • Hits up to 4 enemies
  • Run away from the warrior, until you are in range of Intercept
  • interceptIntercept
    • Moves you into melee range with your opponent
    • Stuns the target for 3 seconds
  • msMortal Strike
    • Very high damage attack that lowers your target's healing taken by 50% for 10 seconds
  • wwWhirlwind
    • High damage attack
    • Hits up to 4 enemies
  • executeExecute
    • Very high damage attack
    • Usable on targets with less than 20% health
  • The warrior will die

*Warrior versus warrior battles are typically over within a very short amount of time. Luck and gear play a large role in this matchup, but you can greatly improve your chances of winning by sticking to the strategy and executing properly.

*Make sure Demoralizing Shout and Hamstring are in effect against the enemy warrior at all times. The use of these two abilities greatly increases your chance to win.


Warlock Strategies

View Step Details General Warlock Information

Overview

In the game's current state, the Warlock is one of the most powerful classes in a player versus player situation. You have the ability to do heavy damage through the use of DoT as well as direct damage spells. You also have a pet which, when used properly, greatly increases your effectiveness on the battlefield.


Warlock Strengths

Warlocks have many instant cast damage over time abilities that can be used while running to effectively 'kite' opposing players. Warlocks also have one of the best forms of PvP crowd control, and a pet that does good damage.


Warlock Weaknesses

Players that are able to break fear and/or remove the warlocks various damage over time spells prove to be very difficult for the warlock to kill


The Best all around PvP Talent Build

Affliction Hybrid

Pet Choice:
Felhunter


How to read the strategy section

  • Ability to Use
    • Details about the ability and why you are using it
    • How enemies can counter
    • What to do if they counter

It is assumed within this guide that you will cast Shadow Bolt for extra damage whenever Nightfall procs, and that you will use a Healthstone whenever low on health.


View Step Details Warlock vs Druid

druidThe Druid

Strategy

  • corruptionCorruption at the same time you deploy your pet
    • Instant cast, heavy damage over 18 seconds
  • spell lockIf the druid attempts to use any non-instant cast spell, use your Felhunter's Spell Lock ability
    • If you use this ability while the druid is casting, it will lock down the majority of his or her spells for 8 seconds
    • Very disruptive to your opposition
  • siphonSiphon Life
    • Instant cast, moderate damage over 30 seconds
  • fearFear
    • 1.5 second cast, causes the target to run in fear for up to 12 seconds
    • If the druid is in caster form, he or she can use the PvP trinket to break the fear. Druids in feral form cannot use the trinket and are easy to kill
    • Do not alter strategy
  • uaUnstable Affliction
    • 1.5 second cast, heavy damage over 18 seconds, damages and silences anyone attempting to dispel
  • fearFear again when the first wears off
    • 1.5 second cast, causes the target to run in fear for up to 6 seconds
    • If the druid remains un-feared for any period of time, he or she will use Health over Time spells to heal
    • Use your Felhunter's Devour Magic ability to remove HoT's as they are cast
  • amp curse + coaAmplify Curse, Curse of Agony
    • Instant cast, extremely heavy damage (because of Amplify Curse) over 24 seconds
  • immoliateImmolate
    • 1.5 second cast, small initial damage, moderate DoT
  • Refresh instant cast DoT's as needed
  • sboltShadow Bolt
    • 2.5 second cast, heavy direct-damage
  • drain lifeDrain Life as needed
    • Channeled spell that deals moderate-heavy damage and heals you for all damage dealt
  • sburnShadowburn when he or she reaches low health
    • Instant cast, moderate direct-damage, excellent finishing move
    • Requires a soul shard to cast, but the soul shard will be returned if the target dies within 5 seconds of the Shadowburn
  • The Druid will be dead, even in top gear

*Druids do not have many counters to your attacks and are generally easy for you to kill.


View Step Details Warlock vs Hunter

hunterThe Hunter

Strategy

  • This is a very easy matchup for you
    • Hunters have absolutely no way to break fear, meaning you win unless they are very lucky
  • amp curse + coaBegin running toward the hunter while casting an Amplify Curse, Curse of Agony and deploying your pet
    • The hunter will try to run away while shooting at you
    • Even if you do not manage to get into melee range with the hunter, you will lower the amount of damage s/he outputs because s/he cannot auto shot while running
    • Curse of Agony is instant cast, extremely heavy damage (because of Amplify Curse) over 24 seconds
  • corruptionCorruption
    • Instant cast, heavy damage over 18 seconds
  • siphonSiphon Life
    • Instant cast, moderate damage over 30 seconds
  • lolcoilDeath Coil
    • Instant cast, moderate direct-damage spell that heals you for all damage it deals, and causes the target to run in terror for 3 seconds
    • You wait until now to use it because you will be missing some health. If you lead with Death Coil, the heal effect is wasted since you already have full health
  • fearFear
    • 1.5 second cast, causes the target to run in fear for up to 12 seconds
    • Some hunters will try to use Feign Death or Scatter Shot to interrupt your Fear cast.
    • Make sure you fear immediately after you use Death Coil, and the hunter will not be able to counter in any way
  • uaUnstable Affliction
    • 1.5 second cast, heavy damage over 18 seconds, damages and silences anyone attempting to dispel
  • Refresh DoT's as they fade
  • drain lifeDrain Life
    • Channeled spell that deals moderate-heavy damage and heals you for all damage dealt
  • sburnShadowburn when he or she reaches low health
    • Instant cast, moderate direct-damage, excellent finishing move
    • Requires a soul shard to cast, but the soul shard will be returned if the target dies within 5 seconds of the Shadowburn
  • fearFear again if the hunter is still alive when it breaks
  • The hunter will die, even in top gear

*The only real threat a hunter has is Silencing Shot. This attack is only a 3 second silence, however, and has a long cooldown. If you find yourself low on health after a Silencing Shot, simply Healthstone and continue killing the hunter.


View Step Details Warlock vs Mage

trollThe Mage

Strategy

  • amp curse + coaAmplify Curse, Curse of Agony while you deploy your pet
    • Instant cast, extremely heavy damage (because of Amplify Curse) over 24 seconds
    • Some mages will dispel themselves
    • Do not change your strategy, it will just take slightly longer to kill the mage
  • spell lockIf the mage attempts to use any non-instant cast spell, use your Felhunter's Spell Lock ability
    • If you use this ability while the mage is casting, it will lock down the majority of his or her spells for 8 seconds
    • Very disruptive to your opposition
  • corruptionCorruption
    • Instant cast, heavy damage over 18 seconds
  • siphonSiphon Life
    • Instant cast, moderate damage over 30 seconds
  • The majority of mages will try to close to melee range so they can Frost Nova/use short range spells
  • howlHowl of Terror
    • Instant cast area of effect fear, affects up to 5 enemies
    • Gives you time to cast Unstable Affliction without being interrupted by Counterspell
    • Frost mages will often use Ice Block, removing all debuffs
    • Repeat the first four steps of the strategy (without Amplify Curse of course)
    • After the Ice Block, the mage will often cast Polymorph
    • Use your Felhunter's Devour Magic ability to remove the Polymorph effect
    • Some mages will cast Polymorph again
    • Use your PvP trinket and continue execution of your strategy
  • uaUnstable Affliction
    • 1.5 second cast, heavy damage over 18 seconds, damages and silences anyone attempting to dispel
  • Refresh Instant-Cast DoT's as they fade
    • Stick to instant casts to prevent interruption from the mage's Counterspell
  • Mages without Ice Block will be approaching death
  • sburnShadowburn when he or she reaches low health
    • Instant cast, moderate direct-damage, excellent finishing move
    • Requires a soul shard to cast, but the soul shard will be returned if the target dies within 5 seconds of the Shadowburn
  • Mages with Ice Block will still be alive and probably at high health, Continue the application of instant cast DoTs
  • fearFear
    • 1.5 second cast, causes the target to run in fear for up to 12 seconds
    • The mage will break this fear with either Will of the Forsaken or the PvP trinket
    • Do not alter your strategy. The point of this Fear was not to crowd control the mage, but to provide you time to cast Unstable Affliction without interruption
  • uaRe-cast Unstable Affliction
    • 1.5 second cast, heavy damage over 18 seconds, damages and silences anyone attempting to dispel
  • lolcoilIf needed, Death Coil
    • Instant cast, moderate direct-damage spell that heals you for all damage it deals, and causes the target to run in terror for 3 seconds
    • It is possible for the mage to use Ice Block again to remove all debuffs
    • Re-apply DoT's and use Healthstone to heal if needed
  • immoliateImmolate
    • 1.5 second cast, small initial damage, moderate DoT
    • Even if the mage uses Counterspell, you will still be able to cast shadow based spells (which are the majority of your damage)
  • sburnShadowburn when he or she reaches low health
    • Instant cast, moderate direct-damage, excellent finishing move
    • Requires a soul shard to cast, but the soul shard will be returned if the target dies within 5 seconds of the Shadowburn
  • Even Ice Block Mages with top gear should be dead

*Non Ice Block mages are generally very easy and cannot counter most of your abilities. Battles with Ice Block mages can take much longer, but you should still come out on top if you properly execute your strategy


View Step Details Warlock vs Paladin

pallyThe Paladin

Strategy

  • amp curse + coaAmplify Curse, Curse of Agony while you deploy your pet
    • Instant cast, extremely heavy damage (because of Amplify Curse) over 24 seconds
  • spell lockIf the paladin attempts to use any non-instant cast spell, use your Felhunter's Spell Lock ability
    • If you use this ability while the paladin is casting, it will lock down the majority of his or her spells for 8 seconds
    • Very disruptive to your opposition
  • uaUnstable Affliction
    • 1.5 second cast, heavy damage over 18 seconds, damages and silences anyone attempting to dispel
    • This will prevent the Paladin from using Cleanse to remove your other DoT abilities
  • Begin moving away from the paladin
    • Paladin attacks have very short range, stay away from him and he won't be able to touch you
  • corruptionCorruption
    • Instant cast, heavy damage over 18 seconds
  • siphonSiphon Life
    • Instant cast, moderate damage over 30 seconds
  • Continue moving away from the paladin, refreshing instant cast DoT's as needed
    • The paladin will be forced to use Divine Shield
    • The paladin may try to save Divine Shield and simply spam heals until DoT's wear off
    • Simply re-apply DoT spells until the paladin runs low on mana and is forced to use Divine Shield
  • When the paladin uses Divine Shield, maintain a safe distance but take no action
  • fearWhen Divine Shield fades, Fear
    • 1.5 second cast, causes the target to run in fear for up to 12 seconds
    • The paladin PvP trinket removes Fear, he or she may use it here and run towards you
    • Do not alter your strategy, the paladin cannot kill you if you continue to kite
  • uaUnstable Affliction
    • 1.5 second cast, heavy damage over 18 seconds, damages and silences anyone attempting to dispel
    • This will prevent the Paladin from using Cleanse to remove your other DoT abilities
  • coaCurse of Agony
    • Instant cast, heavy damage over 24 seconds
  • corruptionCorruption
    • Instant cast, heavy damage over 18 seconds
  • siphonSiphon Life
    • Instant cast, moderate damage over 30 seconds
  • fearWhen Fear breaks, Fear again
    • 1.5 second cast, causes the target to run in fear for up to 6 seconds
  • sboltShadow Bolt
    • 2.5 second cast, heavy direct-damage
  • sburnShadowburn when he or she reaches low health
    • Instant cast, moderate direct-damage, excellent finishing move
    • Requires a soul shard to cast, but the soul shard will be returned if the target dies within 5 seconds of the Shadowburn
  • The paladin will die

*If the paladin ever closes to within 10 yards, he or she can stun you for 6 seconds with Hammer of Justice.
When the stun fades use Death Coil and continue where you left off. If the paladin managed to bring you to low health within this time period, use a Healthstone


View Step Details Warlock vs Priest

priestThe Priest

Strategy

  • swardUse Shadow Ward, and continue to use it every time it is off of cooldown during the fight
    • Absorbs a considerable amount of the priest's damage
    • Can turn a losing battle into a win
  • amp curse + coaAmplify Curse, Curse of Agony while you deploy your pet
    • Instant cast, extremely heavy damage (because of Amplify Curse) over 24 seconds
  • spell lockIf the priest attempts to use any non-instant cast spell, use your Felhunter's Spell Lock ability
    • If you use this ability while the priest is casting, it will lock down the majority of his or her spells for 8 seconds
    • Very disruptive to your opposition
  • uaUnstable Affliction
    • 1.5 second cast, heavy damage over 18 seconds, damages and silences anyone attempting to dispel
    • This will prevent the Paladin from using Cleanse to remove your other DoT abilities
  • Begin running away from the priest
    • Priests will usually attempt to run into melee range so they can Fear you
    • If you do not run fast enough, and the priest does fear you, PvP trinket
  • corruptionCorruption
    • Instant cast, heavy damage over 18 seconds
  • siphonSiphon Life
    • Instant cast, moderate damage over 30 seconds
  • fearFear
    • 1.5 second cast, causes the target to run in fear for up to 12 seconds
  • sboltShadow Bolt
    • 2.5 second cast, heavy direct-damage
  • uaUnstable Affliction (even if it has not worn off yet)
    • 1.5 second cast, heavy damage over 18 seconds, damages and silences anyone attempting to dispel
    • This will prevent the priest from removing your other DoT abilities
  • Refresh instant cast DoT's as needed
  • fearFear again when it breaks
    • 1.5 second cast, causes the target to run in fear for up to 6 seconds
  • sburnShadowburn when he or she reaches low health
    • Instant cast, moderate direct-damage, excellent finishing move
    • Requires a soul shard to cast, but the soul shard will be returned if the target dies within 5 seconds of the Shadowburn
  • The Priest should be dead
  • If the Priest is not dead, continue refreshing DoT spells as needed until he or she is

*Often, priests will attempt to heal throughout the fight.
Use Fear, Death Coil, your Felhunter's Spell Lock ability, and Howl of Terror to interrupt.

*Priests will continually use Power Word:Shield, and Renew in an attempt to heal.
Use your Felhunter's Devour Magic ability to remove these from the priest as they are cast


View Step Details Warlock vs Rogue

rogueThe Rogue

Strategy

  • paranoiaEven if a rogue is in stealth, you will often be able to see them as they approach because of your Felhunter's Paranoia ability
    • Paranoia greatly increases stealth detection
    • You should be able to see the rogue well before s/he is able to melee you
  • coeThe moment you see the rogue, cast Curse of Exhaustion and begin to run away
    • Instant cast, ranged snare
    • Will pull the rogue out of stealth, s/he will be unable to get an opener on you
  • corruptionWhile running away, cast Corruption
    • Instant cast, heavy damage over 18 seconds
  • siphonSiphon Life
    • Instant cast, moderate damage over 30 seconds
    • Many rogues will use Cloak of Shadows to remove all debuffs and then Vanish to get an opener on you
    • Do not alter your strategy, even if the rogue lands a cheap shot you should come out of the stunlock before dying. Mash the Death Coil button and you will be able to turn the battle back into your favor
  • lolcoilThe rogue will be within melee range again, Use Death Coil
    • Instant cast, moderate direct-damage spell that heals you for all damage it deals, and causes the target to run in terror for 3 seconds
    • If the rogue used Cloak of Shadows but did not Vanish and runs into melee range, the Cloak will cause them to resist your Death Coil
    • Make sure that Cloak of Shadows fades before you attempt to use Death Coil
  • uaUnstable Affliction
    • 1.5 second cast, heavy damage over 18 seconds, damages and silences anyone attempting to dispel
  • fearFear
    • 1.5 second cast, causes the target to run in fear for up to 12 seconds
    • Most rogues will use their PvP trinket to break your fear and run back towards you
    • The rogue can only break fear once, unless they are undead. Simply cast Fear again and continue the execution of your strategy
    • If the rogue is undead, he or she will have the Will of the Forsaken ability, which will enable the breaking of a second fear
    • Use an Amplify Curse, Curse of Exhaustion while running away instead of Curse of Agony in the next step
      • You will likely have Crippling Poison on you and the rogue will attempt to re-enter melee range. Your Curse of Exhaustion will prevent this and enable you to maintain a safe distance from the rogue
      • If he still manages to get within melee range, use your Instant Howl of Terror
        • The rogue will be feared for at least a few seconds, giving you time to escape
  • amp curse + coaBegin running away, Amplify Curse, Curse of Agony
    • Instant cast, extremely heavy damage (because of Amplify Curse) over 24 seconds
  • corruptionCorruption
    • Instant cast, heavy damage over 18 seconds
  • siphonSiphon Life
    • Instant cast, moderate damage over 30 seconds
  • Rogues without very high health will die from your damage over time spells
  • sburnShadowburn when he or she reaches low health
    • Instant cast, moderate direct-damage, excellent finishing move
    • Requires a soul shard to cast, but the soul shard will be returned if the target dies within 5 seconds of the Shadowburn
  • If the rogue is not dead, continue to run away while refreshing your damage over time spells and casting Shadow Bolt

*Rogues have many ways to re-enter your melee range. Make sure you maintain a safe distance and employ Curse of Exhaustion as needed. If a rogue manages to engage in melee combat and you are unable to escape, Keep your DoT's up, Use Drain Life to heal while damaging him, and use your Healthstone if needed. You should win this matchup the great majority of the time.

*Make sure you do not attempt to Death Coil at any point where the rogue is under the effects of Cloak of Shadows. S/he will simply resist it and you will have wasted one of your most powerful tools.


View Step Details Warlock vs Shaman

shamanThe Shaman

Strategy

  • felhunterDeploy your pet to kill any Grounding Totem/Tremor Totem the shaman has placed
    • Grounding Totems will absoarb damage spells you cast upon the shaman. They only have 5 health, however, and will die in one hit from your pet
    • Tremor Totems break any fear spell placed upon the shaman. They have only 5 health, however, and will die in one hit from your pet
  • amp curse + coaWhile maintaining a safe distance from the shaman, Amplify Curse, Curse of Agony
    • Regardless of talent build, shamans will try to close to near melee range since many of their most powerful spells have less than a 20 yard range
    • Use your range advantage by staying 30 yards or further from the shaman
  • corruptionCorruption
    • Instant cast, heavy damage over 18 seconds
  • siphonSiphon Life
    • Instant cast, moderate damage over 30 seconds
  • fearFear
    • 1.5 second cast, causes the target to run in fear for up to 12 seconds
    • If the shaman managed to close within 20 yards during your cast, he or she will Earth Shock to interrupt the Fear
    • Death Coil
      • Instant cast, moderate direct-damage spell that heals you for all damage it deals, and causes the target to run in terror for 3 seconds
    • Unstable Affliction
      • 1.5 second cast, heavy damage over 18 seconds, damages and silences anyone attempting to dispel
      • If you cast this now, do not cast it again as the next step dictates. Begin casting Immolate.
    • Re-Cast Fear
      • 1.5 second cast, causes the target to run in fear for up to 12 seconds
  • uaUnstable Affliction
    • 1.5 second cast, heavy damage over 18 seconds, damages and silences anyone attempting to dispel
  • immoliateImmolate
    • 1.5 second cast, small initial damage, moderate DoT
  • Refresh instant cast DoT's as they expire
  • sboltShadow Bolt
    • 2.5 second cast, heavy direct-damage
  • fearIf the shaman is still alive when Fear breaks, Fear again
    • 1.5 second cast, causes the target to run in fear for up to 6 seconds
  • sboltShadow Bolt
    • 2.5 second cast, heavy direct-damage
  • sburnShadowburn when he or she reaches low health
    • Instant cast, moderate direct-damage, excellent finishing move
    • Requires a soul shard to cast, but the soul shard will be returned if the target dies within 5 seconds of the Shadowburn
  • The shaman will die

*Good shaman will continually re-drop Grounding Totems as the cooldown permits. Make sure to kill these totems with your pet before casting another spell

*The shaman will try to heal when s/he has low health, use your Felhunter's Spell Lock ability to interrupt the heal and prevent another heal from landing for at least 8 seconds


View Step Details Warlock vs Warlock

lockThe Warlock

Strategy

  • swardUse Shadow Ward, and continue to use it every time it is off of cooldown during the fight
    • Absorbs a considerable amount of the enemy warlock's damage
    • Can turn a losing battle into a win
  • amp curse + coaAmplify Curse, Curse of Agony while you deploy your pet
    • Instant cast, extremely heavy damage (because of Amplify Curse) over 24 seconds
  • spell lockIf the enemy warlock attempts to use any non-instant cast spell, use your Felhunter's Spell Lock ability
    • If you use this ability while the warlock is casting, it will lock down the majority of his or her spells for 8 seconds
    • Very disruptive to your opposition
  • banishBanish the opposing warlock's pet
    • Felhunters will often resist the banish, but any other type of pet will be put out of commission for the duration of the battle
    • Many opposing warlocks will use Death Coil at the start of the battle, followed by a Fear
    • Your Shadow Ward will absorb the damage of the Death Coil
    • Use your Felhunter's Devour Magic ability to remove the fear from yourself
    • Some warlocks will cast Fear again
    • Use your PvP trinket to remove Fear and continue execution of your strategy
    • Occasionally warlocks will cast Fear again
    • If you are Undead you can use Will of the Forsaken; otherwise simply ignore the fear, it will last only a few seconds
  • corruptionCorruption
    • Instant cast, heavy damage over 18 seconds
  • siphonSiphon Life
    • Instant cast, moderate damage over 30 seconds
  • fearFear
    • 1.5 second cast, causes the target to run in fear for up to 12 seconds
    • The enemy warlock will break this Fear more often than not
    • Do not change your strategy, the point of this Fear was not to crowd control the other warlock, but simply to buy you time to cast your non-instant spells
  • uaUnstable Affliction
    • 1.5 second cast, heavy damage over 18 seconds, damages and silences anyone attempting to dispel
  • immoliateImmolate
    • 1.5 second cast, small initial damage, moderate DoT
  • drain lifeDrain Life
    • Channeled spell that deals moderate-heavy damage and heals you for all damage dealt
  • Refresh DoT's as they fade
  • sburnShadowburn when he or she reaches low health
    • Instant cast, moderate direct-damage, excellent finishing move
    • Requires a soul shard to cast, but the soul shard will be returned if the target dies within 5 seconds of the Shadowburn
  • The opposing warlock will die

*The trick to beating other warlocks is to outlast. Use Death Coil, Shadow Ward, Healthstone, Siphon Life, and Drain life as ways to heal yourself and you will find you come out on top the majority of the time.


View Step Details Warlock vs Warrior

orcThe Warrior

Strategy

  • amp curse + coaAmplify Curse, Curse of Agony before the warrior is within charge range (25 yards) while deploying your pet
    • Instant cast, extremely heavy damage (because of Amplify Curse) over 24 seconds
    • Prevents the warrior from charging
  • immoliateImmolate
    • 1.5 second cast, small initial damage, moderate DoT
    • You should be able to easily cast this before the warrior is in range of Intercept
    • If the warrior gets close enough, s/he will be able to intercept, stunning you for three seconds. After the intercept he or she will hamstring, limiting your movement speed
    • Death Coil while beginning to run away from the warrior
      • Do not attempt to fear after the Death Coil, the warrior will be immune
    • Switch to Curse of Exhaustion to prevent the warrior from catching back up to you
    • If the warrior used Intercept before you use Death Coil, the fight is over. You will win.
  • corruptionBegin running away from the warrior, cast Corruption
    • Instant cast, heavy damage over 18 seconds
  • siphonSiphon Life
    • Instant cast, moderate damage over 30 seconds
  • uaStop running and cast Unstable Affliction
    • 1.5 second cast, heavy damage over 18 seconds, damages and silences anyone attempting to dispel
  • Resume running and refresh Corruption / Siphon Life / Curse of Agony when they expire
  • sburnThe warrior will be near dead, Shadowburn
    • Instant cast, moderate direct-damage, excellent finishing move
    • Requires a soul shard to cast, but the soul shard will be returned if the target dies within 5 seconds of the Shadowburn
  • The warrior will die

*Warriors are generally easy for a warlock to kill unless they manage to charge you. The charge will force you to Death Coil before they use Intercept and they will be able to regain melee range.
Unless the warrior has extremely good gear, you will still win the fight 99% of the time. Simply bein using Drain Life to heal and use your Healthstone if you get low


This guide is copyright 2007 Spugnort's World. Unauthorized reproduction, distribution or publication is strictly prohibited by Fedral and Internernational copyright laws.